Esta publicación, más que ser un tutorial, es un anecdotario de lo que viví al querer montar mi propio blog en mi propio equipo en lugar de rentar una VPS.
Dicho esto, si bien voy a tratar de hacer esto desde un punto de vista más general, seguiré enfocándome en realizar el proceso exclusivo para Linux. Ya que, según mi humilde opinión, es más versátil y más en punto del equipo que elegí, además de no consumir tantos recursos como Windows o Mac. Digo, se puede. Pero no le veo mucho sentido. :P
Es importante aclarar que sí se requiere de una inversión monetaria. Asumiendo que ya cuentas con tu propio equipo y conexión a internet estable, requerirías pagar por el nombre de dominio para tu servidor. Realmente sería el único gasto extra requerido, y lo voy a cubrir más a detalle en la sección correspondiente.
Y para llevar a cabo este tutorial-anecdotario, voy a volver a realizar el proceso en otro equipo, con un tiempo estimado de cinco horas. Parece demasiado tiempo, pero queda en el mismo día, si te das el tiempo.
Índice
- Eligiendo el equipo
- Preparando el servidor
- Apache: El servidor web como tal
- MariaDB: Base de datos almacenados del servidor
- Proxy inverso vs Servidor en solitario: ¿Qué conviene más?
- Adquiere tu propia dirección para tu instancia
- DNS dinámico vs. Cloudflare Tunnel
- Registro en Cloudflare for Teams
- Instalación y configuración de Cloudflared
- Crear y configurar el túnel de acceso
- Crea los registros DNS para apuntar a tu equipo
- ¡A crear el blog de WriteFreely!
- Descarga e instalación de WriteFreely
- Inicialización de las bases de datos y configuración de WriteFreely
- Crea tu primera publicación
- Configurando las opciones del blog
- Traducción de (gran parte de) la interfaz de usuario
- Habilita las suscripciones por correo electrónico
- Aplicaciones web adicionales
- Comentarios finales
Eligiendo el equipo
Partamos de dos puntos. El primero es que tienes una computadora vieja que no utilizas a menudo, pero que todavía enciende, y tiene procesador de 64 bits. A esa computadora puedes instalarle un sistema minimalista o específico para servidores, como Arch Linux o Ubuntu Server, que pese a ser sistemas en lineas de comandos como base, realmente es todo lo que necesitas para configurar un servidor web.
Y el segundo, es que realmente no tienes un equipo extra del que puedas disponer, y el que tienes no es tan viable usarlo como servidor porque juegas o lo utilizas para el trabajo, o para hacer traducciones de webcómics (soy culpable de eso último :P). Así que sí necesitarías adquirir un nuevo equipo. Aunque opciones para equipos económicos existen. Por ejemplo, equipos de segunda mano y de casas de empeño, o la opción que elegí yo, una computadora de placa única, como las Raspberry Pi. Yo me decanté por la Raspberry Pi 5 de 4GB de RAM, y una MicroSD de 64GB, aunque con base en mi experiencia, incluso la Raspberry Pi Zero 2 W funcionaría bastante bien. Además, existen kits para comprar en Mercado Libre y Amazon.
Si te decantas por un equipo de segunda mano, lo mismo. Arch o Ubuntu Server, y queda joya. Y si te decantas por una Raspberry Pi, puedes formatear la tarjeta MicroSD para el arranque usando Raspberry Pi Imager. Súper recomendado, ya que te permite instalar la versión lite de Raspberry Pi OS (y otros sistemas) y aplicar configuraciones previas, como usuario y contraseña, red WiFi a conectarse, y habilitar el acceso a través de SSH por defecto.
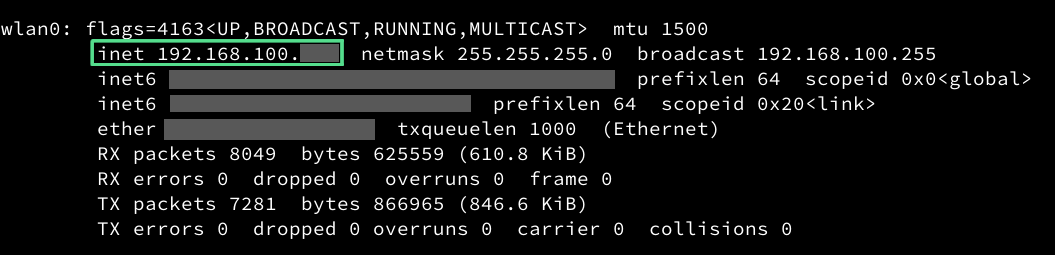
Si usas la Raspberry Pi, para saber la dirección IP que ésta tiene, puedes conectar un teclado y monitor a tu equipo, y ejecutar el comando ifconfig, lo que te daría una salida como esta:
Si esto no es opción, entras a la configuración de tu router (usualmente entrando a 192.168.100.1 con el navegador, pero varía de router a router), y buscas los dispositivos conectados, ya sea a Ethernet o a WiFi, y también puedes encontrar su dirección.

Con ese dato, a través de cualquier cliente de SSH (incluyendo la línea de comandos de Windows 10 y 11) puedes conectarte con el comando ssh [usuario]@[dirección IP], para poder seguir configurando el equipo desde otro lado, e incluso acceder a los archivos utilizando SFTP. Pongo como ejemplo, Thunar (uno de los administradores de archivos de Linux), que funciona directo.
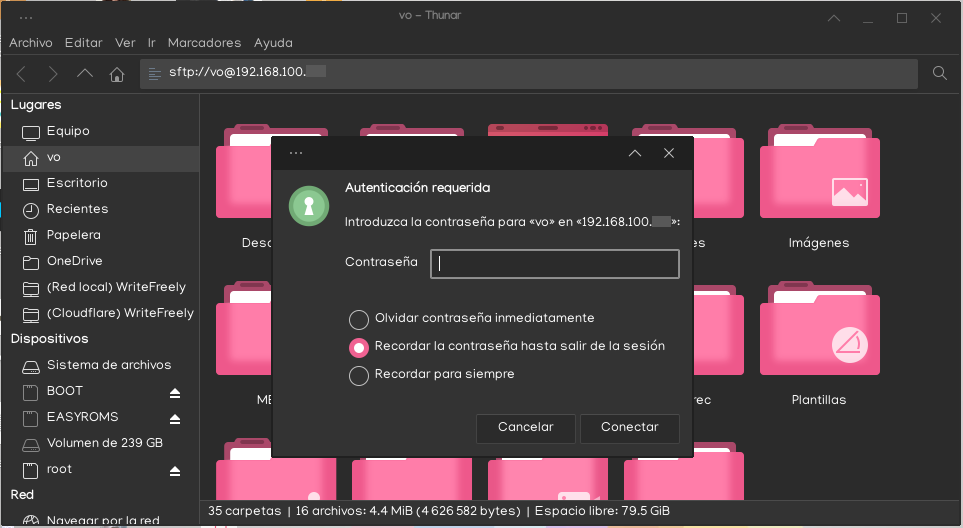
Al ingresar con el usuario y la dirección, nos pide la contraseña.
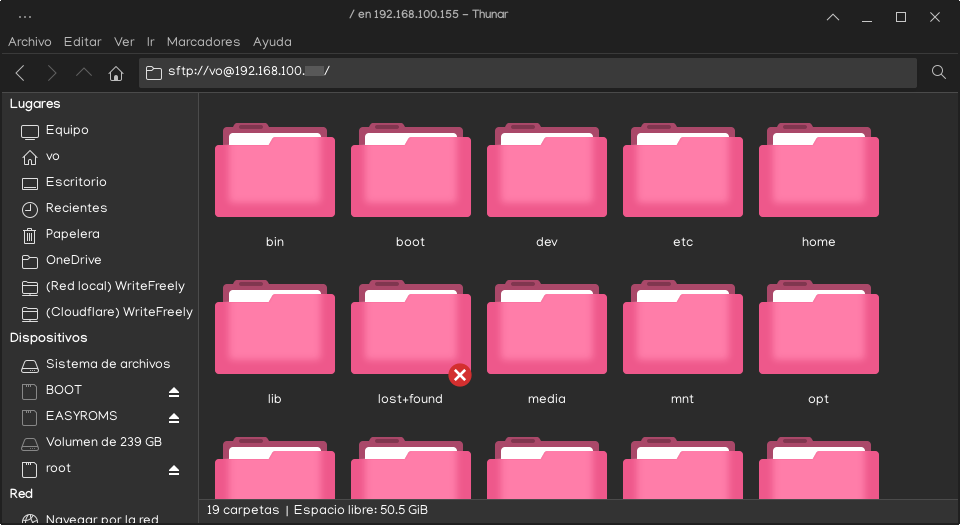
Y una vez adentro, nos muestra el directorio inicial del equipo.
Si bien, para Windows no hay acceso directo desde el explorador integrado, en su momento utilicé WinSCP, y realmente me funcionó bastante bien, así que lo recomiendo ampliamente. (Sin capturas de pantalla, porque ya no uso WinSCP... ni Windows xd)
Preparando el servidor
Una vez que tenemos la computadora preparada para interactuar como tal, vamos a instalar los programas de servidor web, y de bases de datos.
En Arch y derivadas (Manjaro, Endeavour, Garuda):
sudo pacman -Syu apache mariadb
En Debian y derivadas (Ubuntu, Linux Mint, Raspberry Pi OS, Pop! OS, MX Linux):
sudo apt update
sudo apt upgrade
sudo apt install apache2 mariadb-server
Esto sólo nos instala los programas, pero no nos ayuda a configurar nada como tal. Vayamos a ello.
Apache: El servidor web como tal
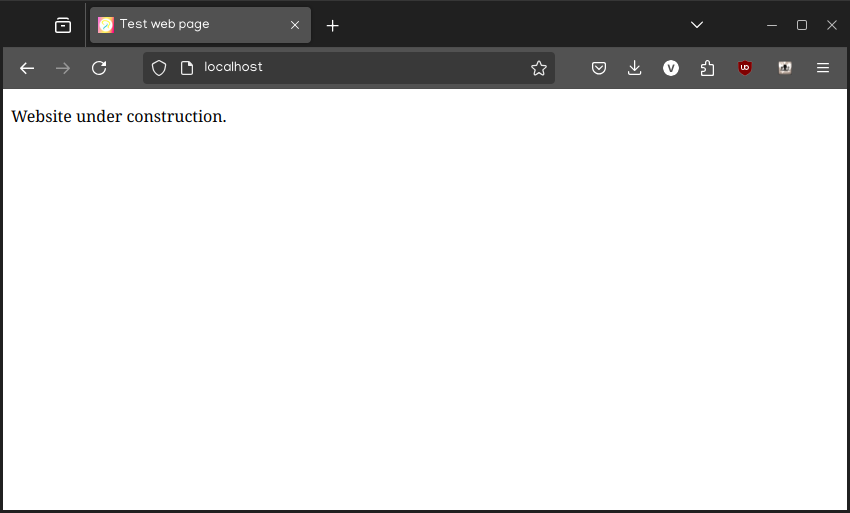
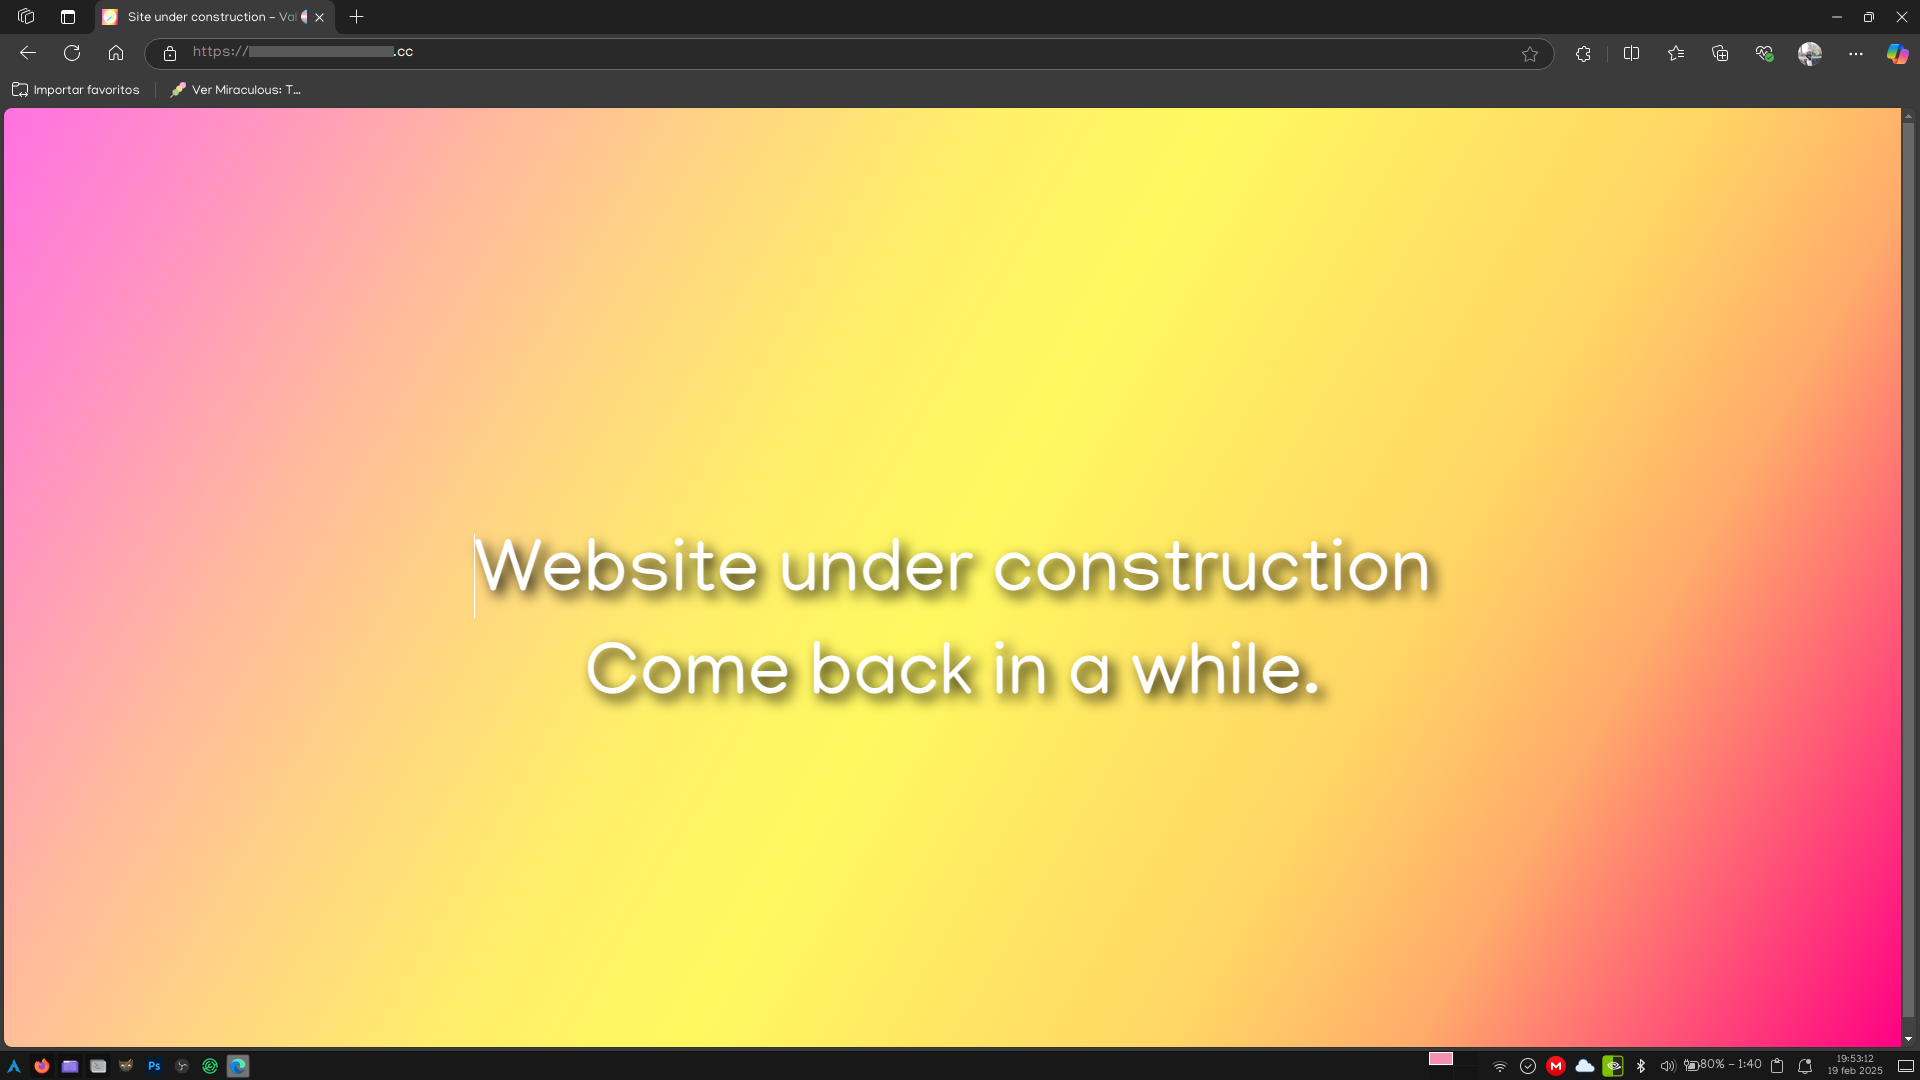
Antes de activar el servidor, lo ideal es que tengamos una página web básica de prueba sólo para ver si el servidor funciona. Copiando y pegando este código en un editor de texto debería ser más que suficiente.
<!DOCTYPE html>
<html lang="es">
<head>
    <meta charset="UTF-8">
    <title>Página web de prueba</title>
</head>
<body>
    <p>Sitio web en construcción.</p>
</body>
</html>
Recuerda guardar este código en un archivo de texto llamado index.html
La parte que sigue es un poco confusa dependiendo de si estamos haciendo el proceso en sistemas basados en Arch o en Debian, ya que tanto los archivos de configuración como la ubicación para colocar las páginas van a variar dependiendo de cada caso. Por ejemplo, en Arch, el archivo de configuración principal se encuentra en /etc/httpd/conf/httpd.conf, y debes poner los archivos web (el archivo index.html, por ejemplo) en /srv/http. Pero en Debian cambia la cosa. Aquí la configuración se encuentra en /etc/apache2/apache2.conf, y los archivos web se guardan en /var/www/html.
Vamos a copiar nuestro archivo HTML a la carpeta de archivos web de nuestro sistema, y habilitar el servicio de Apache para comprobar que funciona.
Desde Arch:
sudo systemctl enable --now httpd
Desde Debian:
sudo systemctl enable --now apache2
Este comando inicia el servicio al momento, además de que programa el inicio automático con cada arranque del sistema (por ejemplo, después de un reinicio por actualización), por lo que sólo es necesario introducir este comando una vez.
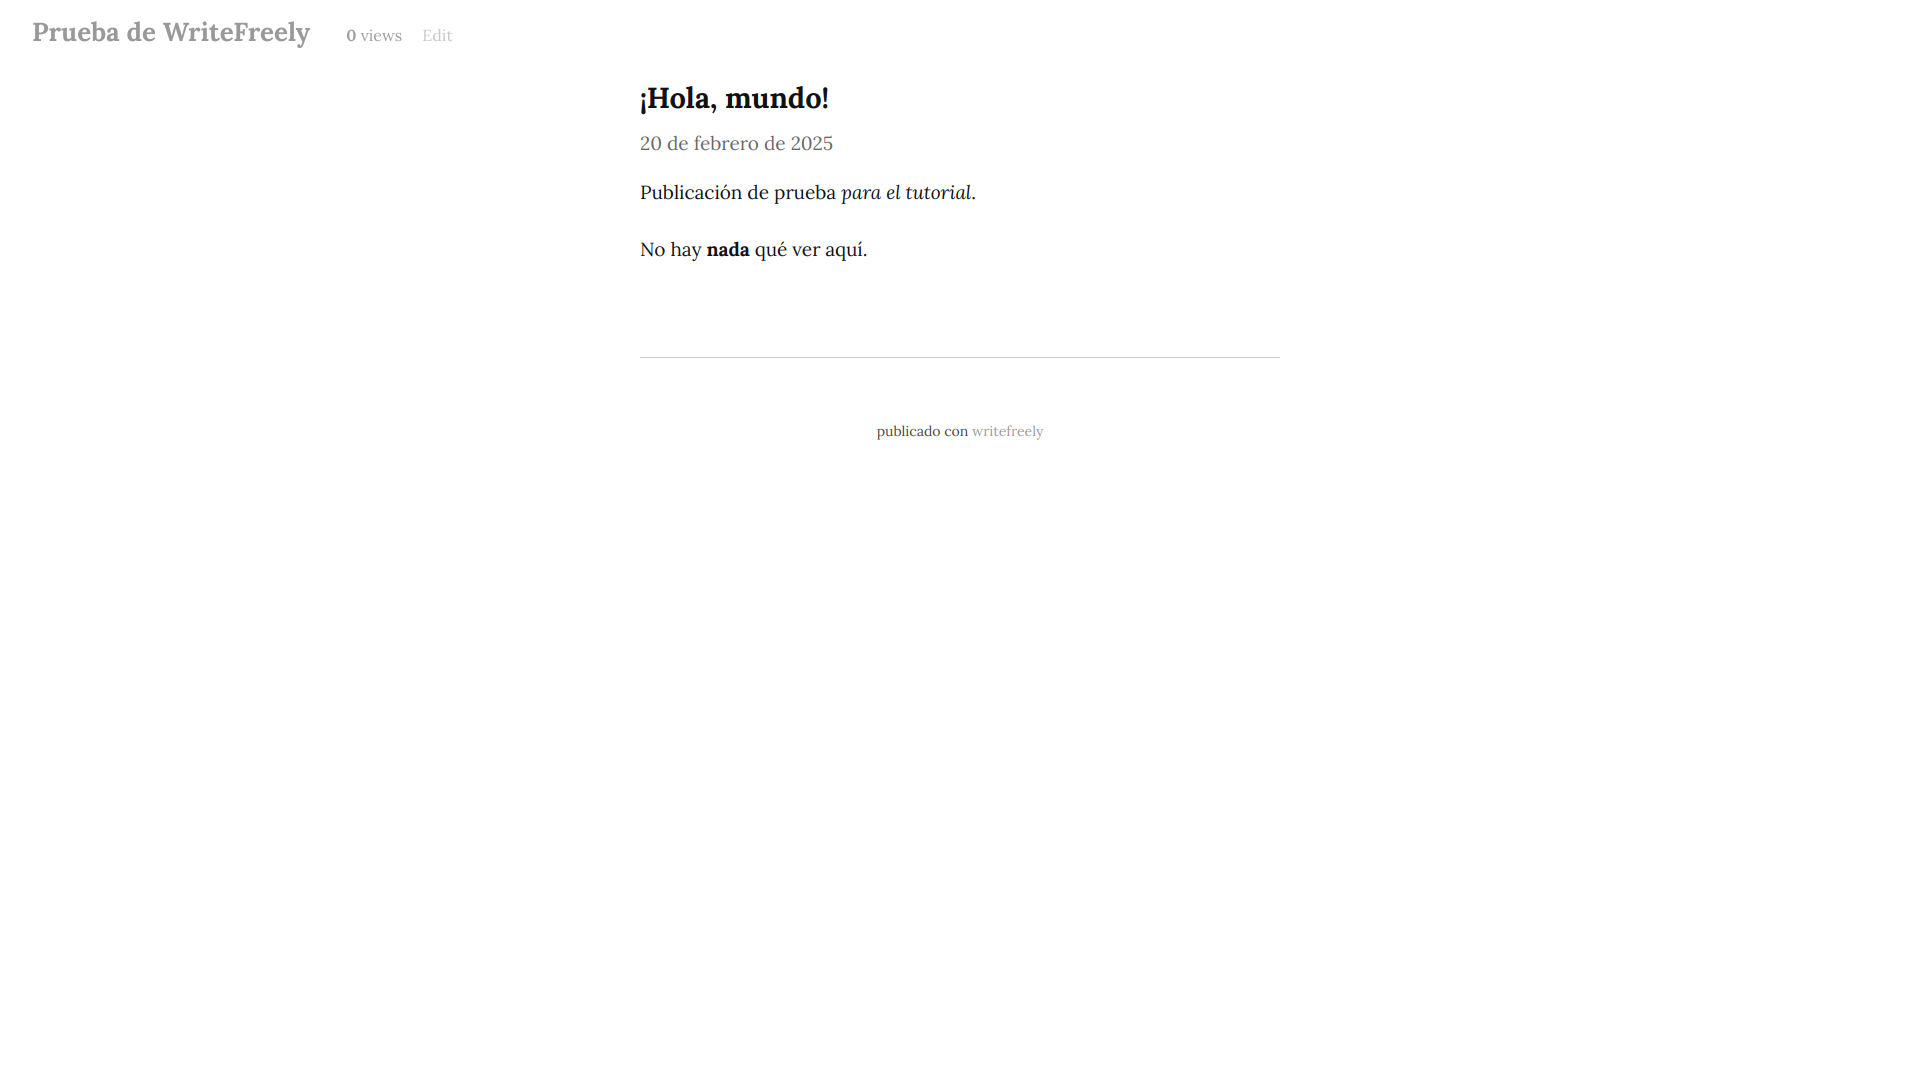
Y para comprobar si sí funciona, vamos a abrir la página http://localhost. Debería salir esto.
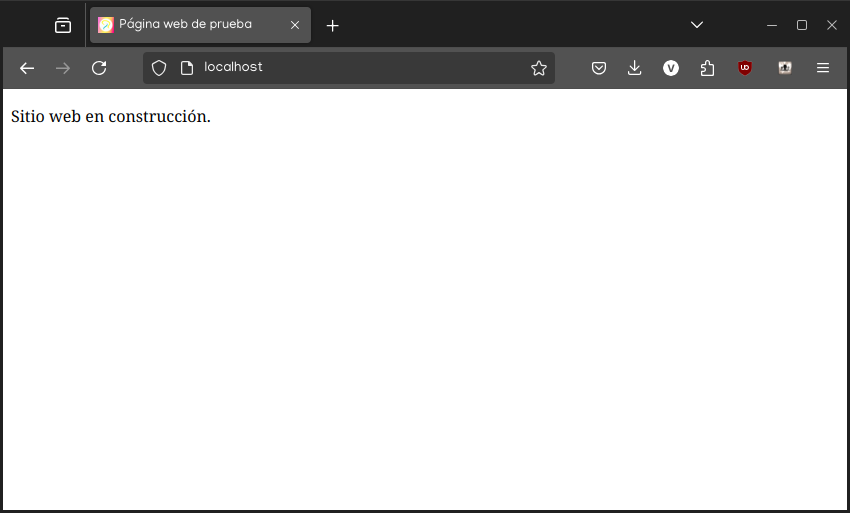
Si te salió esto, ¡Felicidades! Ya comenzamos con este pequeño proyecto. Que apenas es el inicio de este viaje. Vamos a configurar un poco la parte que no se ve.
MariaDB: Base de datos almacenados del servidor
Antes de habilitar el servicio de bases de datos, vamos a ejecutar el siguiente comando sólo en Arch.
sudo mariadb-install-db --user=mysql --basedir=/usr --datadir=/var/lib/mysql
Ahora sí, habilitamos el servicio. El comando es el mismo para ambos sistemas.
sudo systemctl enable --now mariadb
También es importante que mejoremos la seguridad inicial de MariaDB. Convenientemente, se nos incluye un comando para hacerlo.
sudo mariadb-secure-installation
Este comando es interactivo, y consta de siete preguntas. Realmente es bastante directo y sencillo de configurar, pero por si acaso, vamos en orden.
NOTE: RUNNING ALL PARTS OF THIS SCRIPT IS RECOMMENDED FOR ALL MariaDB
      SERVERS IN PRODUCTION USE!  PLEASE READ EACH STEP CAREFULLY!

In order to log into MariaDB to secure it, we'll need the current
password for the root user. If you've just installed MariaDB, and
haven't set the root password yet, you should just press enter here.

Enter current password for root (enter for none):
Nos pide la contraseña de root de MariaDB. No la hemos configurado, así que sólo presionaremos [Enter], y vamos al siguiente paso.
Setting the root password or using the unix_socket ensures that nobody
can log into the MariaDB root user without the proper authorisation.

You already have your root account protected, so you can safely answer 'n'.

Switch to unix_socket authentication [Y/n]
Aquí se nos pide si queremos usar la autenticación por Socket Unix o su autenticación estándar. Honestamente desconozco las implicaciones de eso, y además, la misma configuración nos lo sugiere, así que le diremos que no, presionando [n].
You already have your root account protected, so you can safely answer 'n'.

Change the root password? [Y/n]
Aquí nos sugiere cambiar la contraseña de root de MariaDB. Esta vez, sí le vamos a decir que sí, presionando [Enter].
Inmediatamente nos pide que ingresemos la contraseña que queramos usar, preferentemente que sea diferente de cualquiera de usuario que utilices tú, pero lo dejo a tu criterio. Aunque si me permiten una sugerencia, yo utilizo un generador de contraseñas para no tener qué pensarle, y tener una buena contraseña. Además de que es muy versátil.

Una vez que tengas tu contraseña (recomiendo guardarla en un lugar seguro) debes ingresarla dos veces en la ventana donde estemos ejecutando el comando. Pasamos a la siguiente pregunta.
By default, a MariaDB installation has an anonymous user, allowing anyone
to log into MariaDB without having to have a user account created for
them.  This is intended only for testing, and to make the installation
go a bit smoother.  You should remove them before moving into a
production environment.

Remove anonymous users? [Y/n]
Nos pregunta si queremos eliminar usuarios invitados. Por seguridad, le diremos que sí, presionando [Enter].
Normally, root should only be allowed to connect from 'localhost'.  This
ensures that someone cannot guess at the root password from the network.

Disallow root login remotely? [Y/n]
Obviamente queremos que las bases de datos sólo sean accesibles desde el equipo que funcionará como servidor. Así que deshabilitaremos el acceso remoto en esta pregunta, presionando [Enter].
By default, MariaDB comes with a database named 'test' that anyone can
access.  This is also intended only for testing, and should be removed
before moving into a production environment.

Remove test database and access to it? [Y/n]
MariaDB tiene una base de datos de prueba que no necesitaremos en un entorno final. Así que la vamos a eliminar presionando nuevamente [Enter].
Reloading the privilege tables will ensure that all changes made so far
will take effect immediately.

Reload privilege tables now? [Y/n]
Aquí simplemente recargaremos los privilegios de las bases de datos para que los cambios sean efectivos al momento, simplemente presionando [Enter].
Y ya también tenemos preparada nuestra base de datos limpia y lista para continuar.
Ahora, vamos a entrar a la linea de comandos de MariaDB con el comando sudo mariadb -u root -p. Una vez que lo ejecutes, te pedirá la contraseña que configuramos hace unos momentos. Si lo hiciste bien, al final de la línea de comandos debería aparecer este indicador, que significa que estamos dentro.
MariaDB [(none)]>
Una vez ahí, vamos a ejecutar los siguientes comandos, uno por uno.
CREATE USER 'writefreely'@'localhost' IDENTIFIED BY '[Contraseña de MariaDB]';

CREATE DATABASE writefreely CHARACTER SET latin1 COLLATE latin1_swedish_ci;

GRANT ALL PRIVILEGES on writefreely.* to 'writefreely'@'localhost';

FLUSH PRIVILEGES;

exit
El primer comando crea un usuario específico de WriteFreely para MariaDB, para no interactuar usando la cuenta de root, lo que puede ser peligroso. También especificamos la contraseña.
El segundo crea la base de datos que usará WriteFreely.
El tercer comando le da permisos al usuario de WriteFreely únicamente sobre su base de datos, para que no pueda modificar nada más.
El cuarto, aplica los cambios al momento.
Y el quinto cierra la línea de comandos de MariaDB.
Por el momento, ya no tocaremos más el tema de MariaDB, así que vamos a lo que sigue.
Proxy inverso vs Servidor en solitario: ¿Qué conviene más?
Hay dos formas de configurar cualquier servidor web. Cuando es un sitio web único, y este no es demasiado complejo, se recomienda hacer un servidor en solitario, donde tal sitio, y solamente ese sitio puede existir en ese servidor. Lo que hace que las solicitudes puedan procesarse más eficientemente, pero evidentemente limita la escalabilidad del servidor, en caso de que quieras alojar más de un proyecto, como un sitio web personal, o incluso una instancia de Mastodon. En cuyo caso conviene más el proxy inverso, donde puedes alojar varios sitios en la misma computadora, incluso con diferentes dominios, con la desventaja de que las solicitudes podrían procesarse más lento.
En teoría, WriteFreely soporta ambos tipos de servidor, pero por mucho que lo intenté, no pude hacerlo funcionar en servidor solitario, y no me quiero quebrar la cabeza para hacerlo funcionar así, por lo que lo haremos en proxy inverso.
Para ello, vamos a habilitar la funcionalidad de proxy en Apache.
En Arch, se hace modificando el archivo de configuración principal.
sudo nano /etc/httpd/conf/httpd.conf
Buscamos las siguientes líneas, una por una, y les quitamos el símbolo # del inicio.
#Include conf/extra/httpd-vhosts.conf

#LoadModule proxy_module modules/mod_proxy.so

#LoadModule proxy_connect_module modules/mod_proxy_connect.so

#LoadModule proxy_http_module modules/mod_proxy_http.so

#LoadModule proxy_fcgi_module modules/mod_proxy_fcgi.so

#LoadModule proxy_wstunnel_module modules/mod_proxy_wstunnel.so

#LoadModule proxy_http2_module modules/mod_proxy_http2.so
Guardamos con [Control] + [S] y salimos con [Control] + [X].
Y en Debian, se hace ejecutando dos comandos.
sudo a2enmod proxy
sudo a2enmod proxy_http
Después de eso, reiniciamos el servicio de Apache.
En Arch:
sudo systemctl restart httpd
En Debian:
sudo systemctl restart apache2
Hay una cosa más que debemos de hacer con el proxy inverso, pero para ello, necesitamos el dominio, o la dirección web que usaremos para nuestro blog, y configurar WriteFreely. Vamos con lo primero.
Adquiere tu propia dirección para tu instancia
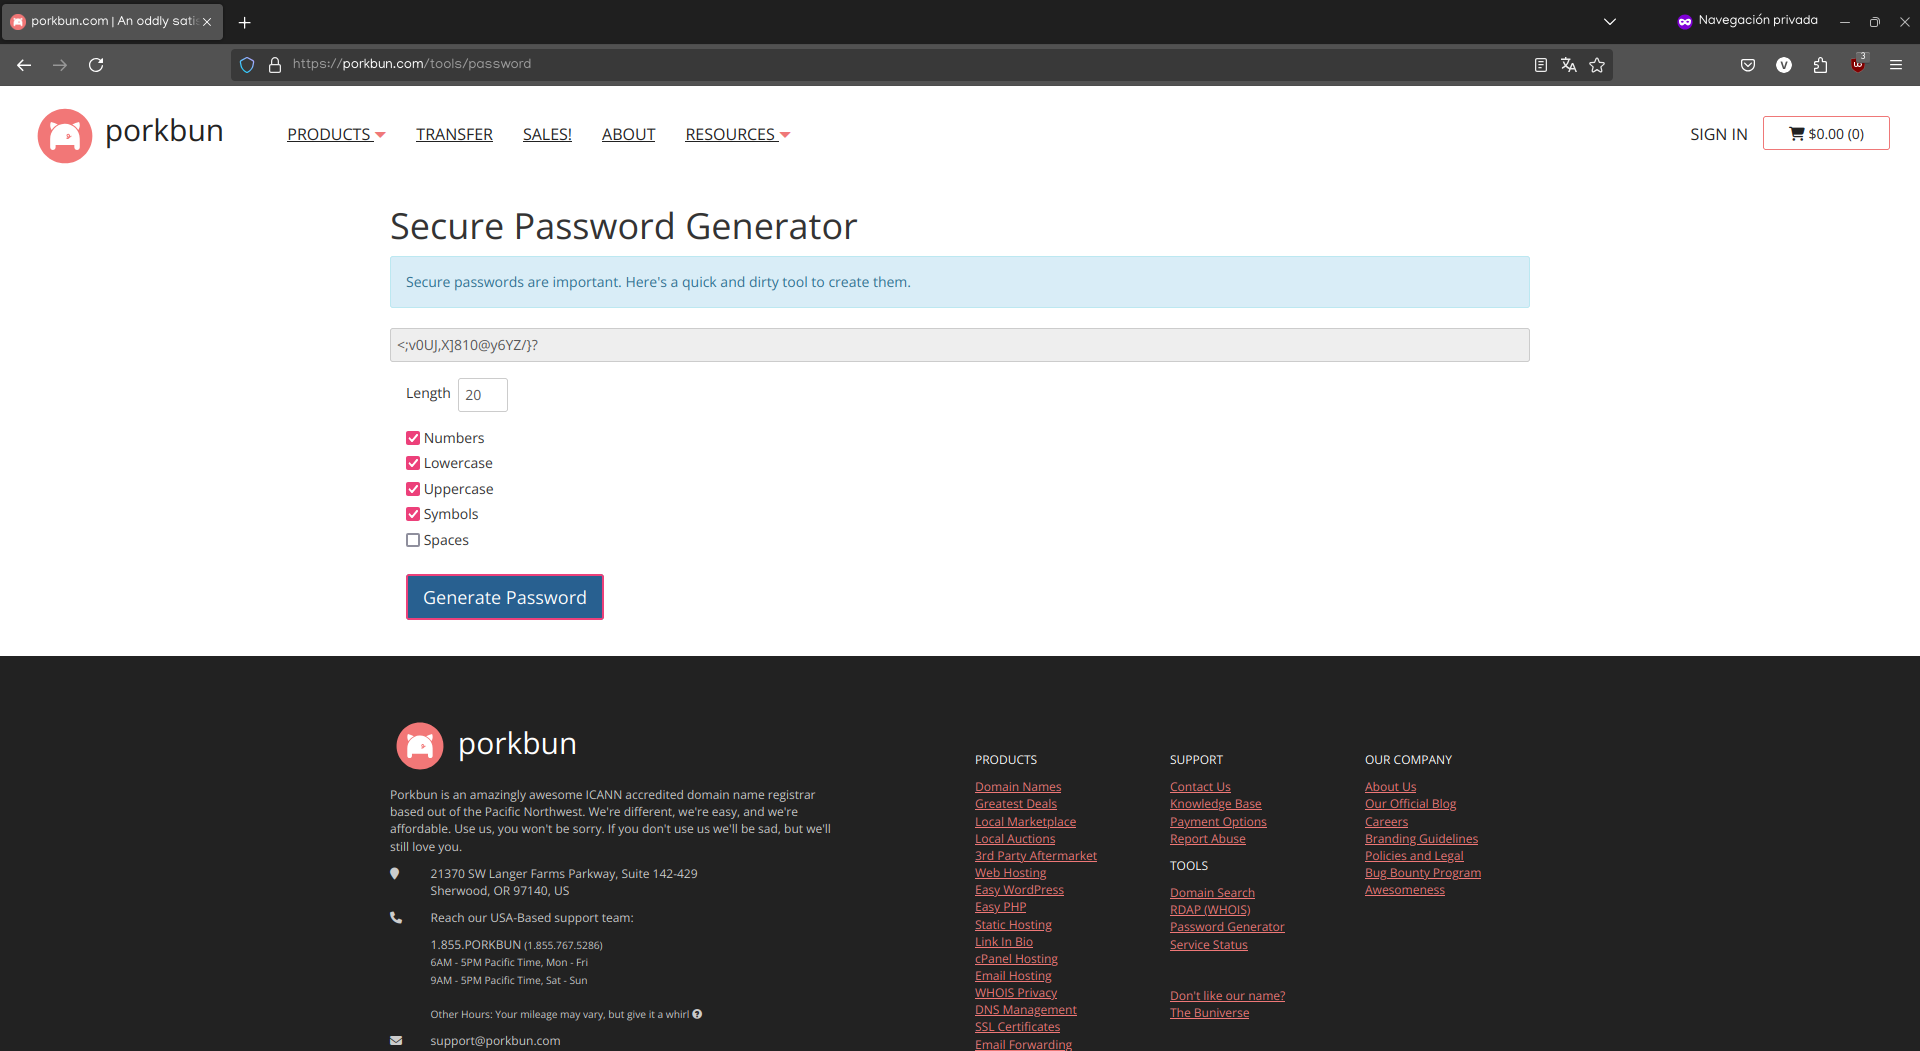
Los sitios web que visitas tienen una dirección detrás de un nombre de dominio para que sea más fácil de recordar. Y registrar un dominio no siempre es sencillo. La forma más accesible de obtener un dominio es a través de un sitio que ofrezca este servicio. Aunque puedes tratar de conseguir un dominio gratuito a través de Freenom, personalmente no lo recomiendo mucho porque tu dominio preferido podría no estar disponible para registrar, y se te limita a unos cuantos dominios de nivel superior (TLD por sus siglas en inglés, con lo que termina la dirección, usualmente .com o .tk). Si no tienes inconveniente con buscar un dominio gratuito, aunque no sea el que tengas en mente exactamente, puede ser una buena opción.
Así que, siguiendo la recomendación que alguien me hizo en su momento, yo ahora recomiendo Porkbun porque también ofrece dominios a precios bastante accesibles, con costos desde USD$1 por oferta de primer año, y renovación anual desde USD$5, además de tener opciones variadas y divertidas de TLDs como .lol, .wtf, .pizza, entre otras.
El proceso de registro es ir a la página de inicio de sesión, y llenar el formulario de registro en la derecha.
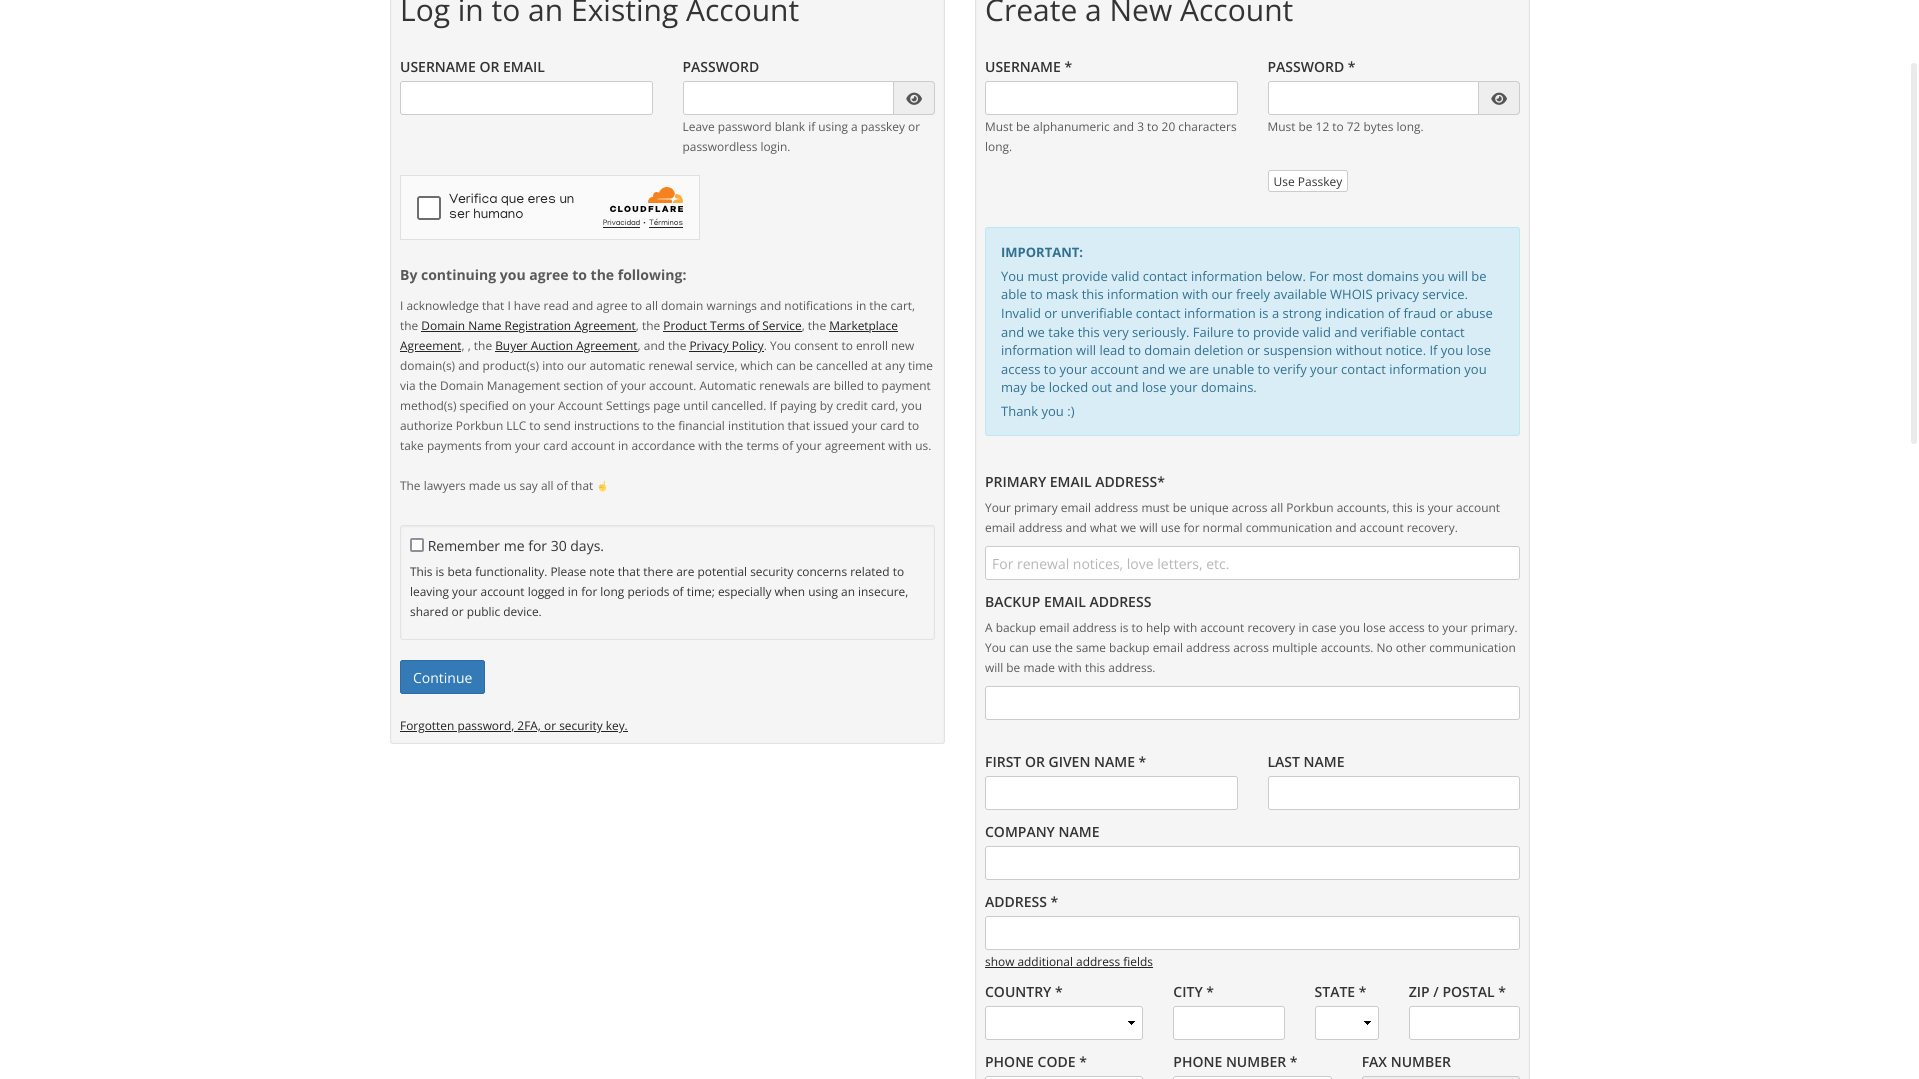
Lo típico. Usuario, contraseña (o llave de acceso física), correo electrónico, datos personales, y aceptar términos y condiciones. Al completar el registro, debes validar tu cuenta con un código que recibes al correo, y una vez validada tu cuenta, ya puedes buscar dominios para adquirir. Y justo voy a comprarme uno que quiero para un pequeño proyecto personal que planeo hacer más tarde, pero todavía no le quiero hacer difusión.
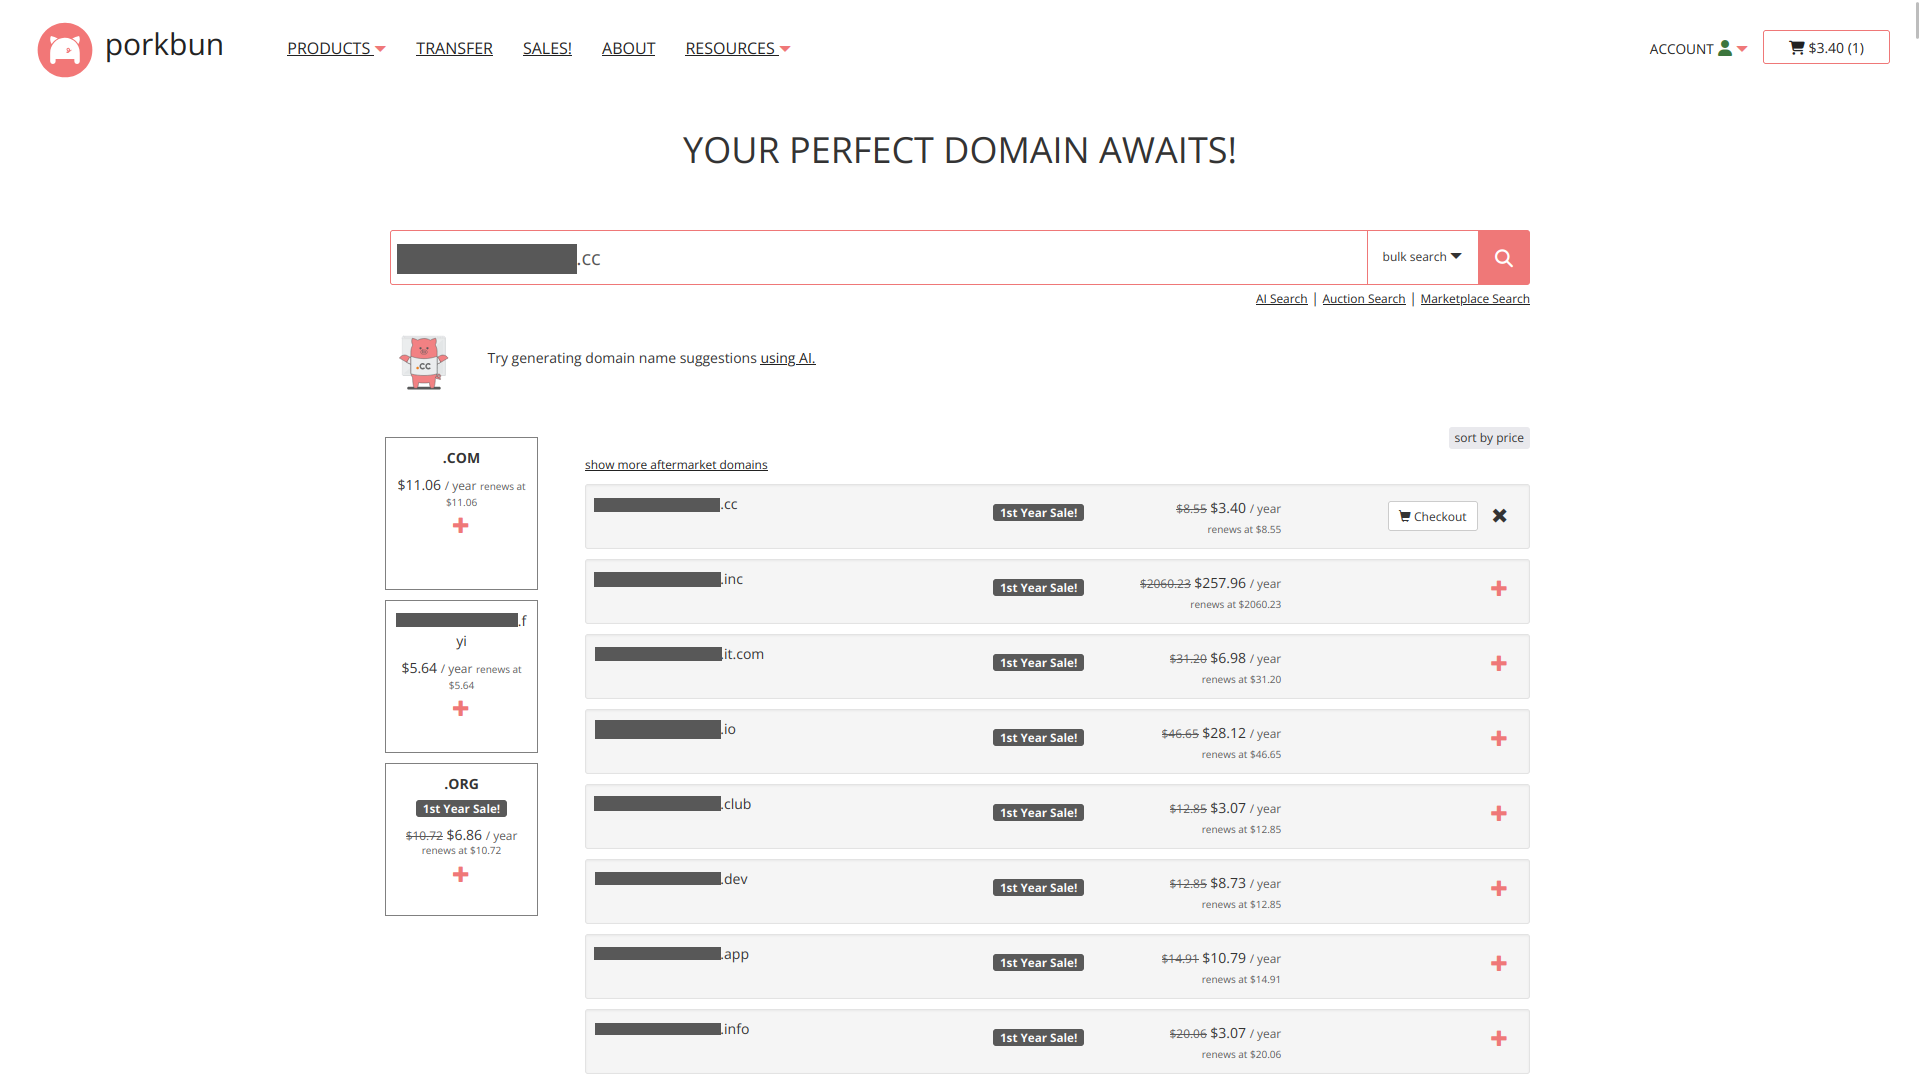
Y aquí podemos ver varios de los TLDs que tenemos disponibles para elegir. Para este dominio, elegí el .cc porque no está caro, y ese proyecto más bien será general. Pero no nos desviemos del tema. Una vez que seleccionemos nuestro dominio, y lo agreguemos al carrito, vamos a proceder a verlo.
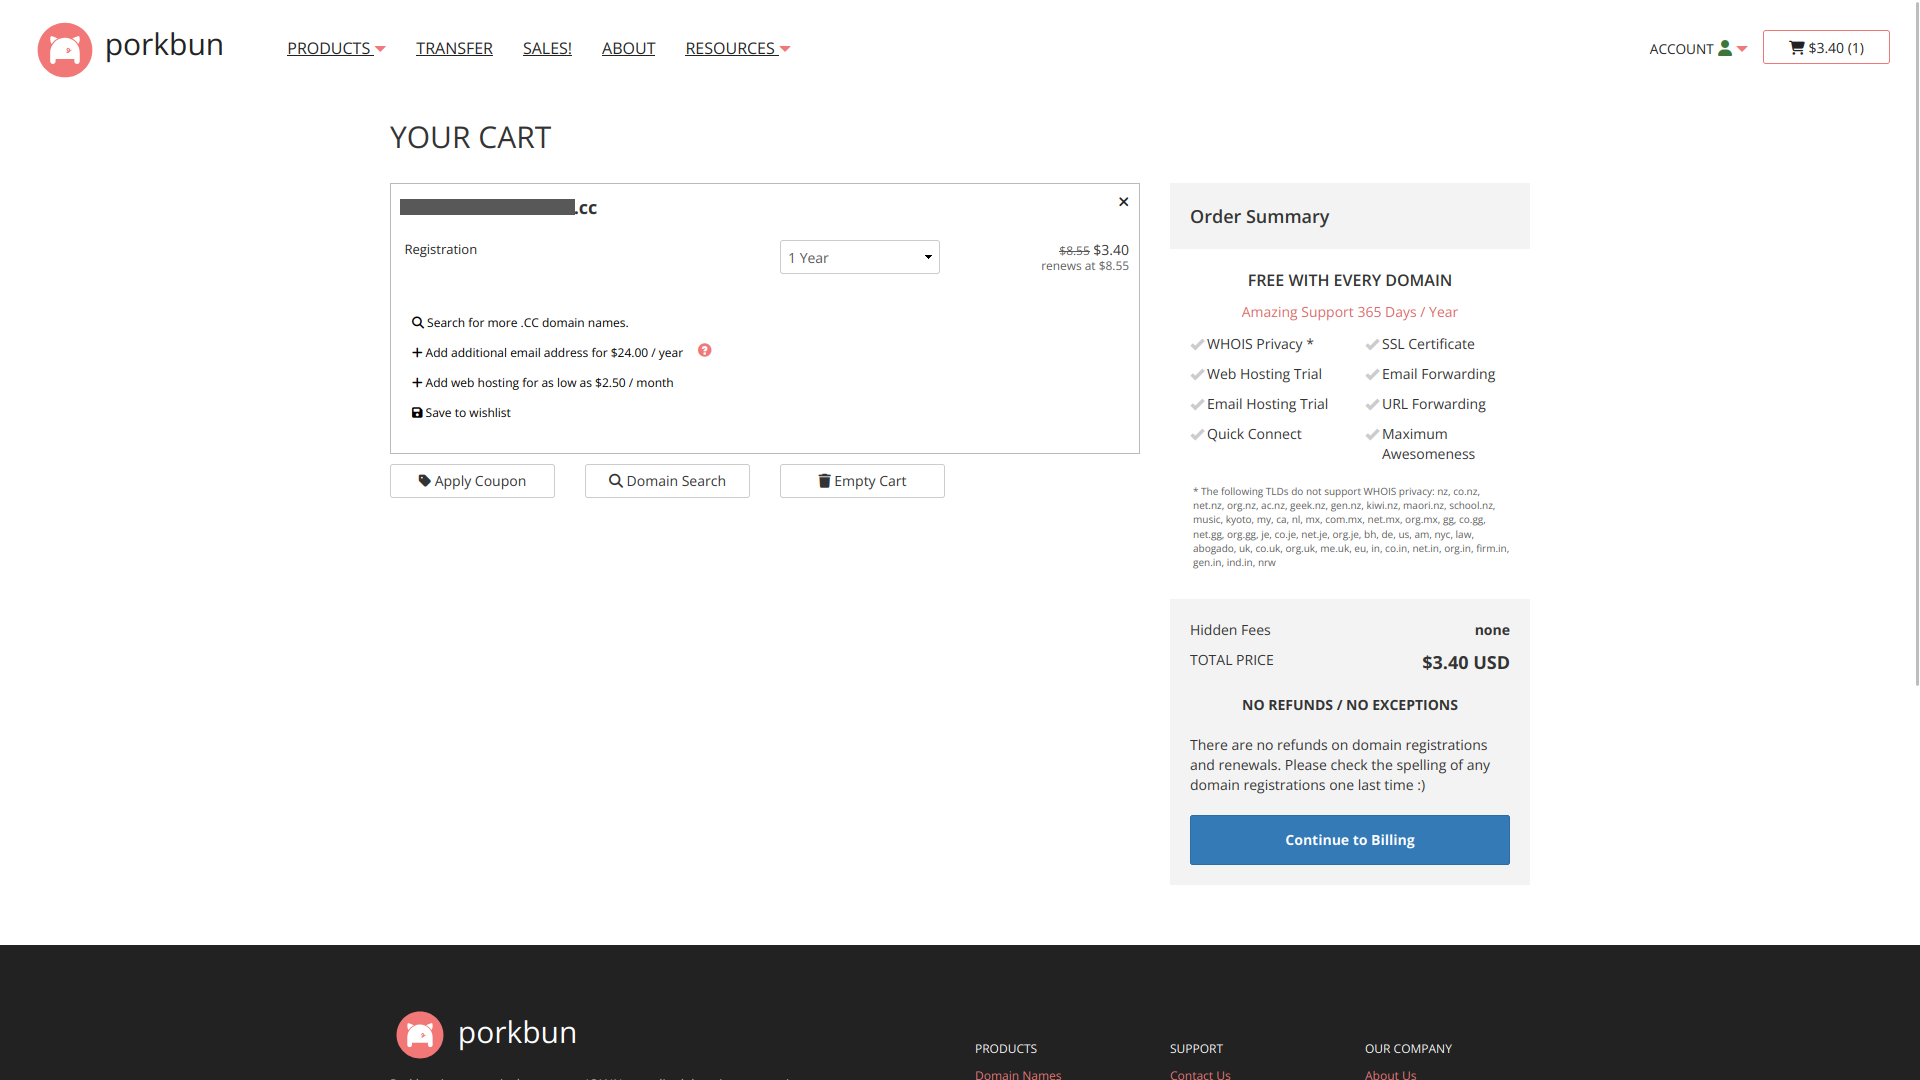
Desde aquí podemos seleccionar por cuántos años queremos comprar el dominio. Por el momento, nos limitaremos a elegir un año, y oprimiremos el botón [Continue to Billing], para proceder a introducir los datos de nuestra tarjeta. Y una vez que pase el pago, vamos a ver nuestro dominio en nuestra lista.
Ya que tenemos nuestro dominio, vamos a hacer que apunte a nuestro equipo.
DNS dinámico vs. Cloudflare Tunnel
Existen dos formas de hacer que la dirección web apunte a nuestro sitio. La primera sería una vieja conocida por muchos, y es DNS dinámico. Donde le pedimos a nuestro router o a nuestra computadora que periódicamente solicite al servidor que haga el cambio de forma automática y que siempre apunte a la dirección pública de tu router. Y la segunda es una que yo no conocía hasta hace poco, pero es muy interesante, y es Cloudflare Tunnel, que hace más o menos lo mismo que el DNS dinámico. La diferencia entre ellas es que el DNS dinámico lo hace con tu dirección IP real, lo que podría exponerte a ataques con bastante facilidad, y Cloudflare tunnel lo hace a través de un enrutamiento de tu dirección IP a través de su infraestructura, lo que agrega una capa de protección más.
De hecho, cuando recién comencé a querer levantar esto, no conocía para nada Cloudflare Tunnel, y lo quise hacer únicamente por DNS dinámico.
No les voy a mentir. En esta parte estuve a punto de rendirme, porque hay proveedores de internet que hacen que los routers se conecten a internet a través de subredes, lo que se conoce como NAT. Básicamente una dirección IP se comparte entre varios equipos, lo que dificulta la parte del DNS dinámico. Y con la parte del túnel te saltas todas esas restricciones de redes, además de que la infraestructura de Cloudflare ayuda un poco.
Un muy querido amigo mío me recomendó probar con Cloudflare Tunnel, y hasta me pasó un tutorial. Y como me fue de mucha utilidad, pero está en inglés, lo voy a poner traducido por acá, aunque un poco más detallado.
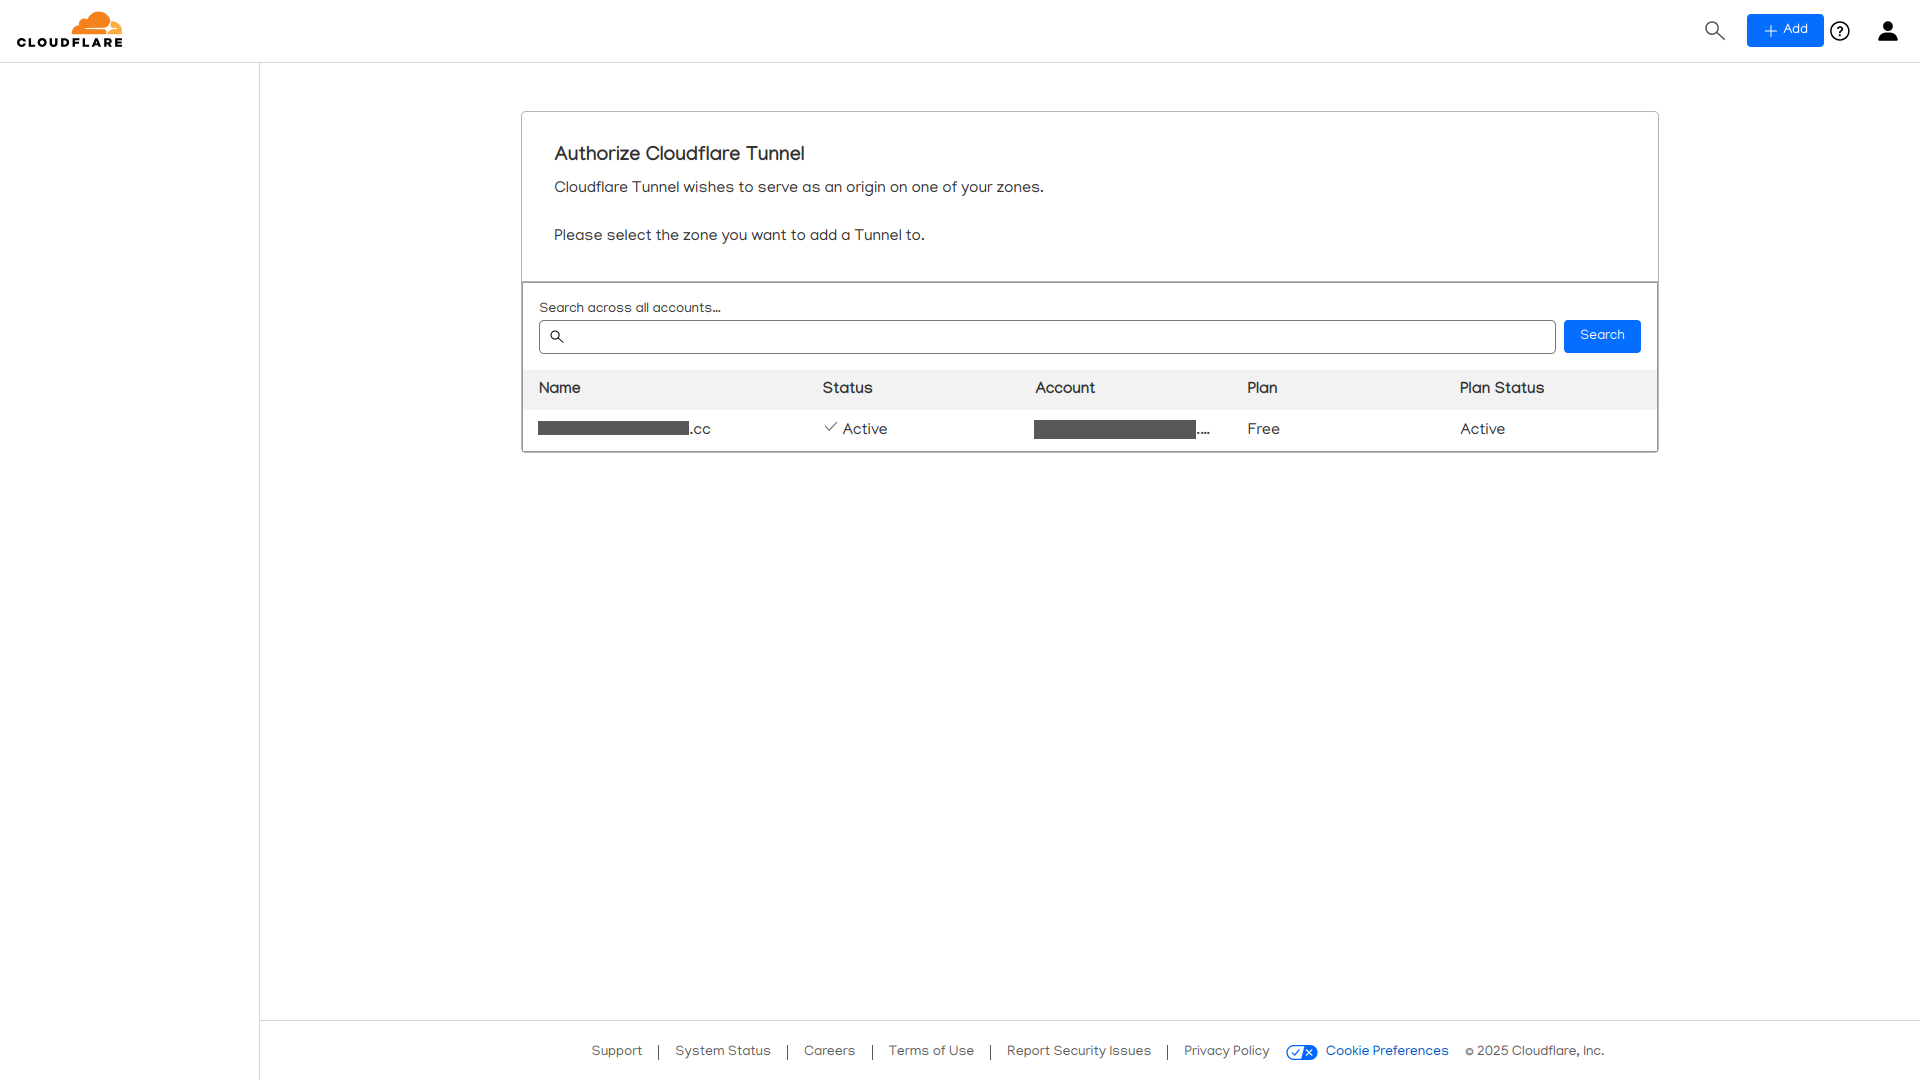
Registro en Cloudflare for Teams
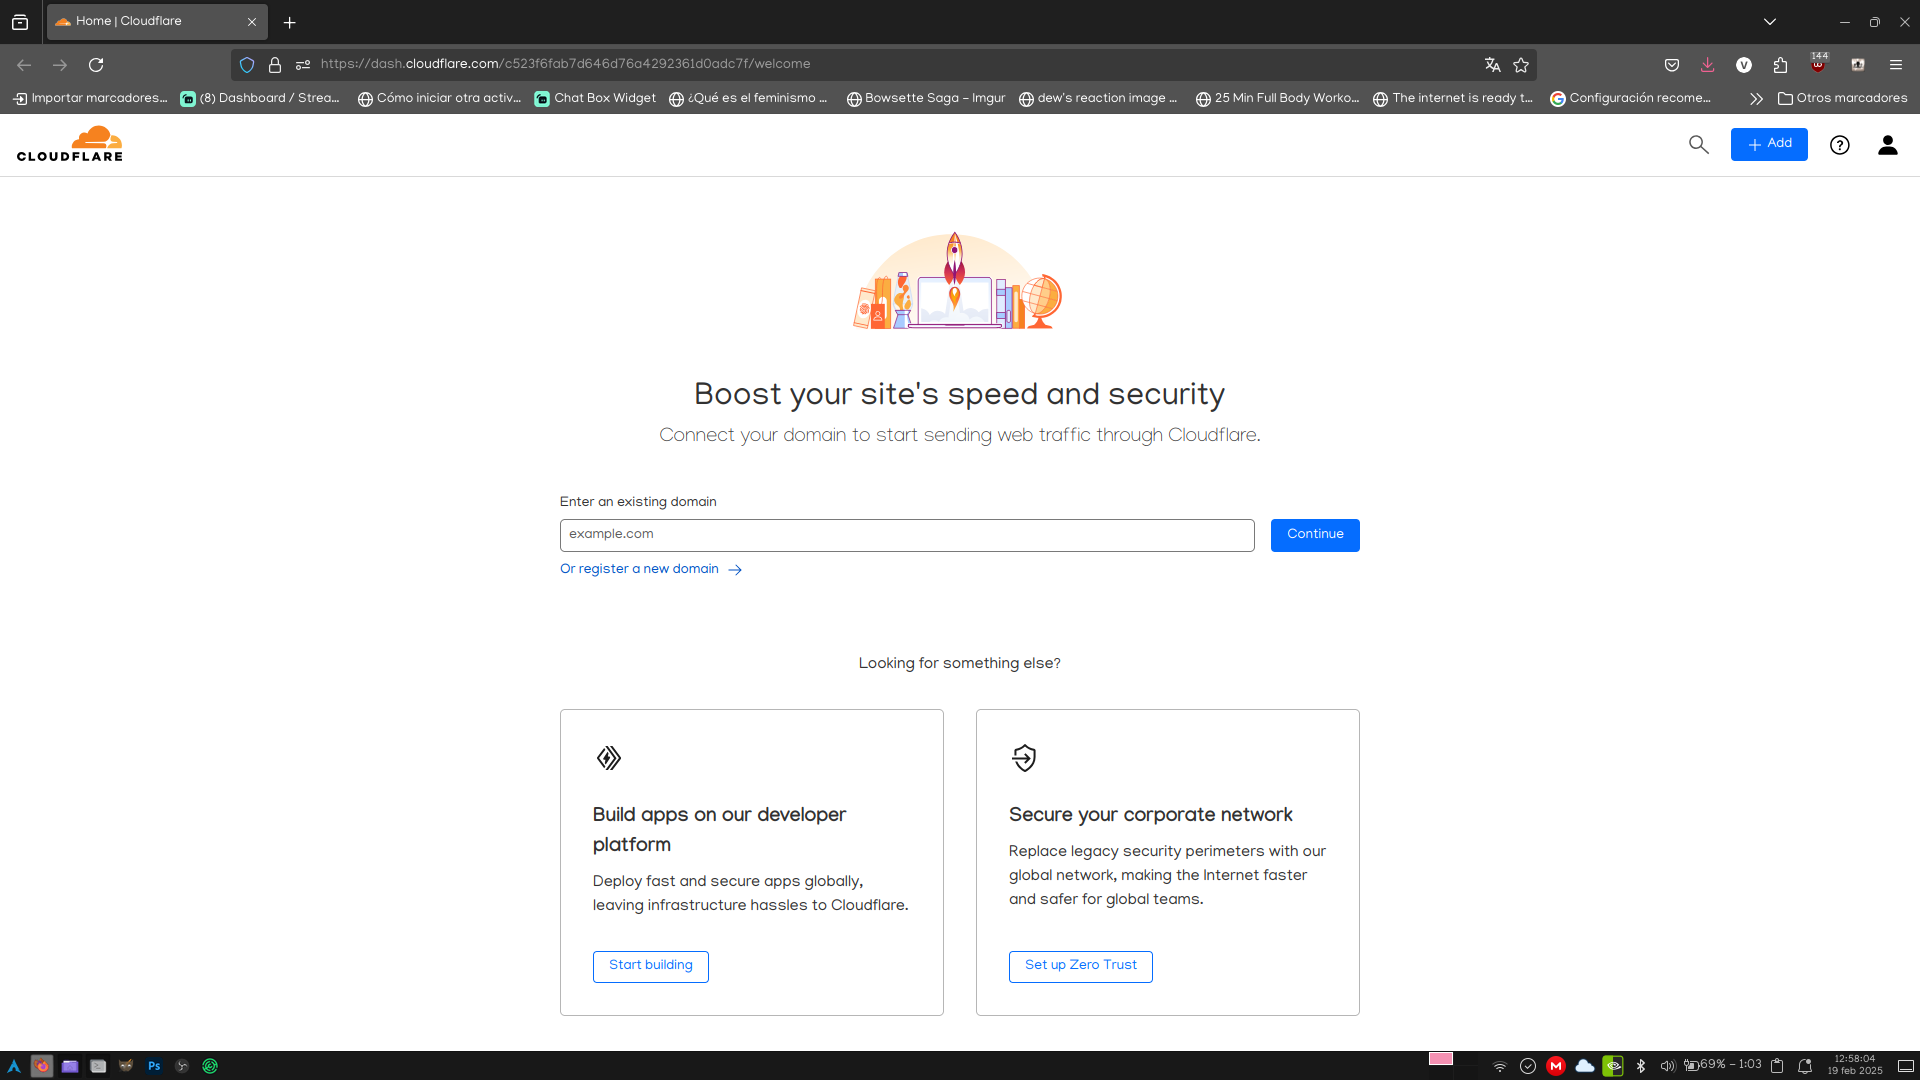
Aquí no debes hacer más que ir a la página de registro, poner tu correo y tu contraseña, y verificar tu correo electrónico. Una vez que hayas hecho todo esto, se te presenta la pantalla para agregar el dominio que acabamos de adquirir.
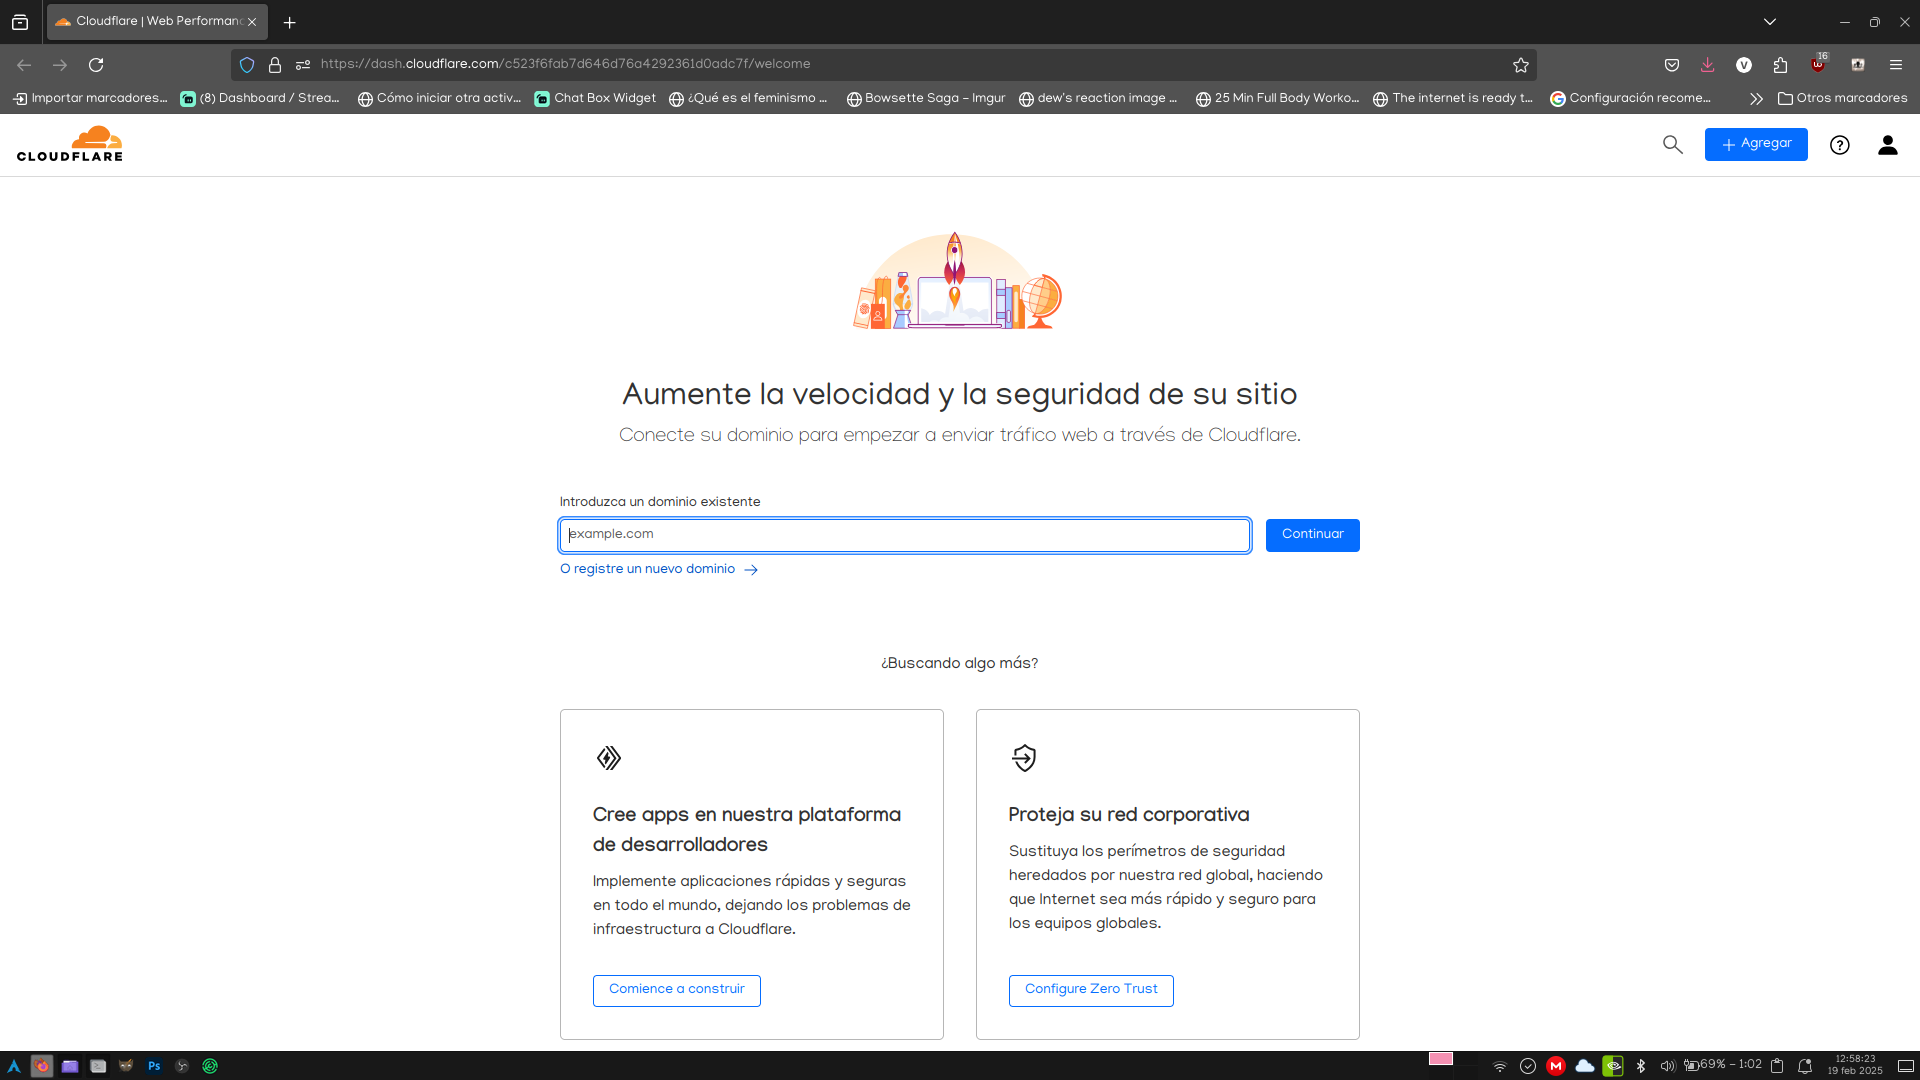
Una vez que ingresemos el dominio, y presionamos el botón de continuar, nos pasa al asistente de configuración.
Con la primera opción seleccionada y presionando en Continuar, avanzamos a la siguiente pantalla.
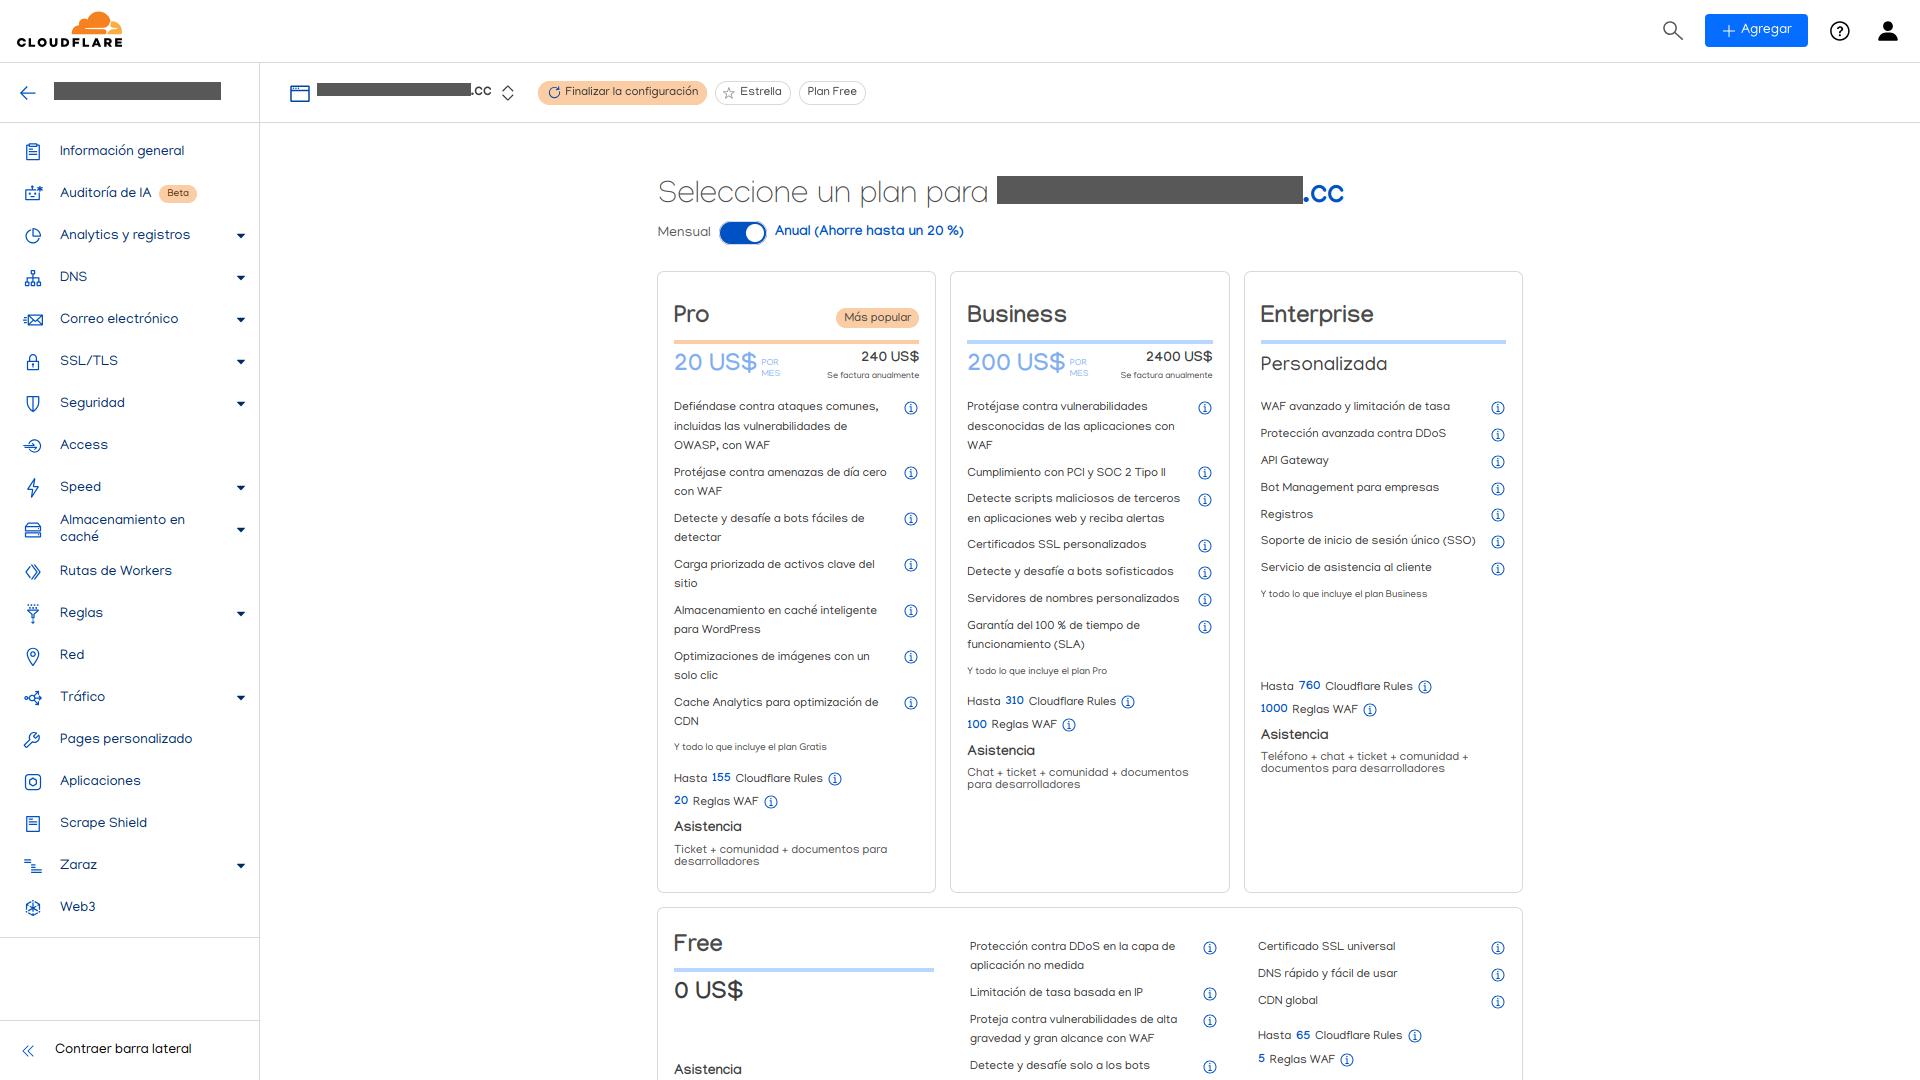
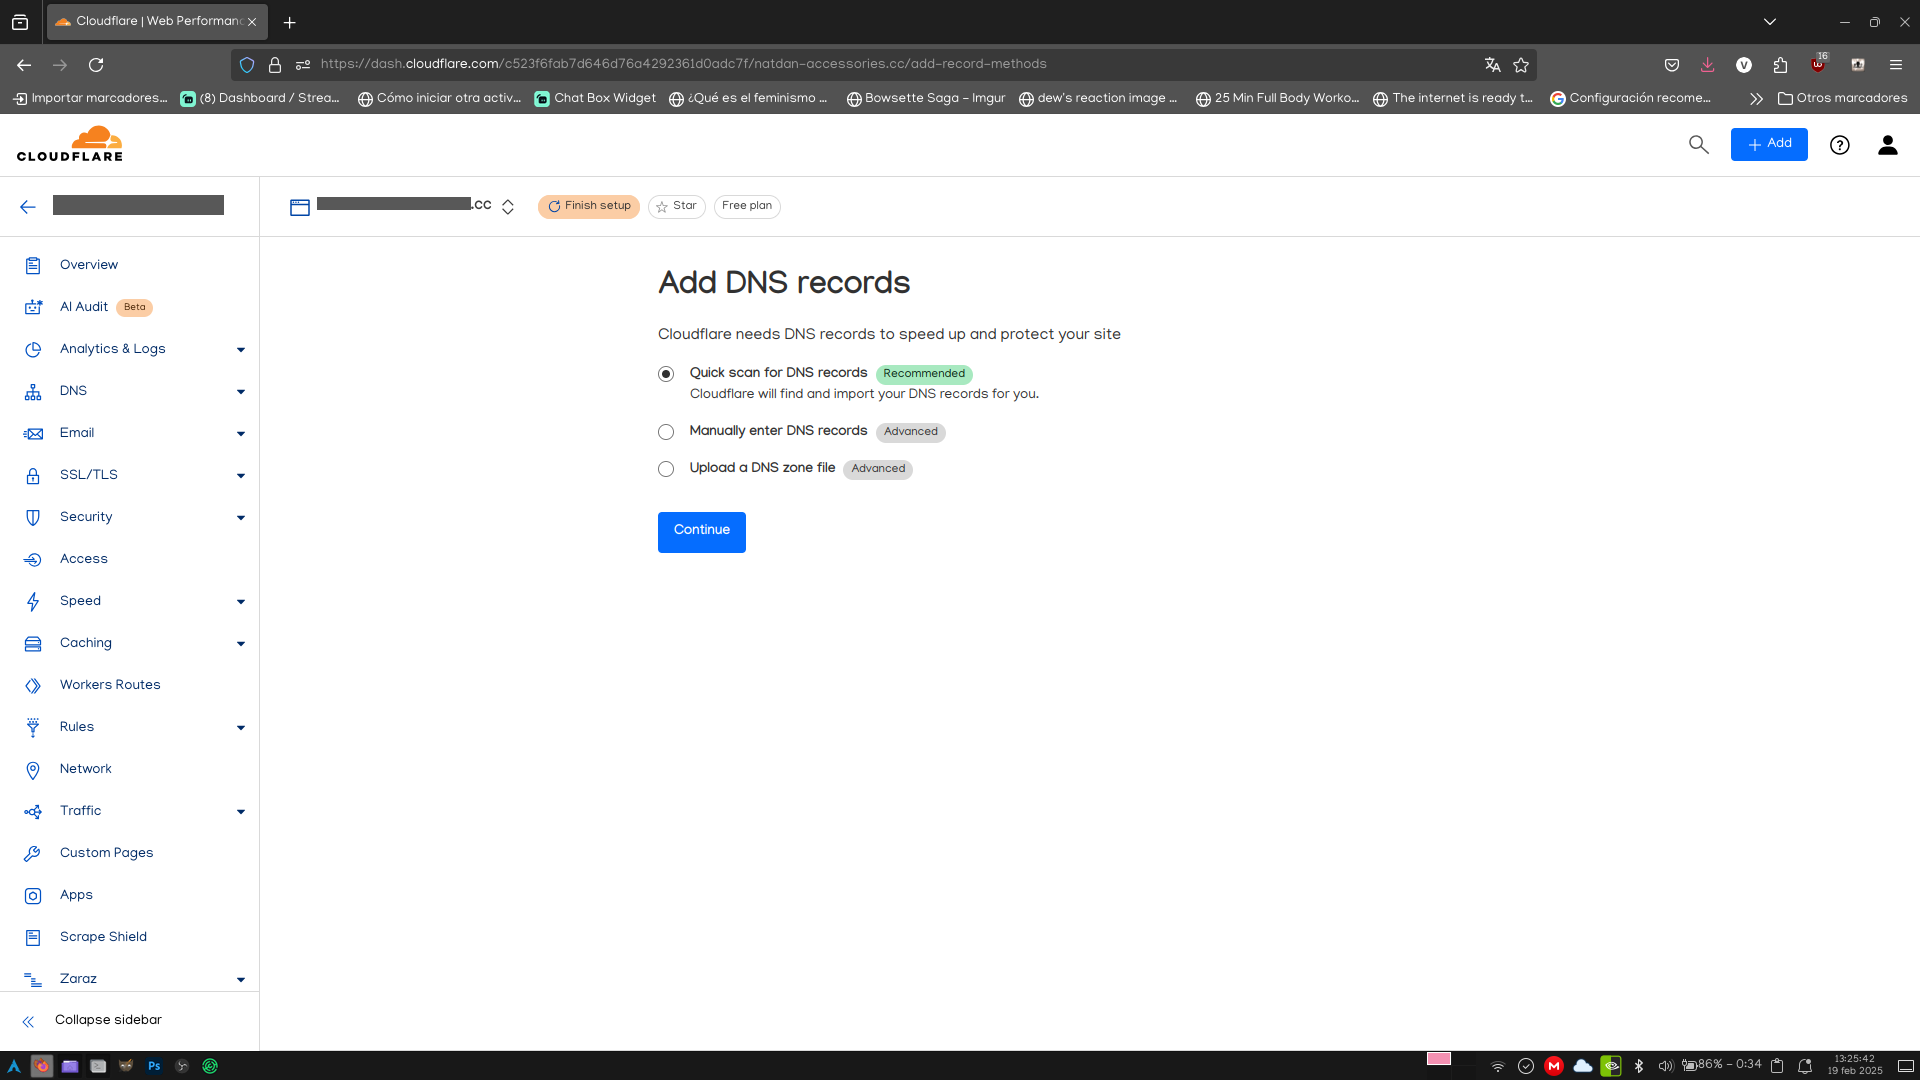
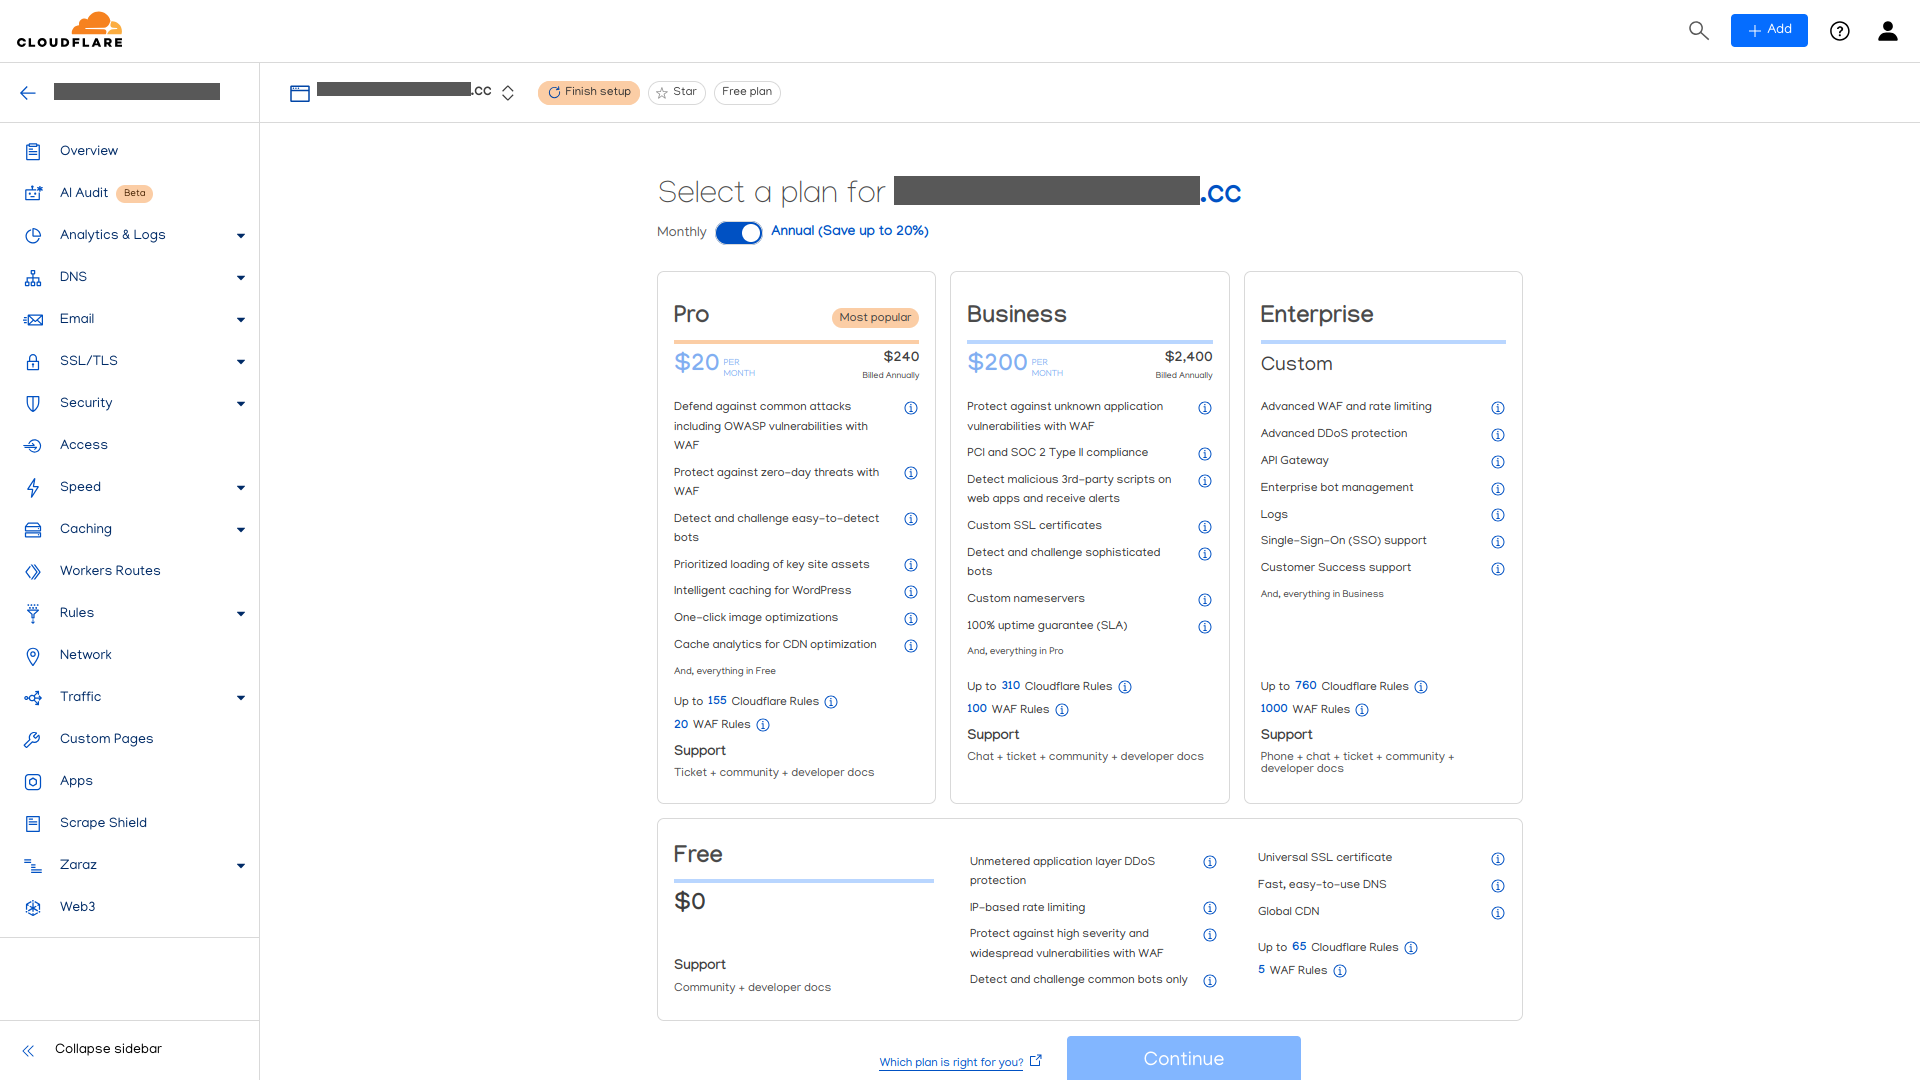
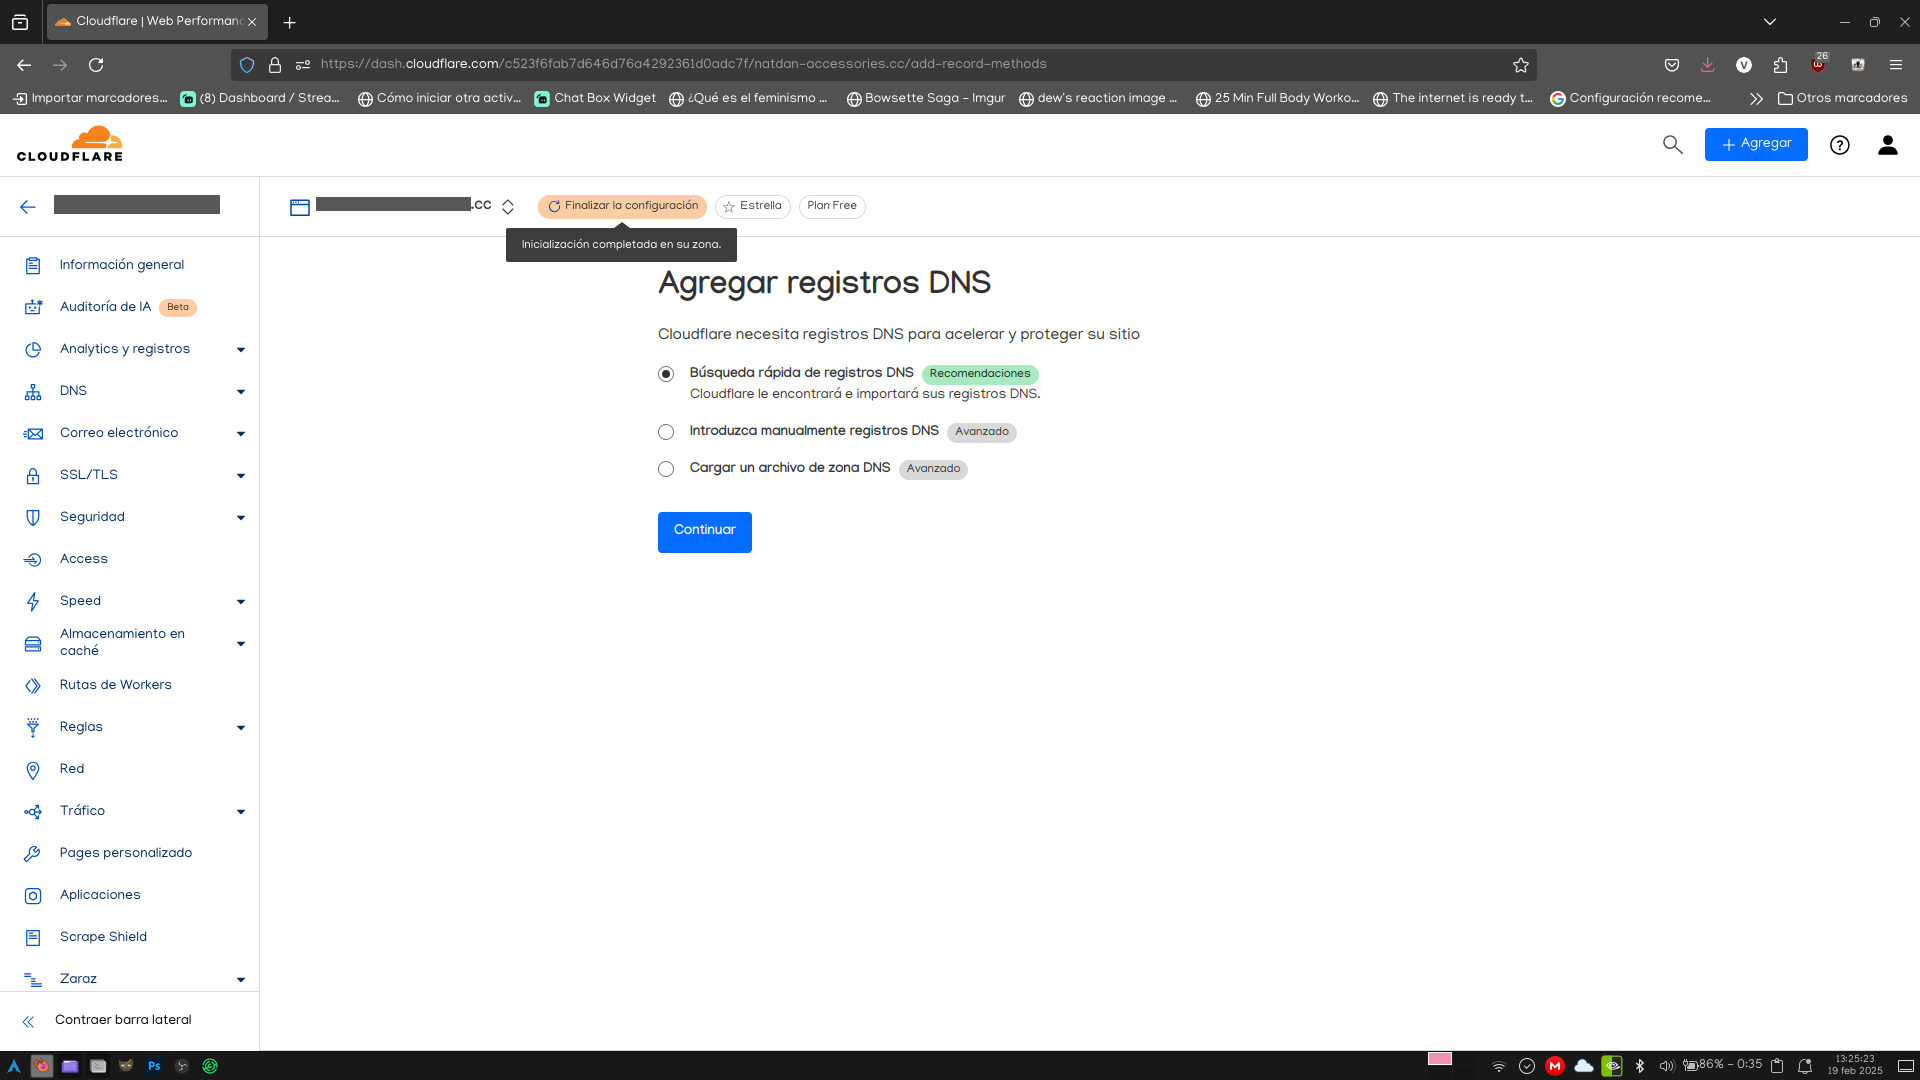
Aquí nos da varios planes para seleccionar. No queremos gastar un centavo más, así que nos iremos por el gratuito. Y al presionar el botón de Continuar, pasamos a la pantalla para configurar los registros DNS.
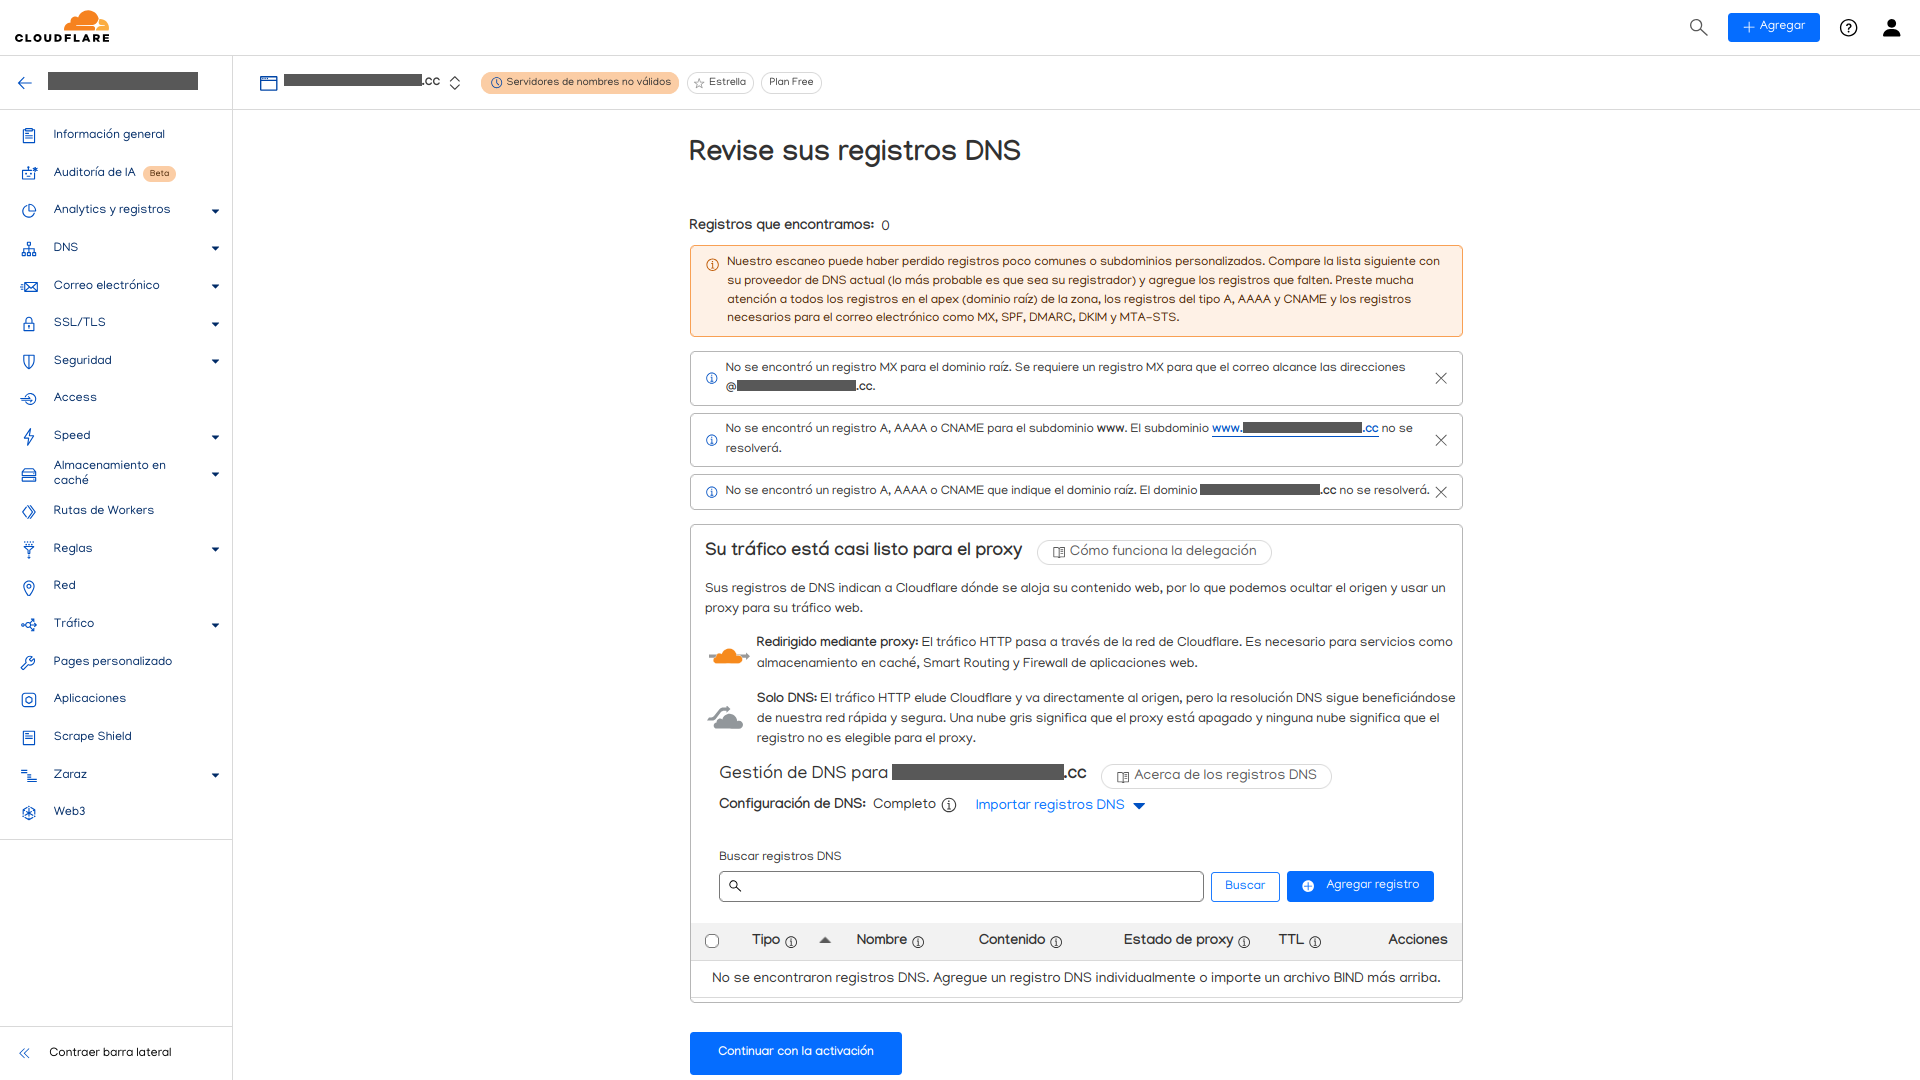
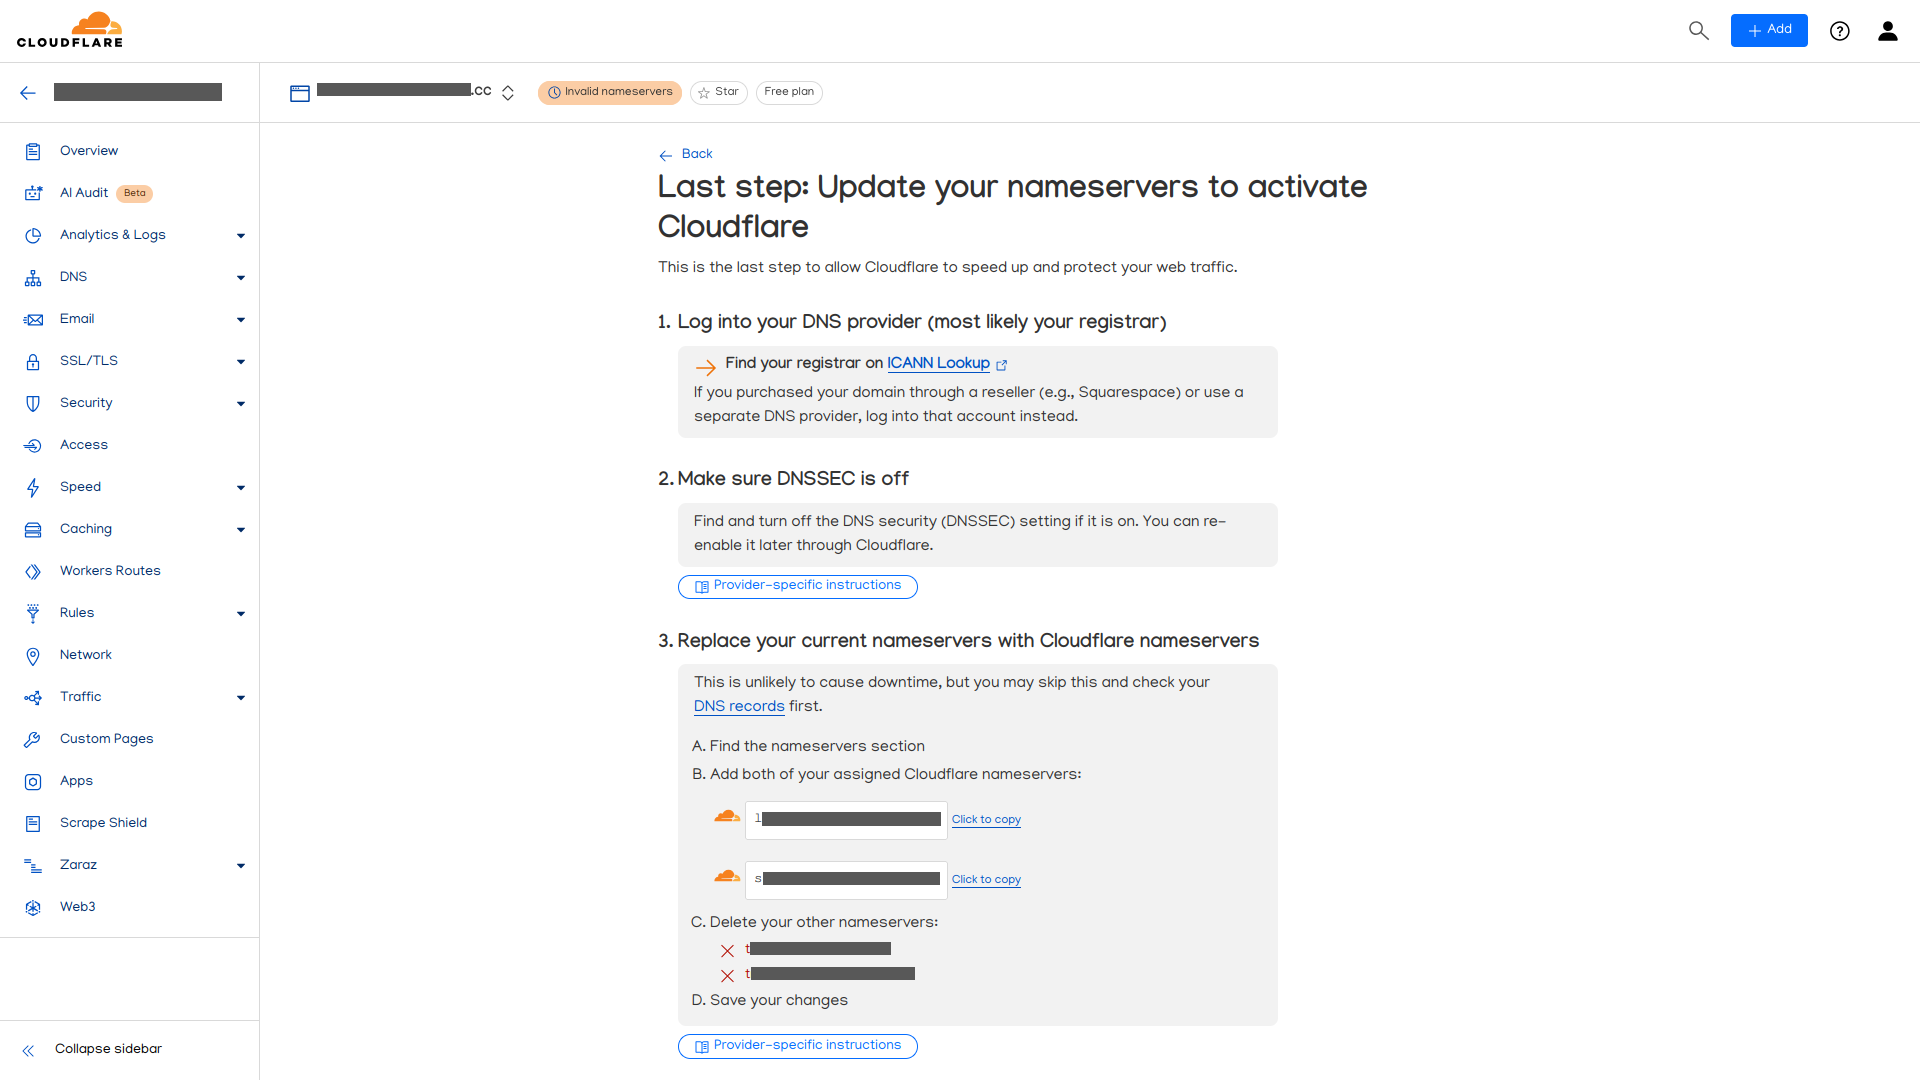
Como este proceso lo haremos más adelante, por el momento daremos en Continuar con la activación, y después en el botón de Confirmar. Pasaremos a la pantalla de guía de configuración de servidores de nombre.
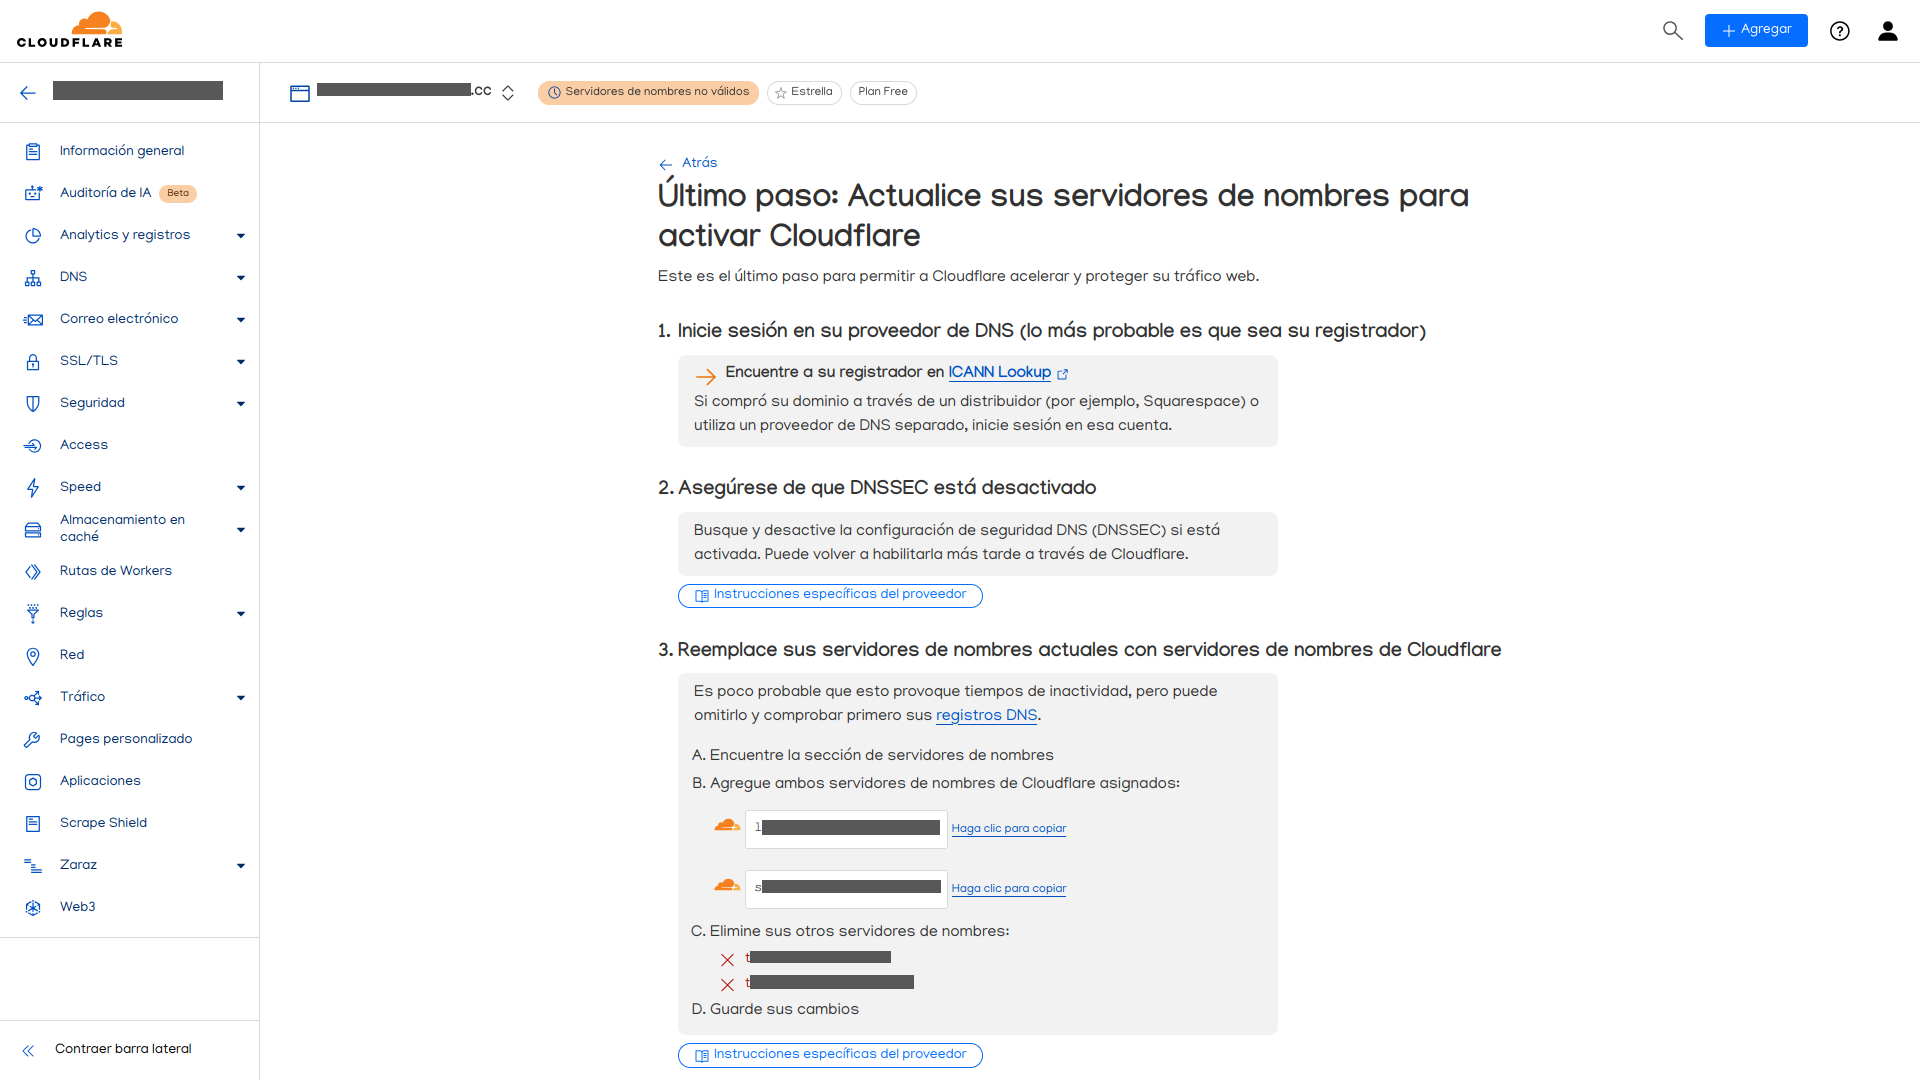
Vamos a seguir las instrucciones que nos aparecen aquí. El primer punto ya está cubierto iniciando sesión en Porkbun, así que sólo basta con ir a la página de control de dominios de tu cuenta de Porkbun.
El segundo punto ya está cubierto por defecto, desglosando los detalles de nuestro dominio, y viendo que la sección Registry DNSSEC está en cero.
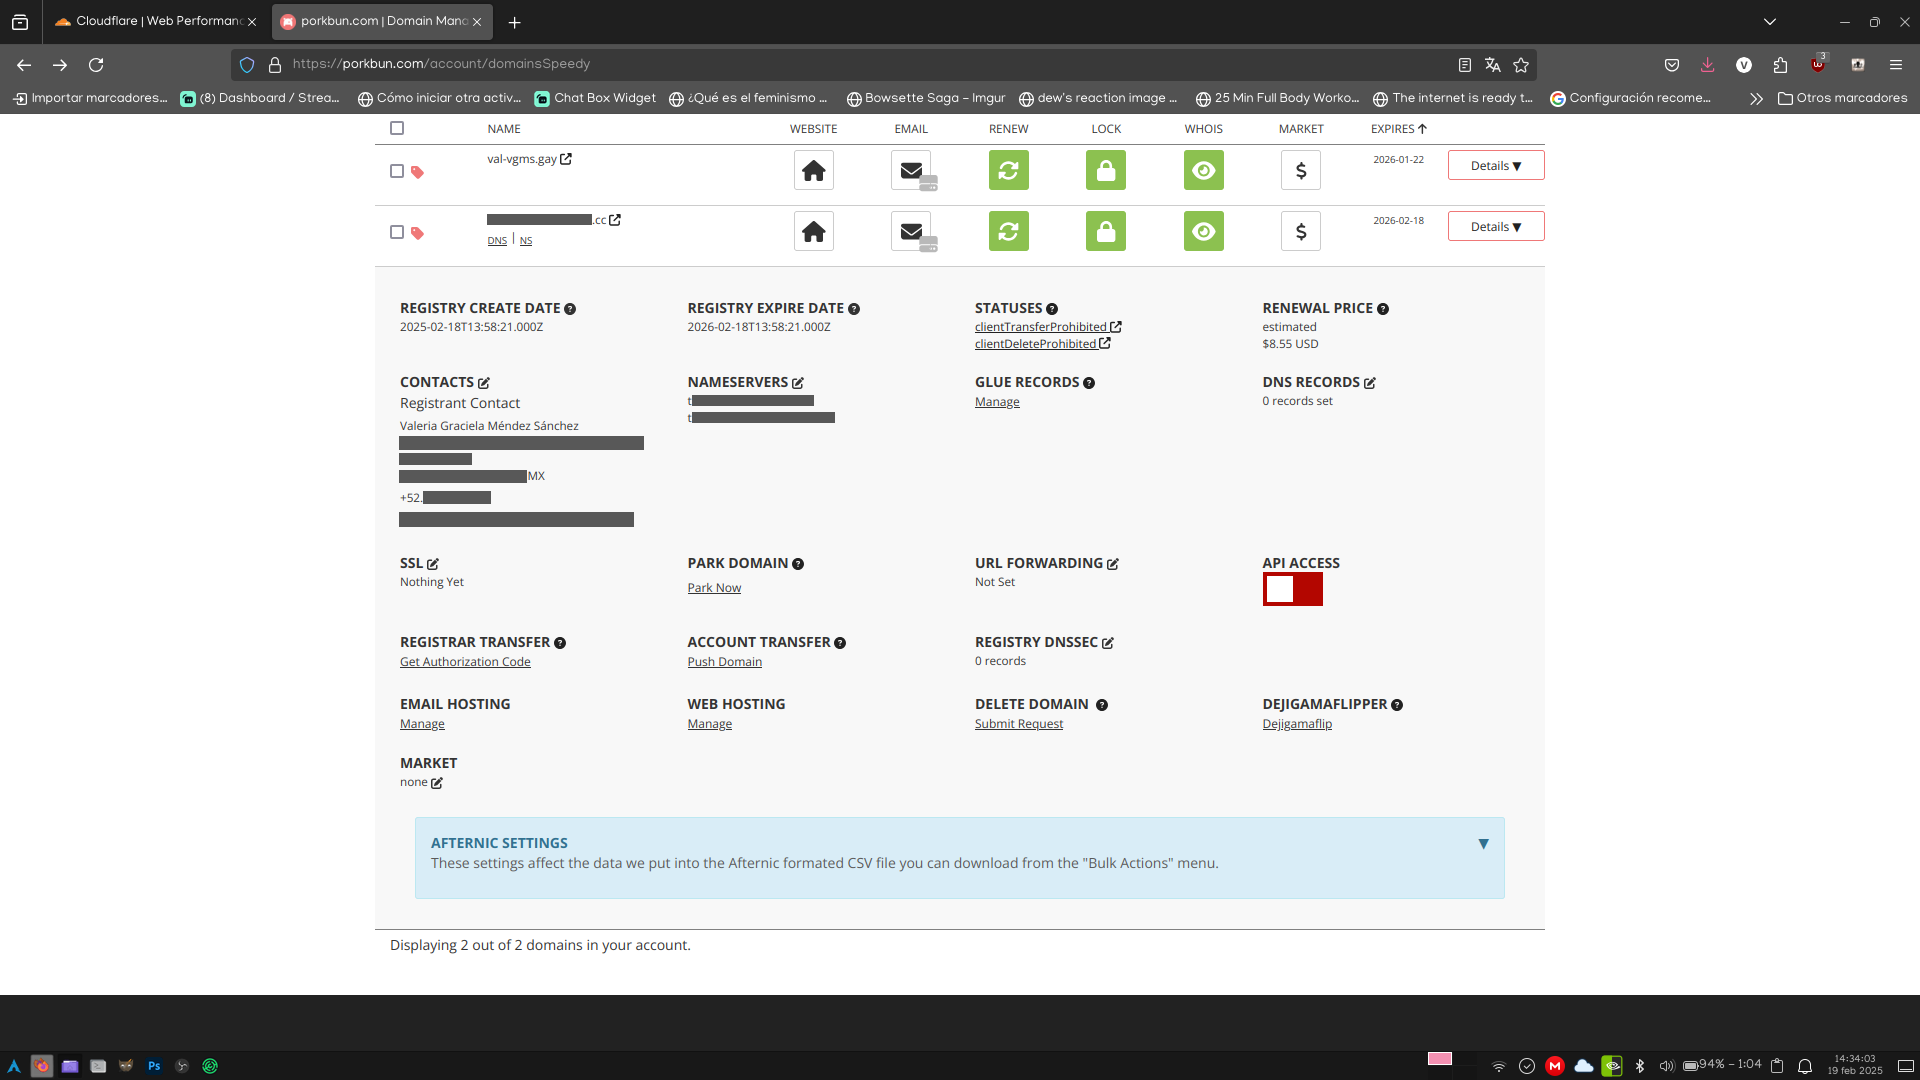
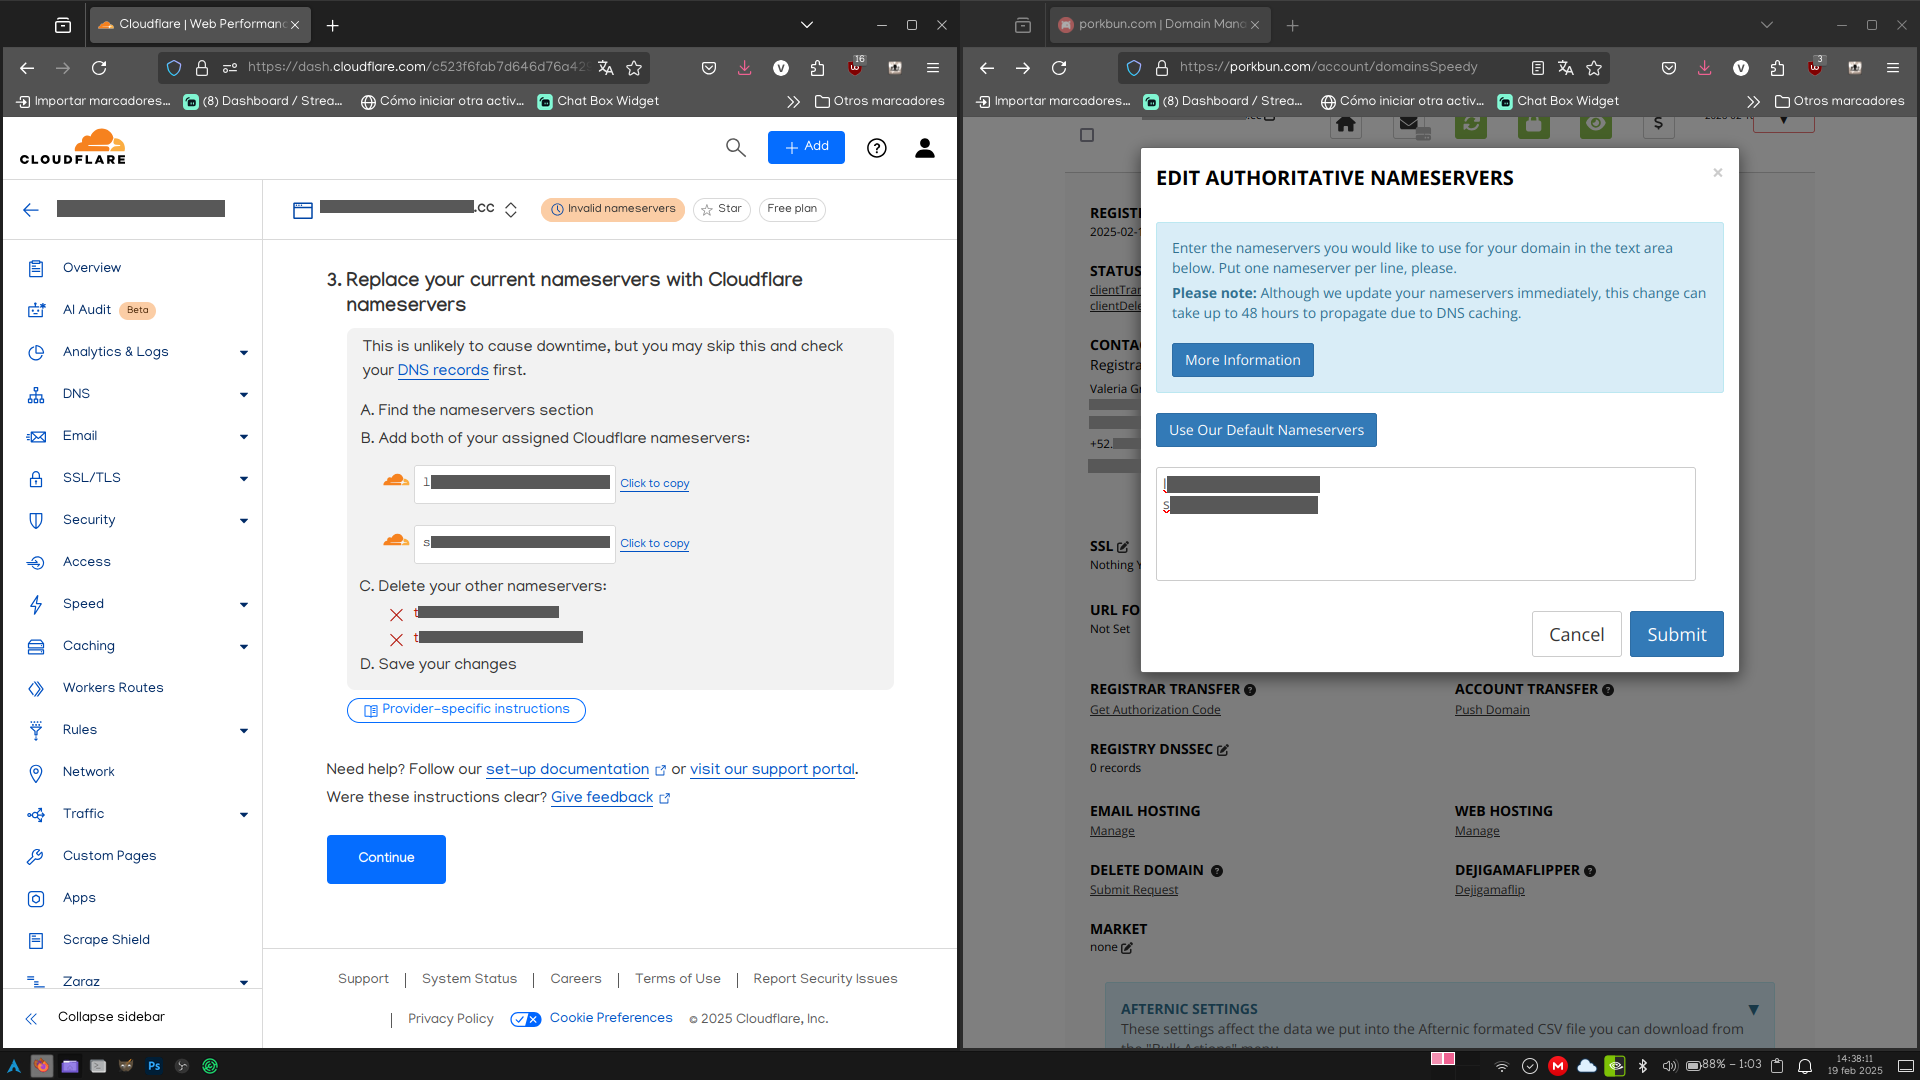
Y el tercer punto, lo vamos a cubrir presionando el botón de editar que está en la sección de Nameservers, y en la ventana que nos aparece, ponemos en lineas separadas los servidores que nos aparecen en Cloudflare.
Al presionar el botón de continuar, nos dice que los servidores quedan listos en un plazo máximo de 24 horas, pero tras refrescar la página unos cinco minutos después, dice que ya quedó.
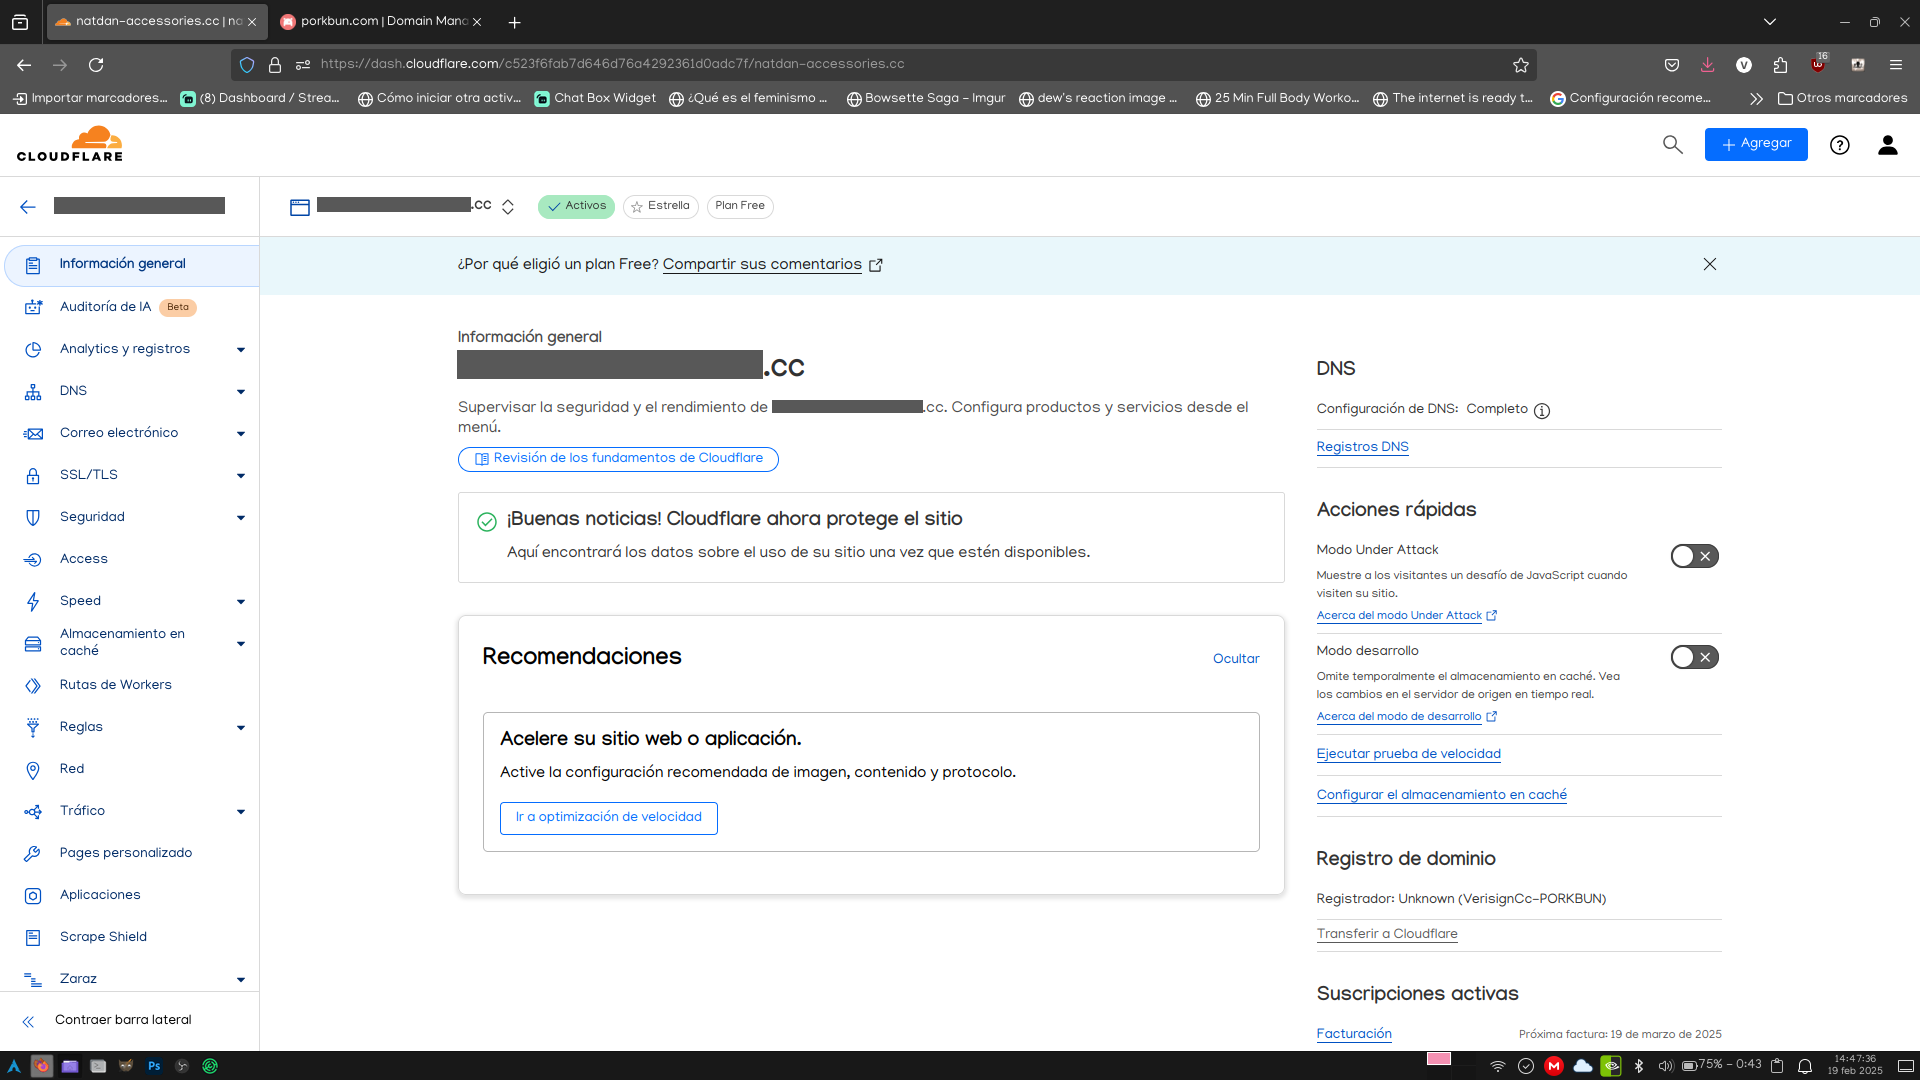
Con los servidores listos, e incluso en lo que termina de quedar, podemos proceder con el siguiente paso.
Instalación y configuración de Cloudflared
Antes de proceder con la instalación del servicio de Cloudflare, debemos saber qué tipo de arquitectura tiene nuestro sistema. En cualquier sistema Linux se puede hacer a través del comando uname -a. Dejo la captura de pantalla con las salidas de este comando desde la computadora que uso a diario (y la que será esta instancia de prueba), y desde mi Raspberry Pi (la que es este blog).
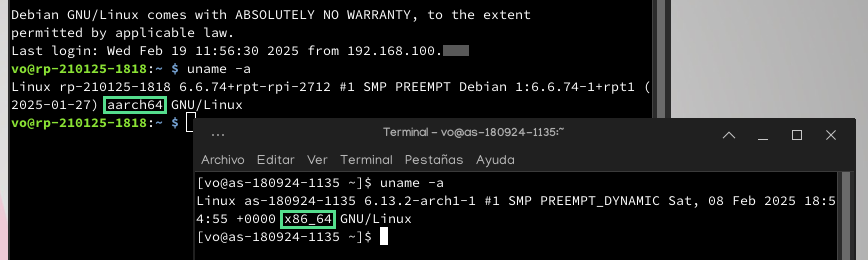
Dependiendo de esa última parte (que resalto en mi captura de arriba), es la versión que vamos a instalar. Si el resultado de uname contiene x86_64, y estás en Arch (o derivadas), la tienes fácil. Lo puedes instalar con el siguiente comando:
sudo pacman -Syu cloudflared
Para otras configuraciones, se complica la cosa. Primero, es importante mencionar que, por alguna razón, los resultados de la salida de uname y la versión del programa que vamos a descargar difiere un poco. Así que les dejo esta tabla con las equivalencias.
| Resultado de uname |
Arquitectura |
| x86_64 |
amd64 |
| x86 |
386 |
| arm7l |
armhf |
| aarch64 |
arm64 |
Basándonos en esto, para instalarlo en Debian (y otros Linux), vamos a ejecutar esta serie de comandos:
sudo wget -O cloudflared https://github.com/cloudflare/cloudflared/releases/latest/download/cloudflared-linux-{arquitectura}
sudo mv cloudflared /usr/local/bin
sudo chmod +x /usr/local/bin/cloudflared
Es importante notar que, con esto, la forma de actualizar Cloudflared (que por cierto, sale al menos una actualización cada mes) varía, dependiendo de si instalas en Arch x86_64 o no. Si sí, basta con usar el comando para actualizar todo el sistema.
sudo pacman -Syu
Pero para los demás, el comando cambia un poco, al no estar ligado al gestor de paquetes del sistema.
cloudflared update
Ahora que ya está instalado el servicio, vamos a configurar el túnel para, por fin, hacer que la dirección apunte a nuestro equipo.
Crear y configurar el túnel de acceso
Primero vamos a crear el túnel, iniciando sesión desde cloudflared.
cloudflared login
Y en la línea de comandos, nos debe salir algo como esto:
A browser window should have opened at the following URL:

https://dash.cloudflare.com/argotunnel?aud=[ID de acceso privado que no comparto por seguridad xd]

If the browser failed to open, please visit the URL above directly in your browser.
Y también es posible que se haya abierto directamente la ventana de nuestro navegador con esa dirección. Pero en caso de que, por algún motivo no se haya abierto, toca copiar y pegar esa dirección en nuestro navegador. La cual, muestra algo parecido a esto.
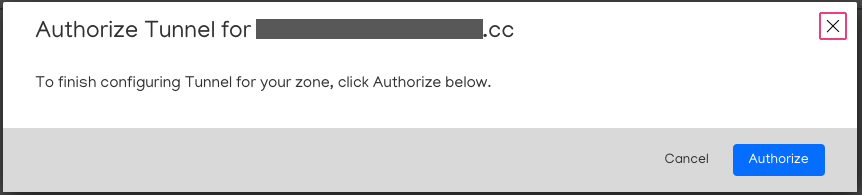
Y una vez que seleccionemos nuestro dominio que creamos hace unos momentos, nos aparece esta otra ventana.
Una vez que le demos al botón de Autorizar, ya podemos cerrar la ventana del navegador. Y ahora podemos crear el archivo del túnel para poder hacerlo servicio automático. Para ello, ejecutamos el siguiente comando:
cloudflared tunnel create [Nombre que quieras darle al túnel]
Y debe darte una salida similar a esta:
Tunnel credentials written to /home/vo/.cloudflared/[UUID largo].json. cloudflared chose this file based on where your origin certificate was found. Keep this file secret. To revoke these credentials, delete the tunnel.

Created tunnel [Nombre del túnel] with id [UUID largo]
Ahora, vamos a crear el archivo de configuración para Cloudflared con los datos del túnel.
sudo nano ~/.cloudflared/config.yml
Y vamos a ingresar el siguiente texto en ese archivo:
tunnel: [UUID largo]
credentials-file: /home/[tu usuario]/.cloudflared/[UUID largo].json

ingress:
  - hostname: [Dominio de Porkbun]
    service: http://localhost:80
  - service: http_status:404
Una vez que guardemos el archivo de texto, ahora vamos a crear los registros DNS. Ya no falta mucho.
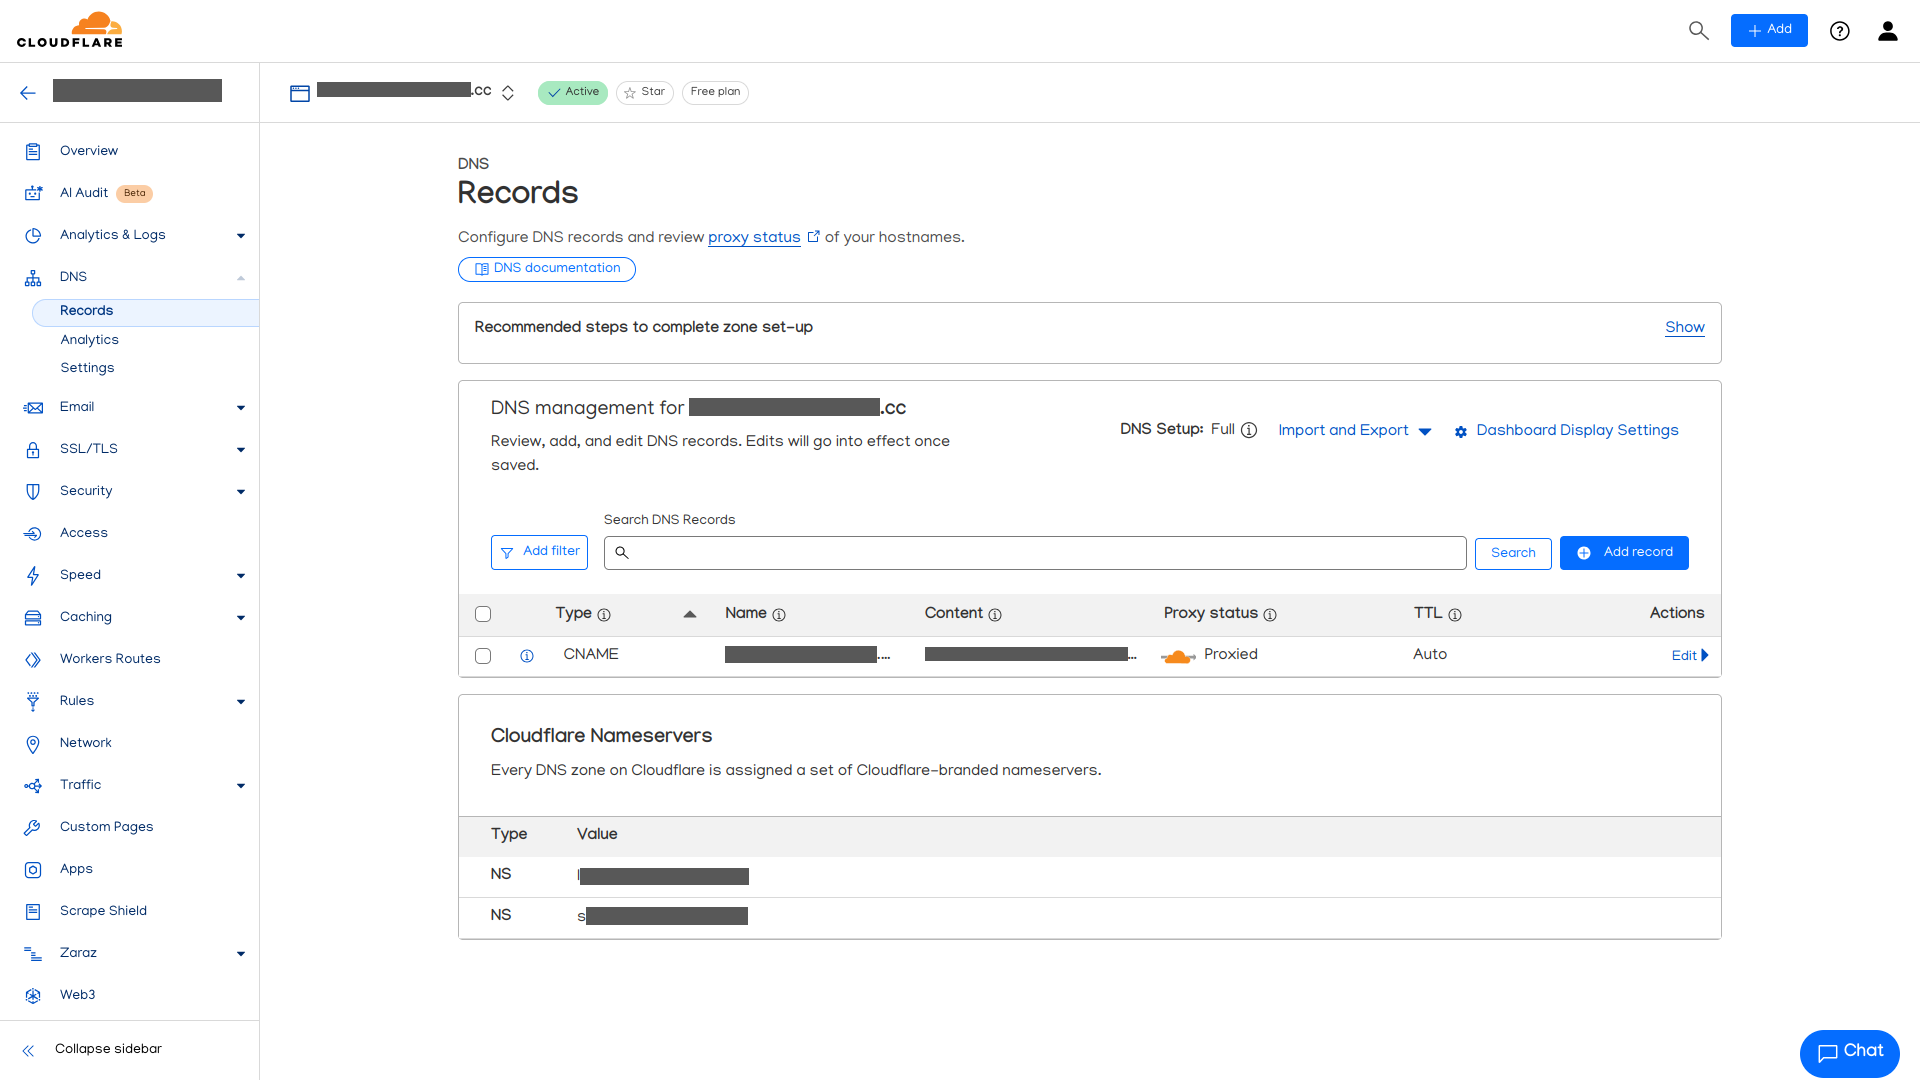
Crea los registros DNS para apuntar a tu equipo
Hay dos formas de crearlos. A mano, y directo desde Cloudflared. Honestamente no sé hacerlo a mano, así que dejemos que Cloudflare nos haga el trabajo con el siguiente comando:
cloudflared tunnel route dns [UUID largo] [Dominio]
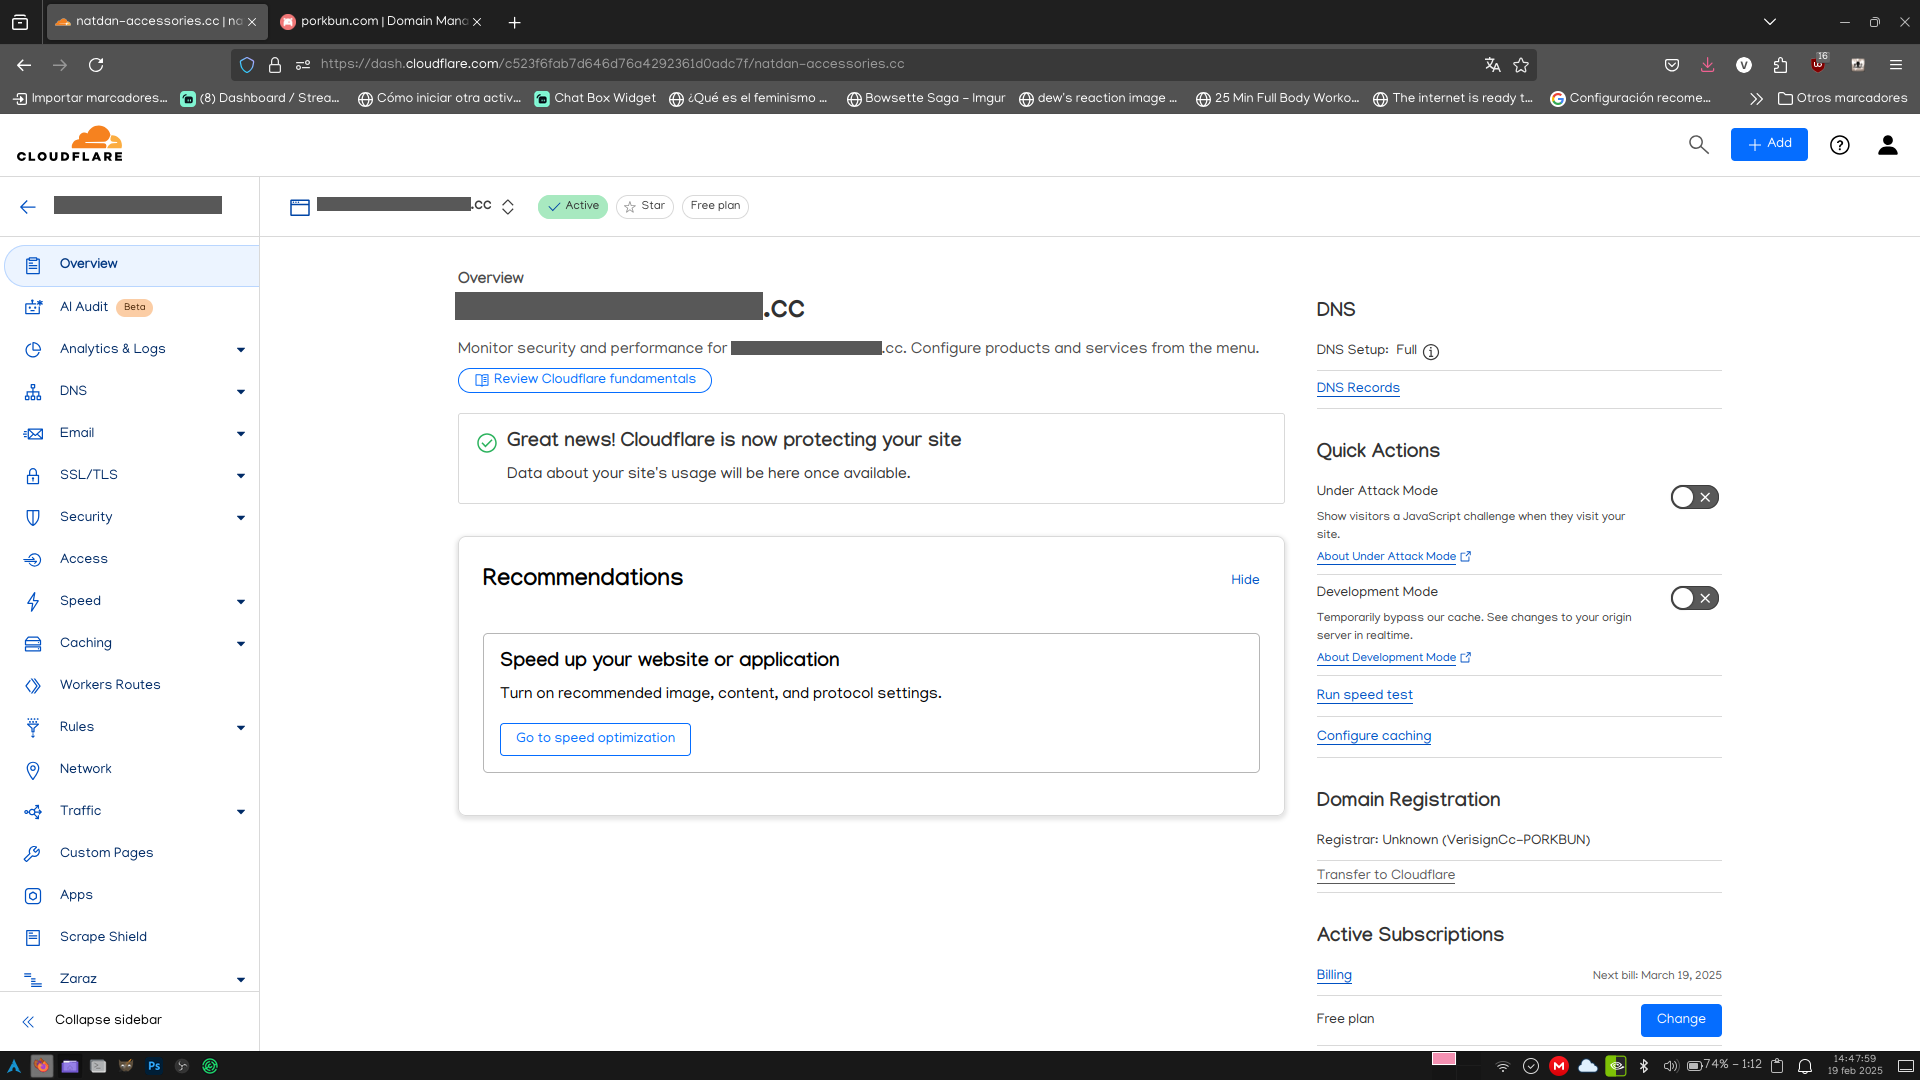
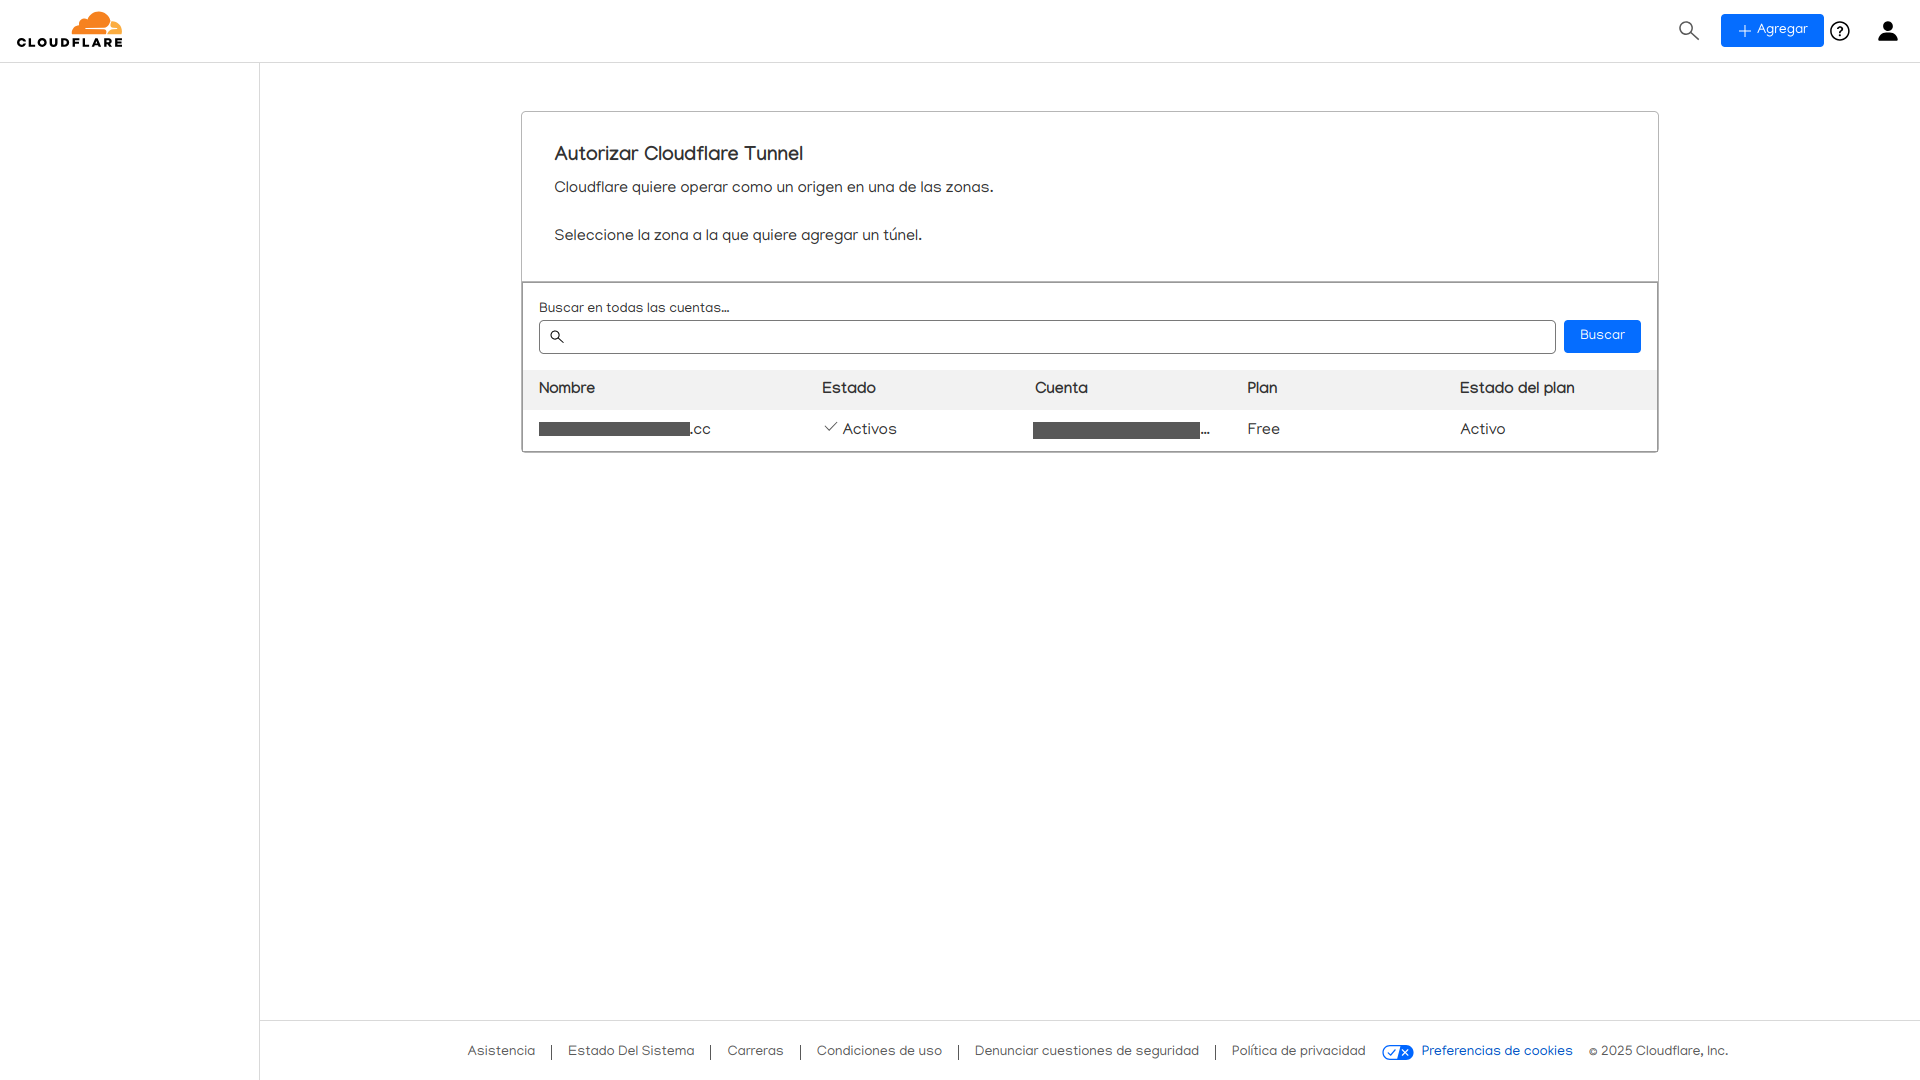
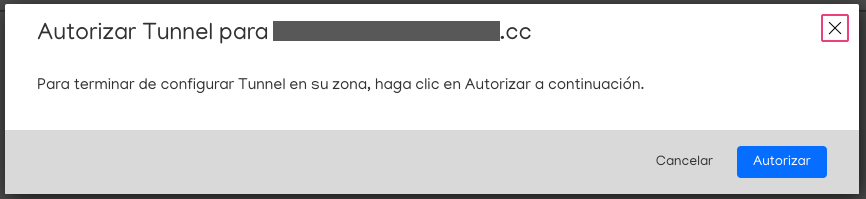
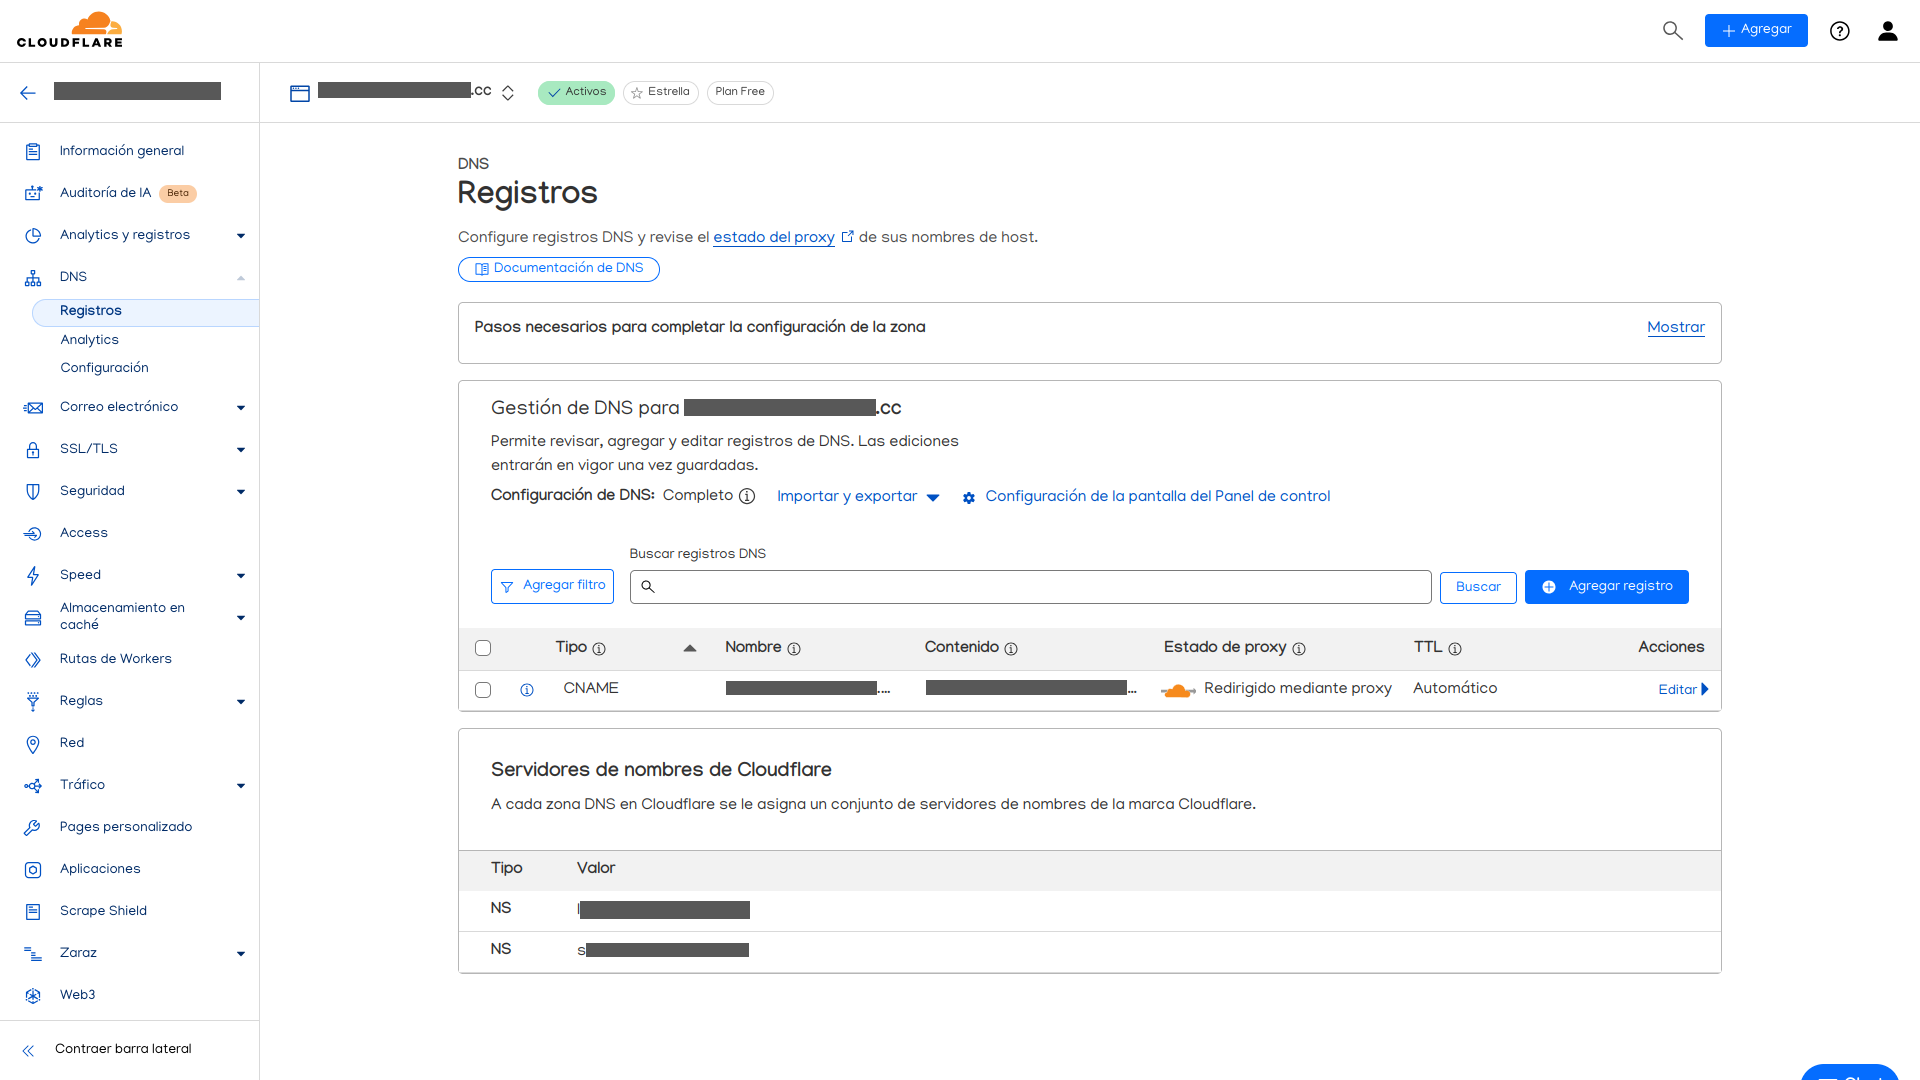
Y así, sin más, en nuestro panel de control de Cloudflare, ya aparecen los registros DNS para que apunten a nuestro equipo.
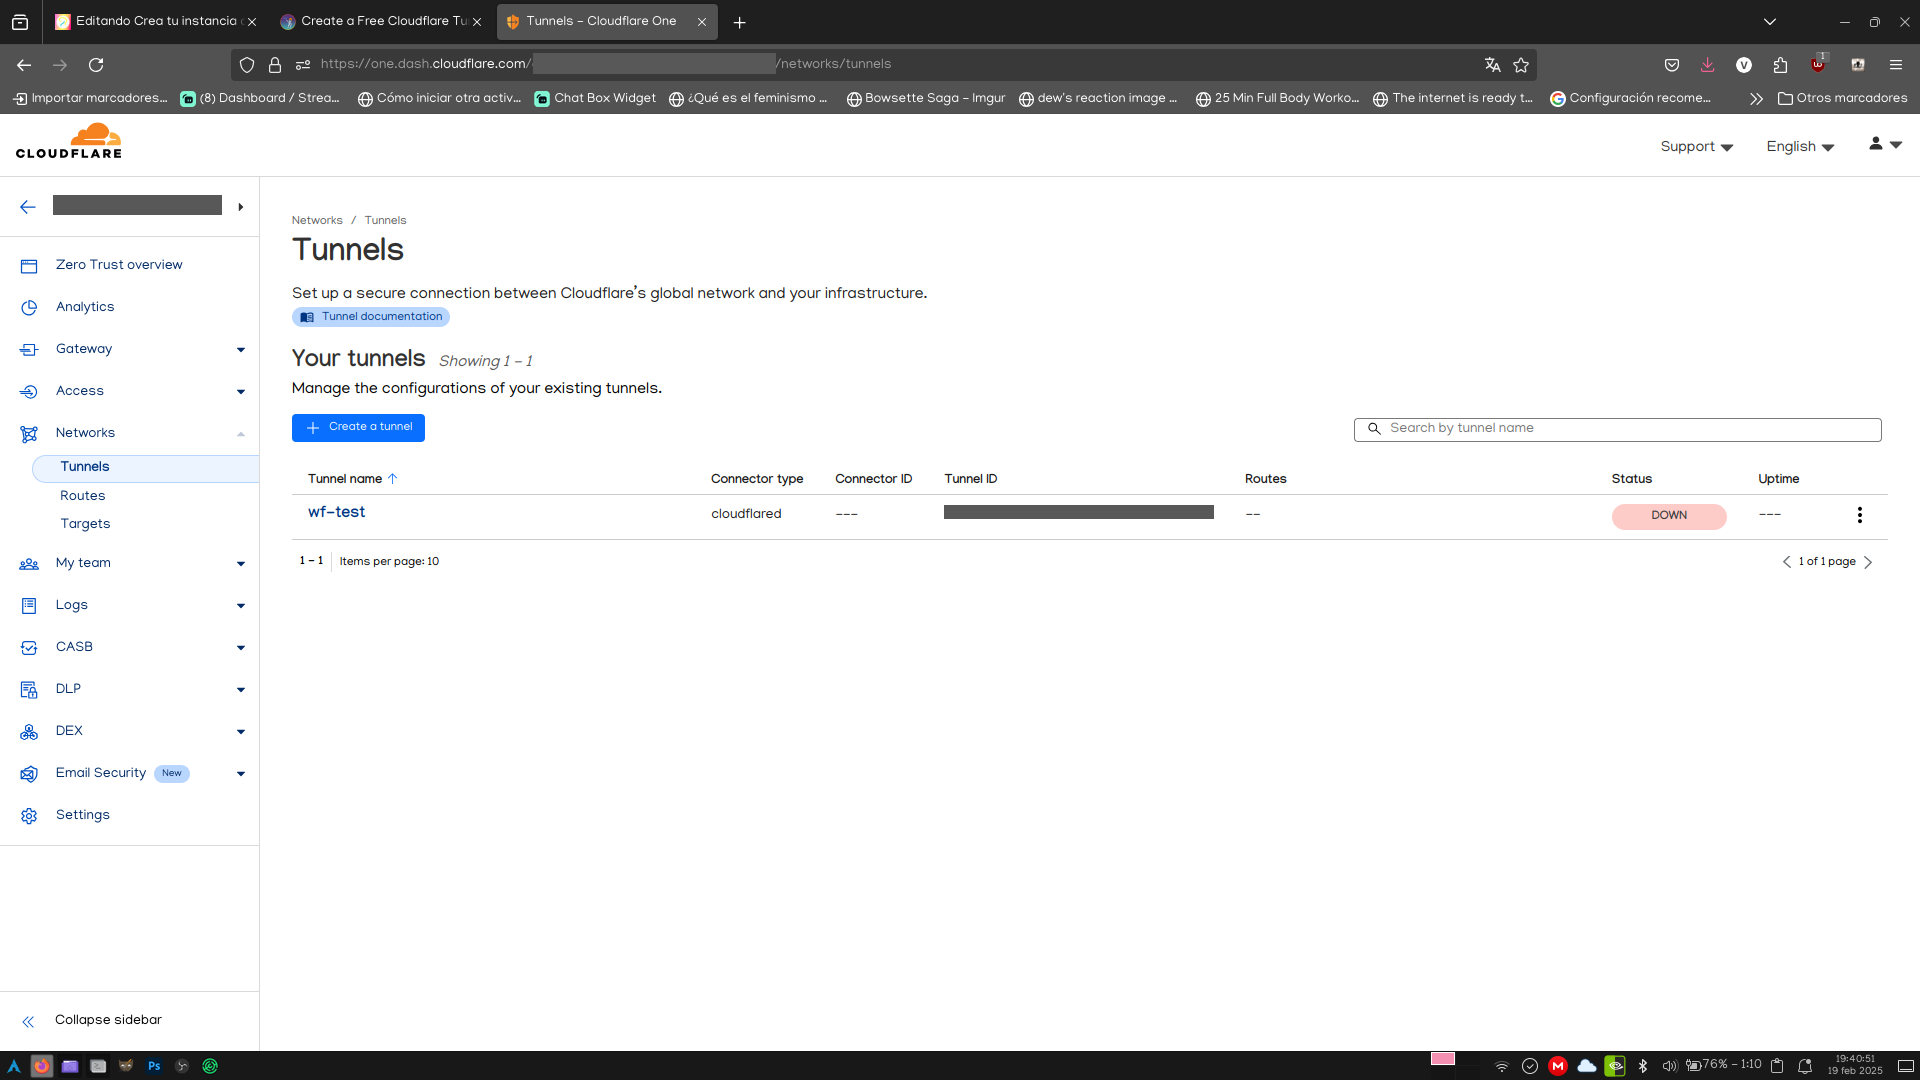
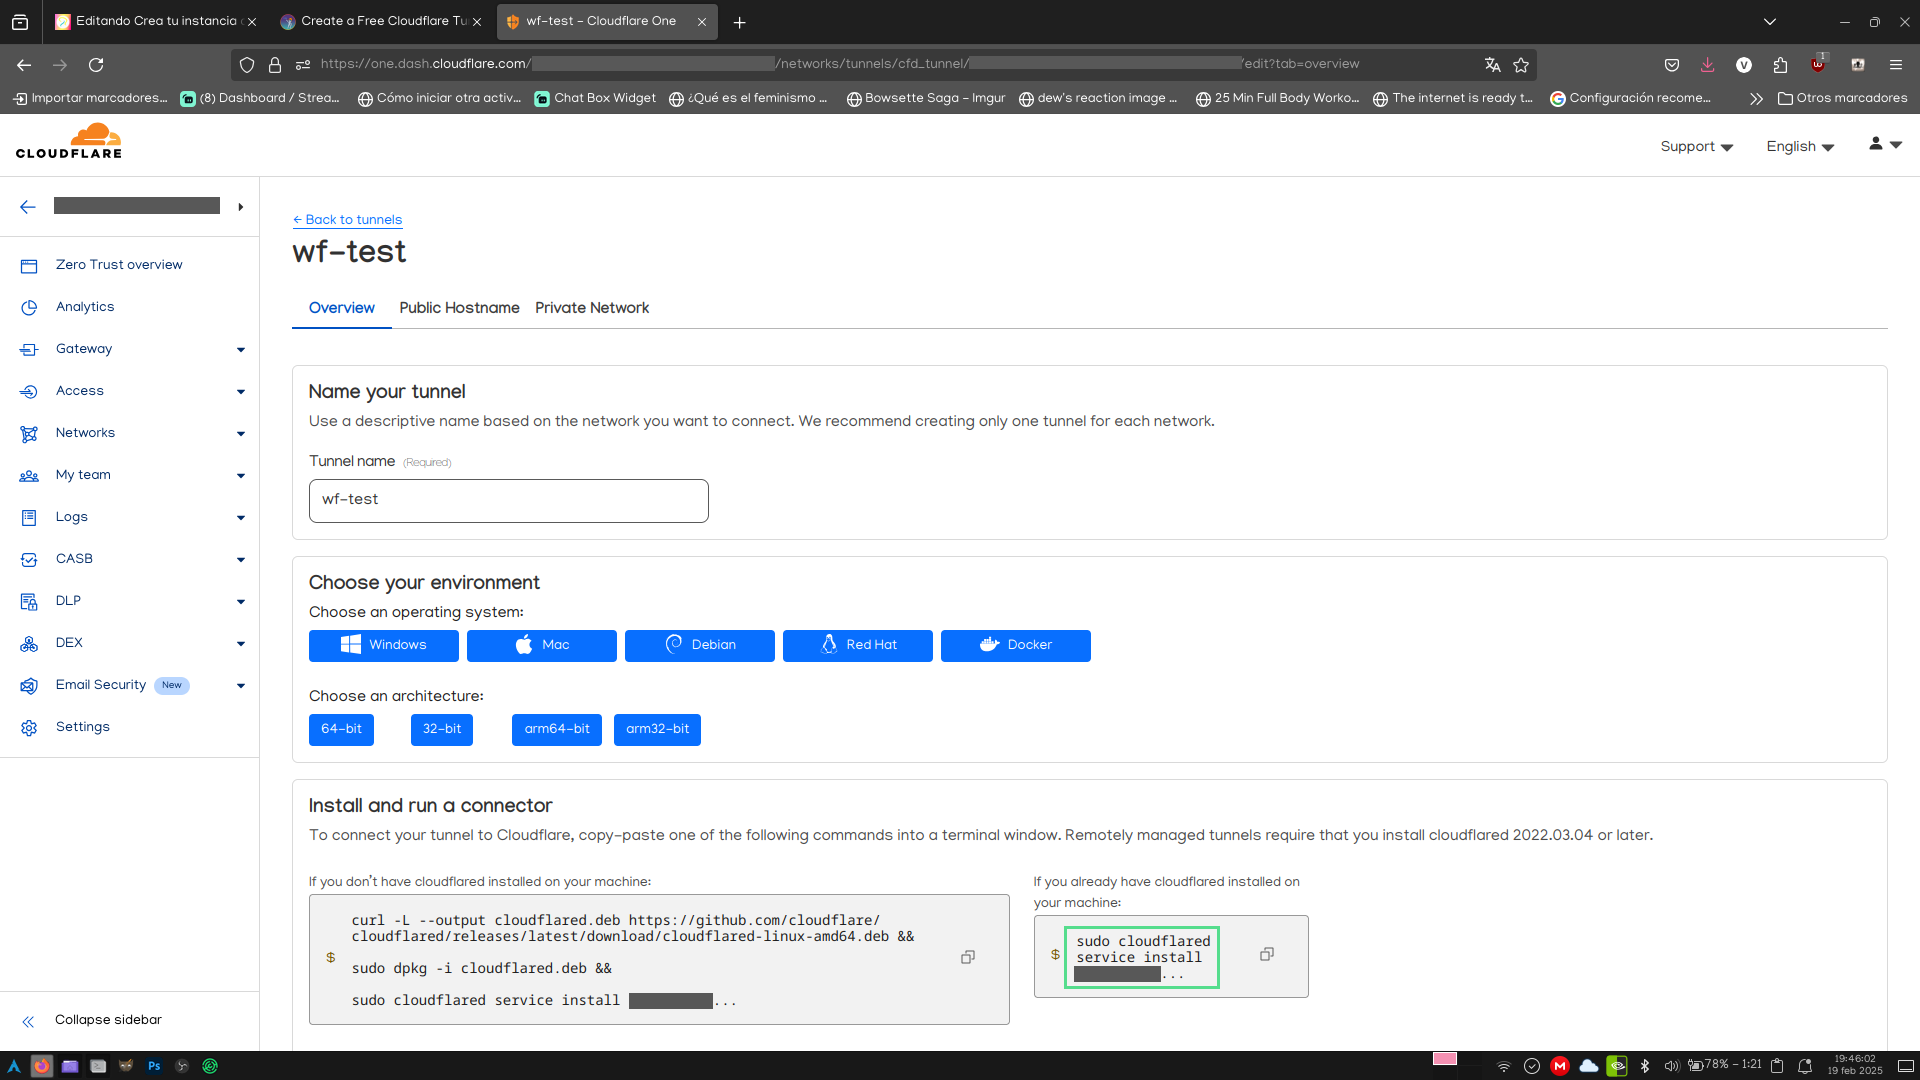
Ahora, en la parte superior izquierda, al lado de nuestra dirección de correo electrónico, está la flecha de 'regresar'. La pulsaremos, y luego, en ese mismo lado, más en medio, está la opción de Zero Trust.
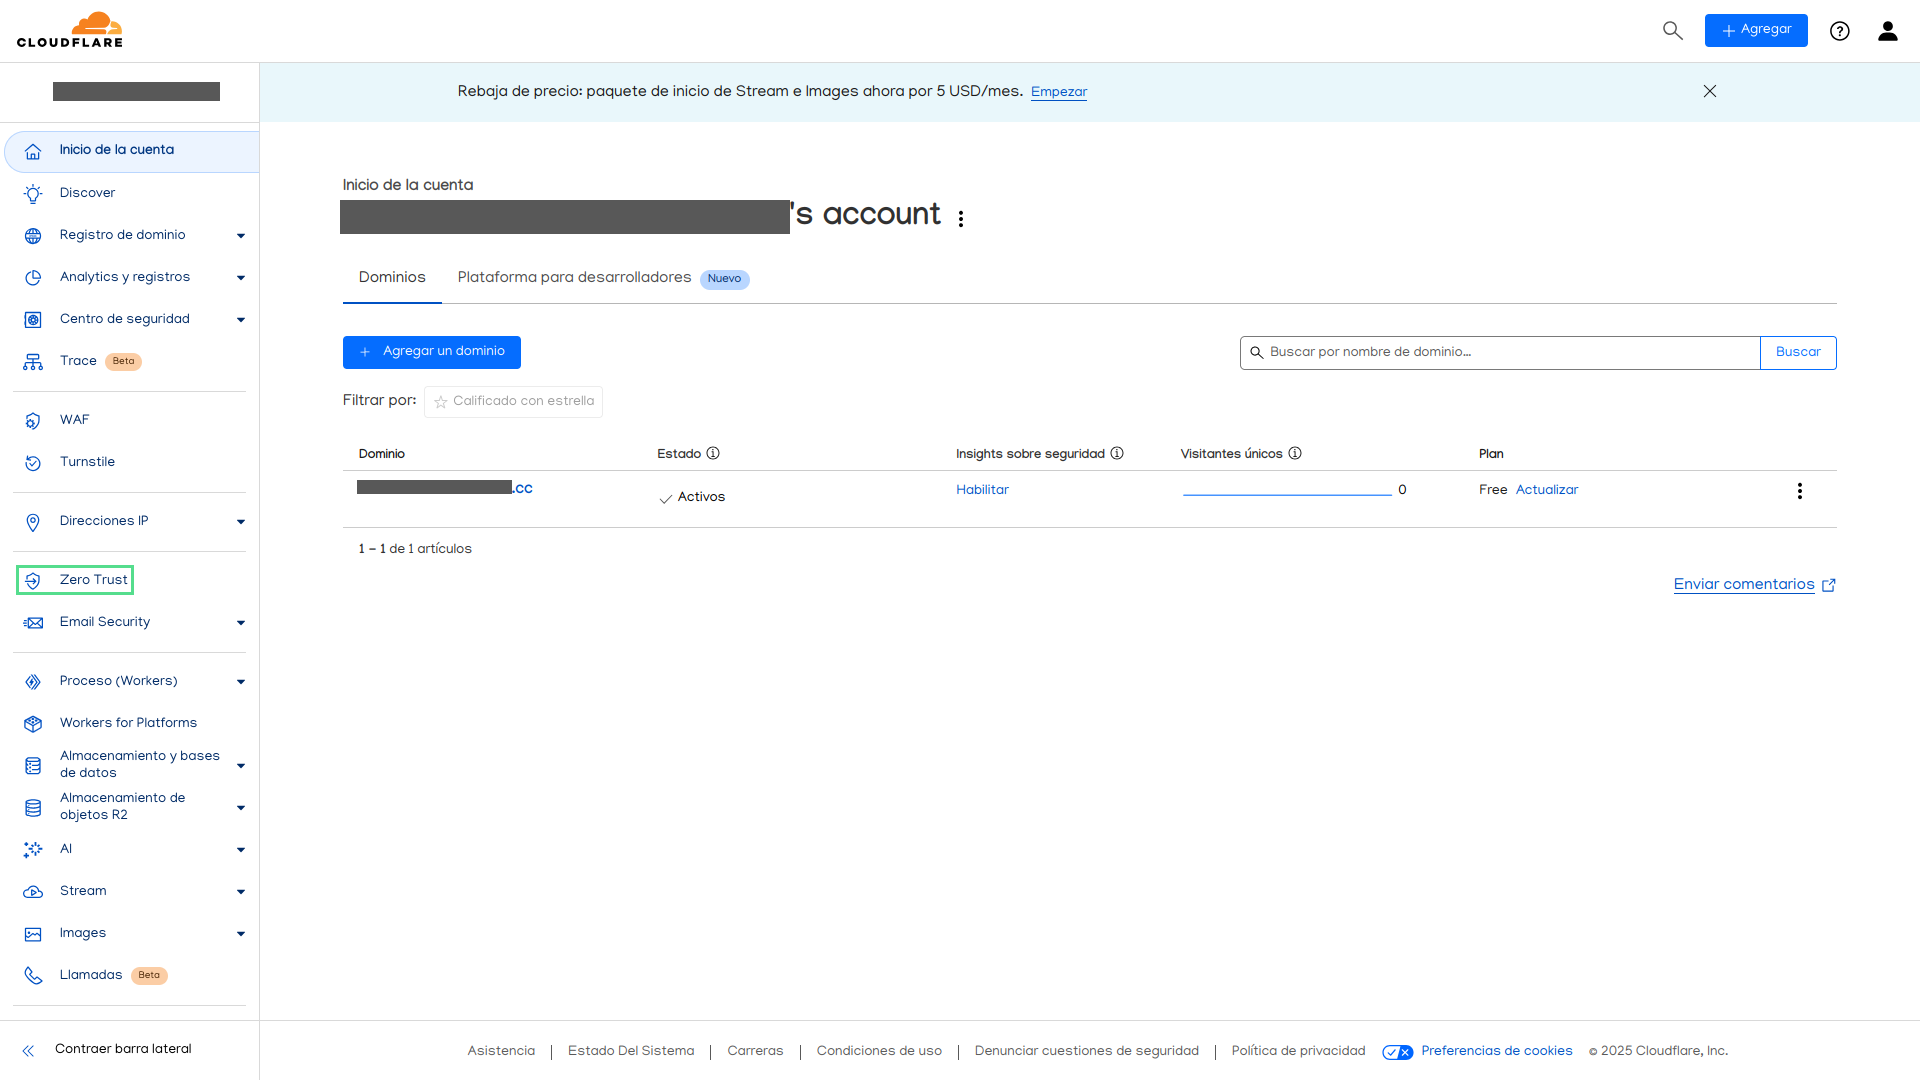
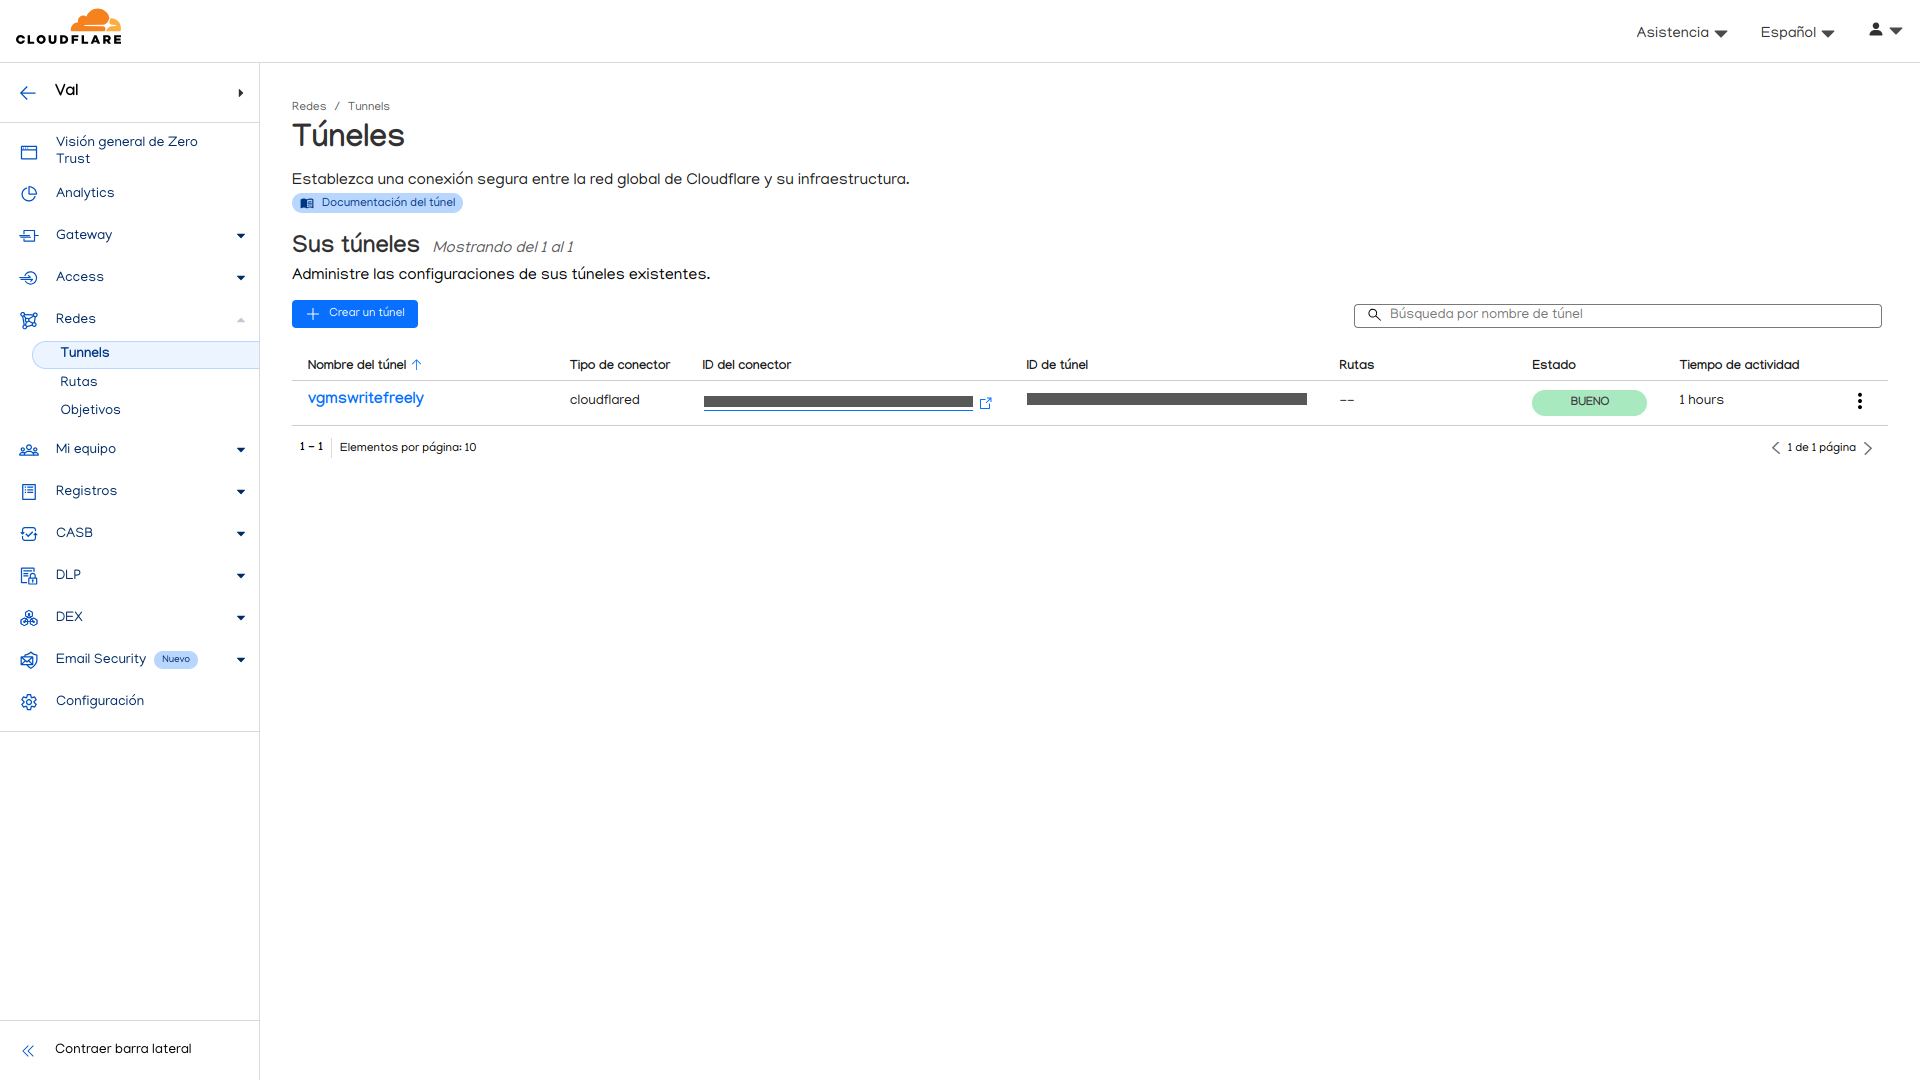
En esta nueva pantalla, vamos a la parte de Redes. Debemos ver esto.

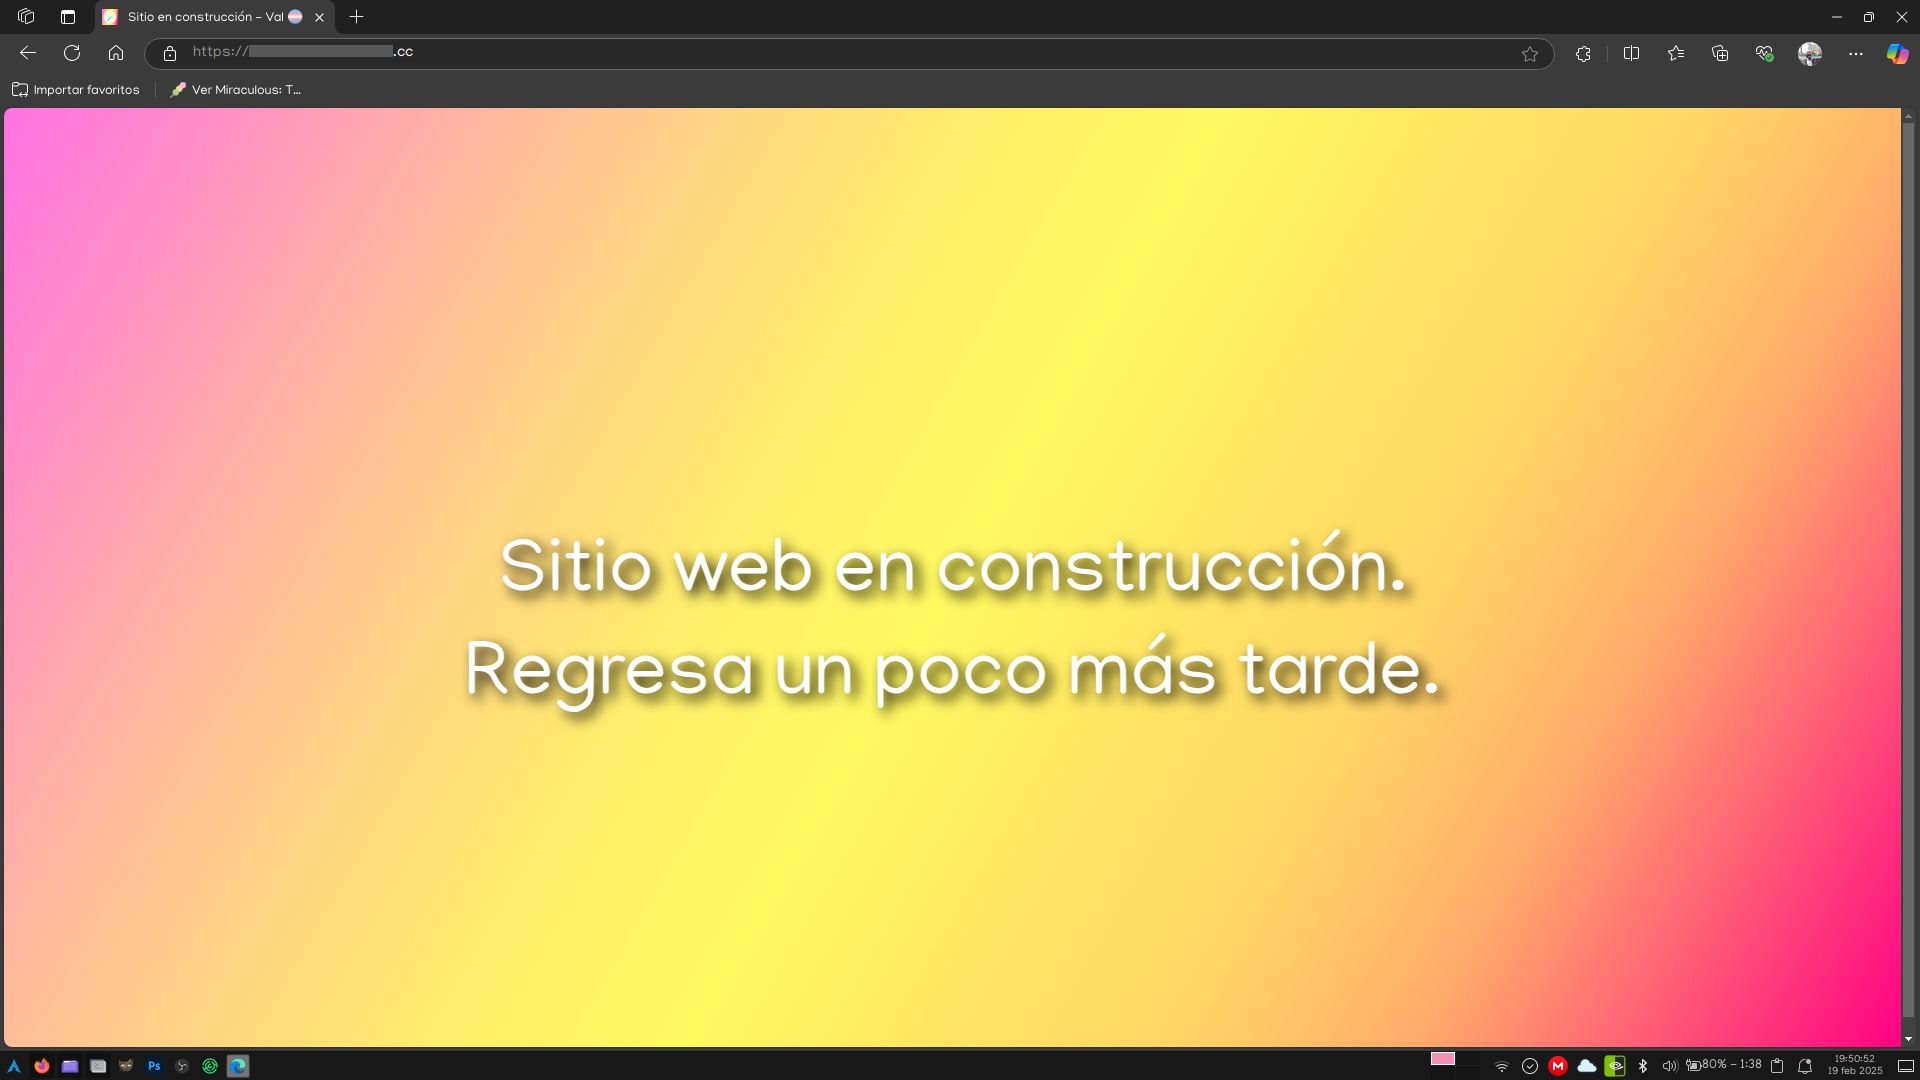
Si aparece el túnel que creamos hace un momento, vamos por buen camino. Le damos click, y estaremos comenzando la migración a un nuevo centro de control específico de Zero Trust. Basta con que sigamos las instrucciones que se nos presentan (ya saben, siguiente, siguiente, terminar), teniendo en cuenta que el proceso sólo se puede hacer una vez. Y debe aparecer esta pantalla.

El comando resaltado es el que más nos interesa, para instalar el servicio de una vez por todas. No se muestra el código completo, así que hay qué hacerle clic para copiarlo, y pegarlo directamente en la linea de comandos. Una vez que lo ejecutemos, el servicio se instalará e iniciará. Lo que ya nos permite acceder a nuestra página de prueba. Que en mi caso, la modifiqué un poco.
Ya podemos deslindarnos de Cloufdlare y dominios por completo. Pasamos a la siguiente parte del proceso.
¡A crear el blog de WriteFreely!
Con todo listo, ahora sí, a lo que vinieron todos. Cómo descargar y configurar WriteFreely. Comencemos con la descarga.
Descarga e instalación de WriteFreely
¿Recuerdas la salida de uname? Nos va a volver a servir ahora para descargar la versión adecuada de WriteFreely.
Si tu arquitectura es amd64:
wget "https://github.com/writeas/writefreely/releases/latest/download/writefreely_0.15.1_linux_amd64.tar.gz"
tar -xvzf writefreely_0.15.1_linux_amd64.tar.gz
rm writefreely_0.15.1_linux_amd64.tar.gz
Si tu arquitectura es arm64:
wget "https://github.com/writeas/writefreely/releases/latest/download/writefreely_0.15.1_linux_arm64.tar.gz"
tar -xvzf writefreely_0.15.1_linux_arm64.tar.gz
rm writefreely_0..15.1_linux_arm64.tar.gz
Si tu arquitectura es armhf:
wget "https://github.com/writeas/writefreely/releases/latest/download/writefreely_0.15.1_linux_arm7.tar.gz"
tar -xvzf writefreely_0..15.1_linux_arm7.tar.gz
rm writefreely_0..15.1_linux_arm7.tar.gz
Ahora, vamos a configurar permisos para las carpetas del servidor, y mover los archivos de instalación de WriteFreely a la carpeta del servidor.
En Arch:
sudo chmod 755 -R /srv/http/
sudo mv writefreely/ /srv/http/
cd /srv/http/writefreely/
chmod +x writefreely
En Debian:
sudo chmod 755 -R /var/www/html/
sudo mv writefreely/ /var/www/html/
cd /var/www/html/writefreely/
chmod +x writefreely
Listo. WriteFreely ya se encuentra instalado de base en nuestro servidor. Pero todavía no está configurado.
Inicialización de las bases de datos y configuración de WriteFreely
Primero, vamos a pasar por la configuración inicial de WriteFreely.
./writefreely --config
Este comando es interactivo, así que vamos paso a paso por las configuraciones.
En Server setup, con las flechas [↑] y [↓] seleccionamos Production, behind reverse Proxy, y presionamos [Enter]. Nos pedirá un puerto, y podemos poner el que queramos, aunque para efectos de este tutorial, usaré 8080.
En Database Setup, vamos a seleccionar MySQL. Inmediatamente nos pedirá el usuario de la base de datos, donde pondremos writefreely, y la contraseña que hayamos elegido cuando creamos la base de datos cuando configuramos MariaDB. Después , ponemos el nombre de la base de datos, que también es writefreely. Host y Puerto lo dejamos tal cual.
Para App Setup es completamente a tu criterio. Ya sea que quieras que tu blog sea sólo para ti, que quieras hacer dos o varios blogs, o que quieras crear una pequeña comunidad de escritores. Para efectos de este tutorial, yo lo voy a dejar en Single user blog. Si es el caso, les pedirá crear el usuario, la contraseña y el nombre del blog. En unos momentos revisaremos la configuración para múltiples usuarios.
Ahora, les pedirá la dirección pública, que es el dominio que adquirimos, antecedido por https://.
La siguiente pregunta es importante, porque nos pide si queremos habilitar la federación, para que nuestras publicaciones se propaguen en el fediverso. Ya hablé de eso antes en otra publicación, así que creo que valdría la pena. Aquí lo vamos a habilitar para este tutorial.
Las siguientes preguntas hablan de estadísticas de uso al público. Esto no tiene efecto en la funcionalidad del blog como tal, pero permite que servicios que monitorean la actividad del fediverso puedan acceder a ellas. Lo dejo a criterio personal.
Tras terminar con este paso, ya terminamos la configuración inicial para una instancia de un solo blog, y parte de la configuración general.
Si configuramos la instancia para múltiples usuarios, hay unos pasos adicionales que debemos seguir. Ejecutaremos los siguientes dos comandos:
./writefreely --init-db
./writefreely --create-admin [Usuario de blog]:[Contraseña de blog]
Y ahora sí, todos ejecutaremos el siguiente comando para generar las claves de certificado.
./writefreely --gen-keys
Antes de pasar a crear el servicio de WriteFreely, vamos a terminar de configurar el Proxy inverso del servidor Apache.
Desde Arch:
sudo nano /etc/httpd/conf/extra/httpd-vhosts.conf
Desde Debian:
sudo nano /etc/apache2/sites-enabled/000-default.conf
Los archivos que están ahí realmente son archivos de muestra que podemos modificar, así que vamos a borrar todo el contenido de estos archivos, y les pegaremos el siguiente texto.
En Arch:
<VirtualHost *:80>
        ProxyPreserveHost On
        ProxyPass / http://127.0.0.1:8080/
        ProxyPassReverse / http://127.0.0.1:8080/
        ServerName [Dominio adquirido]
        ServerAdmin [Correo electrónico personal, opcional]
        DocumentRoot /srv/http
        ErrorLog /var/log/httpd/error.log
        CustomLog /var/log/httpd/access.log combined
</VirtualHost>
En Debian:
<VirtualHost *:80>
        ProxyPreserveHost On
        ProxyPass / http://127.0.0.1:8080/
        ProxyPassReverse / http://127.0.0.1:8080/
        ServerName [Dominio adquirido]
        ServerAdmin [Correo electrónico personal, opcional]
        DocumentRoot /var/www/html
        ErrorLog ${APACHE_LOG_DIR}/error.log
        CustomLog ${APACHE_LOG_DIR}/access.log combined
</VirtualHost>
Guardamos el archivo, y reiniciamos el servicio de Apache.
En Arch:
sudo systemctl restart httpd
En Debian:
sudo systemctl restart apache2
Ahora, vamos a crear el servicio de WriteFreely para que se ejecute todo el tiempo. Lo haremos a través de este comando.
sudo nano /etc/systemd/system/writefreely.service
Ahora, debe mostrarnos un archivo vacío. Lo vamos a llenar, dependiendo del sistema.
En Debian:
[Unit]
Description=Instancia de WriteFreely
After=syslog.target network.target mariadb.service

[Service]
Type=simple
StandardOutput=syslog
StandardError=syslog
WorkingDirectory=/var/www/html/writefreely
ExecStart=/var/www/html/writefreely/writefreely
Restart=always

[Install]
WantedBy=multi-user.target
En Arch:
[Unit]
Description=Instancia de WriteFreely
After=syslog.target network.target mariadb.service

[Service]
Type=simple
StandardOutput=syslog
StandardError=syslog
WorkingDirectory=/srv/http/writefreely
ExecStart=/srv/http/writefreely/writefreely
Restart=always

[Install]
WantedBy=multi-user.target
Ahora, sólo queda habilitar el servicio de WriteFreely.
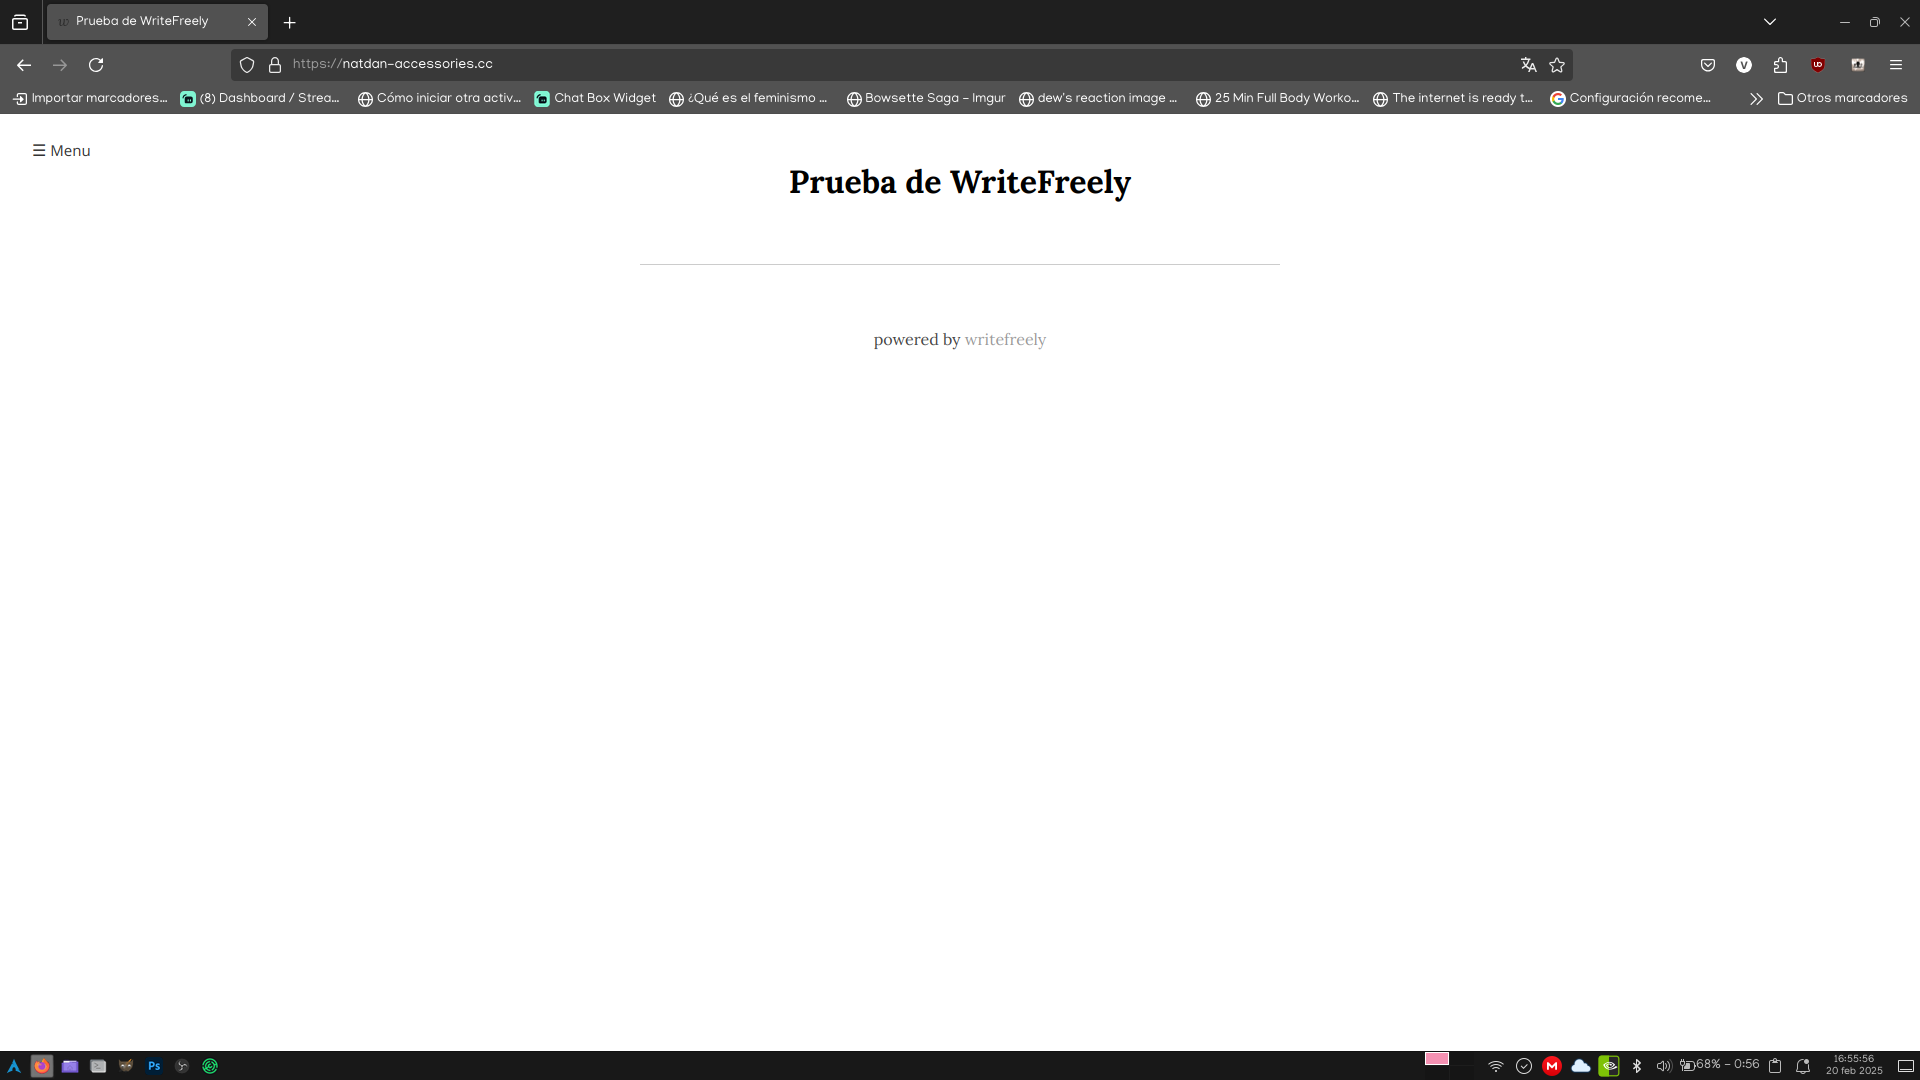
sudo systemctl enable --now writefreely
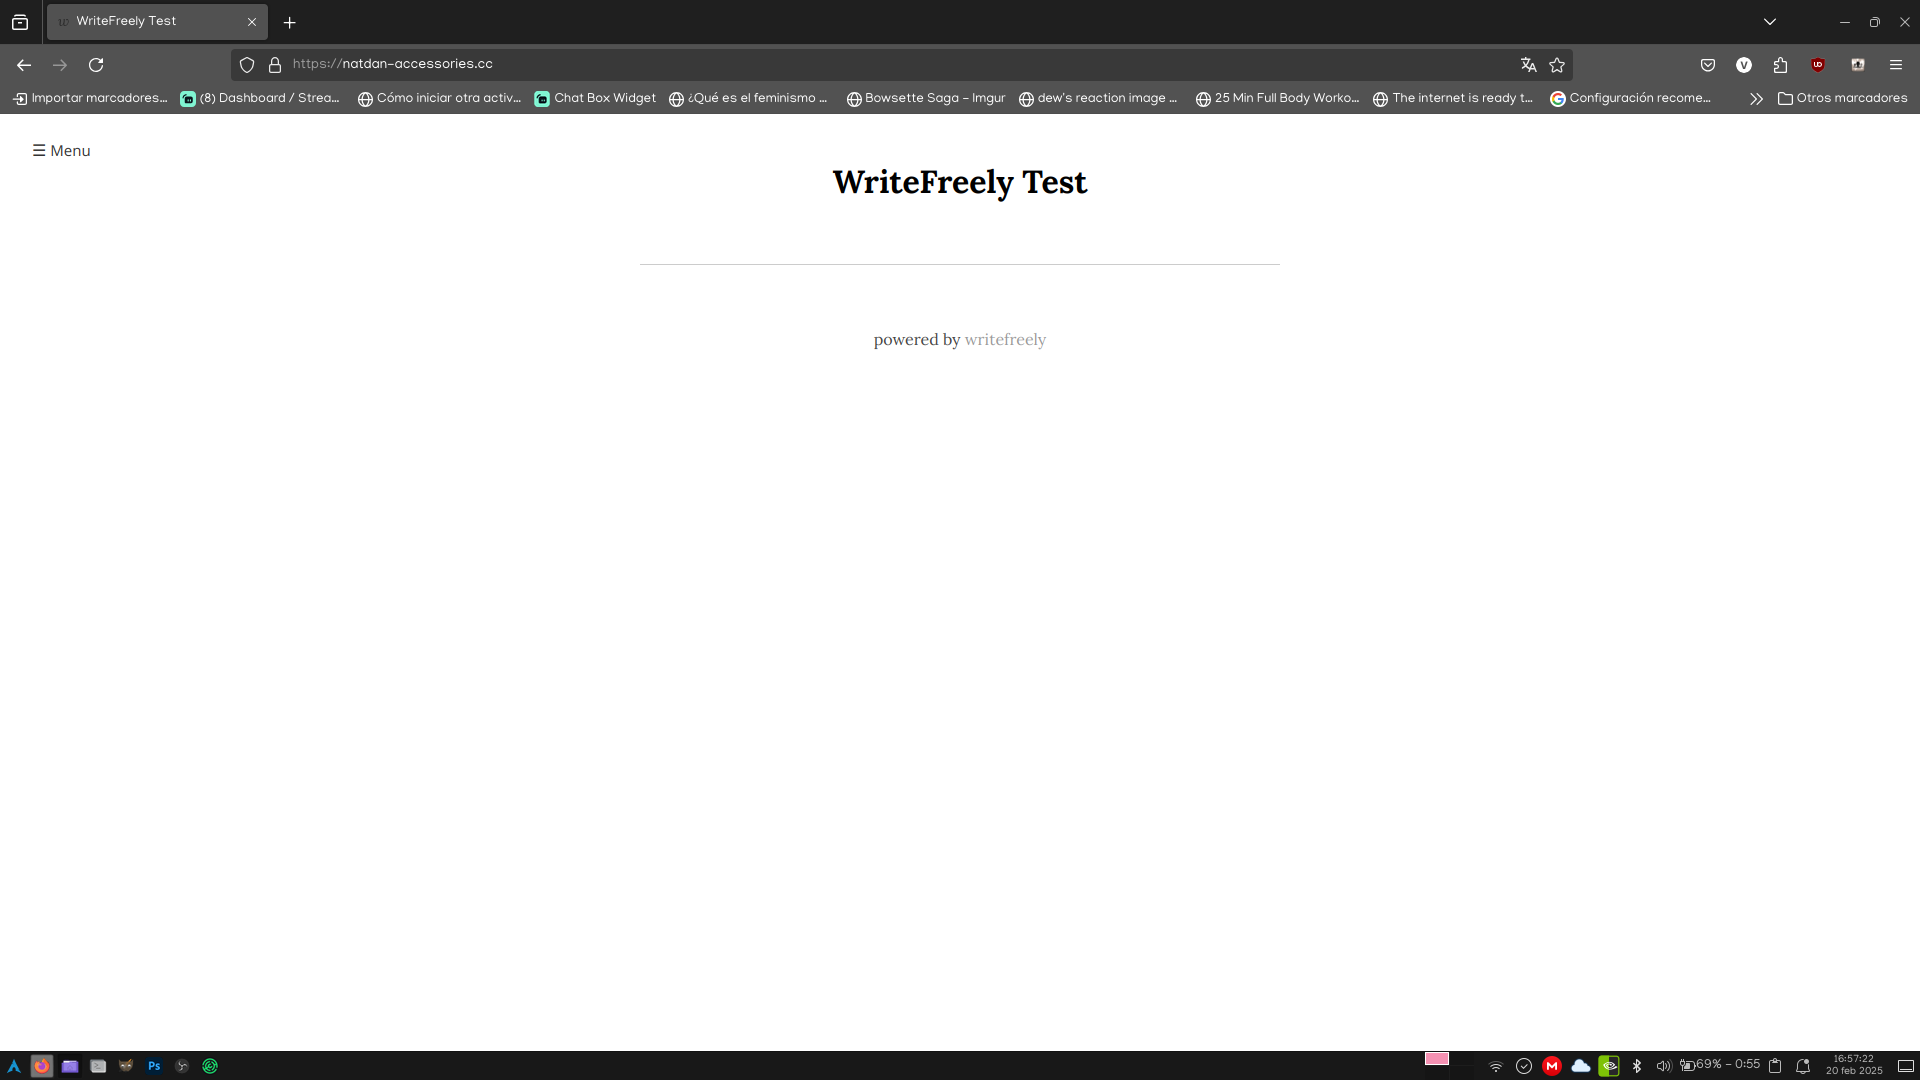
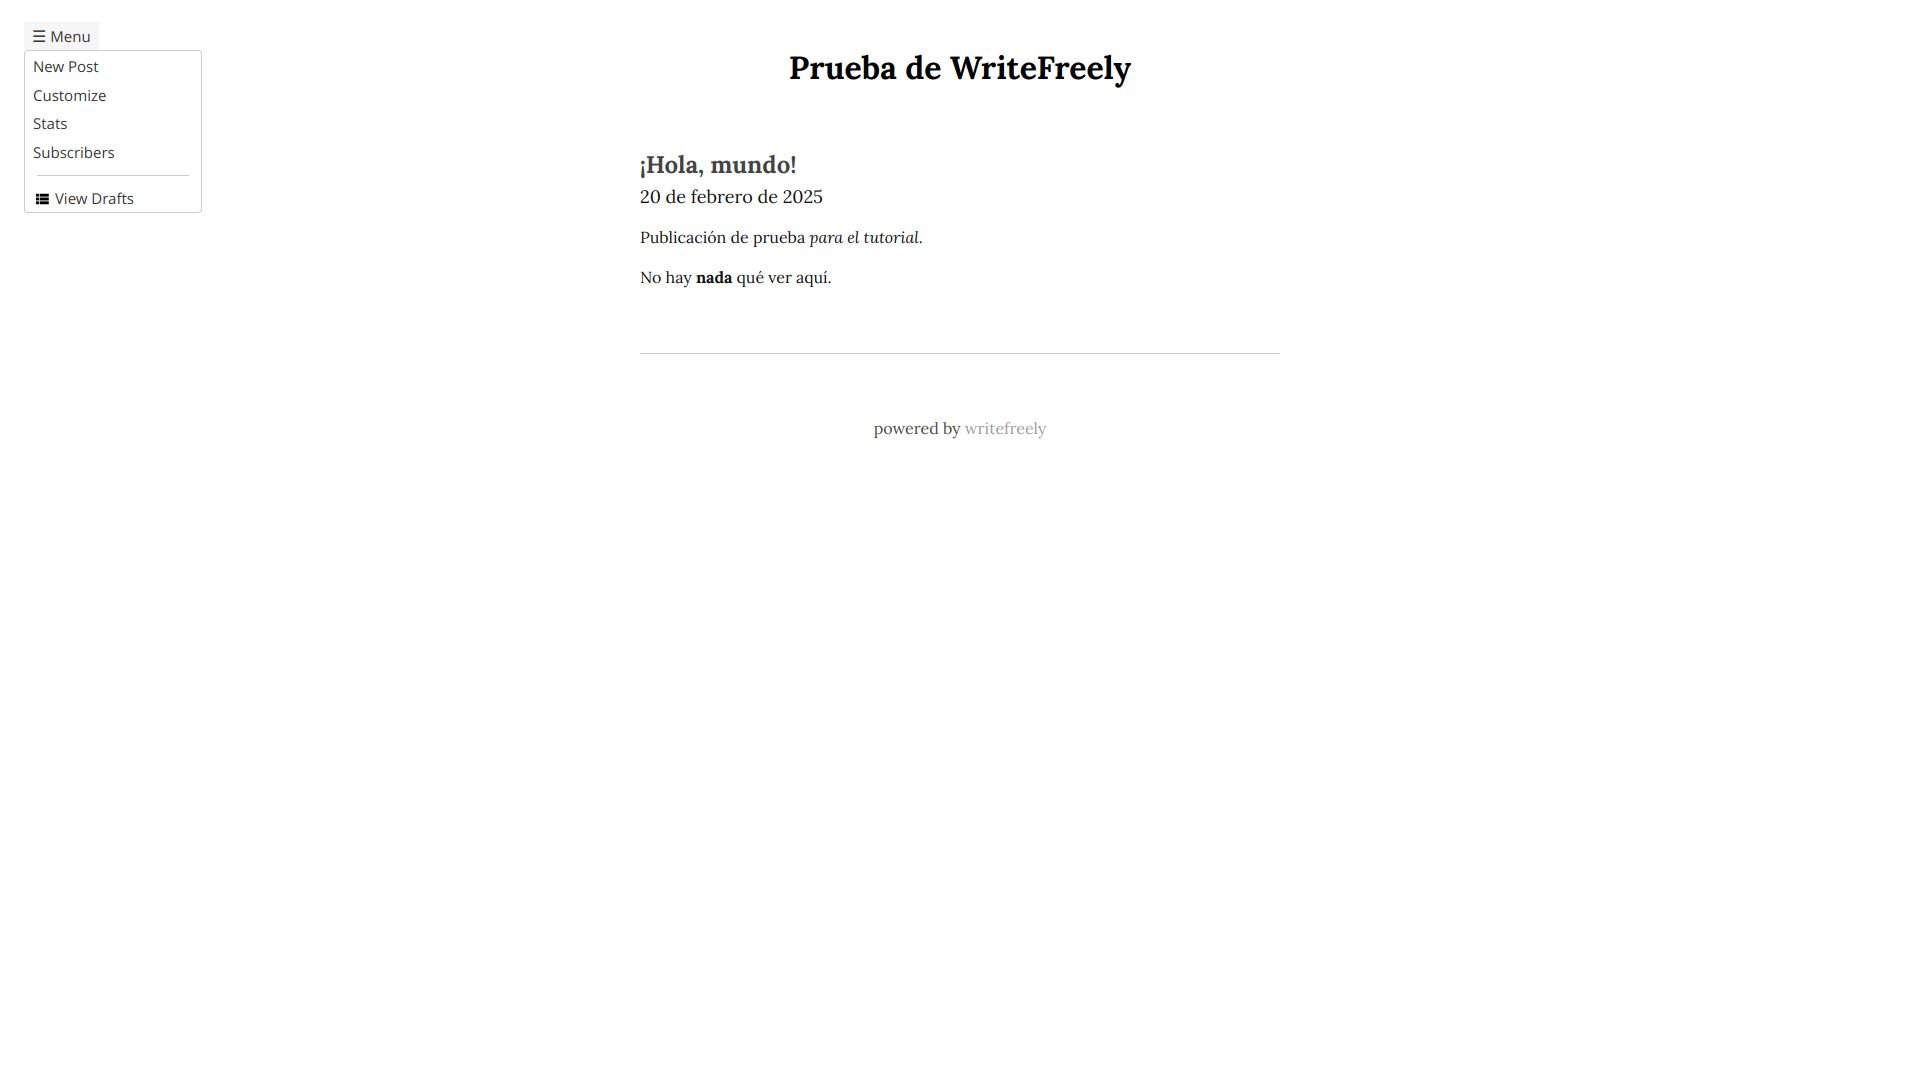
Y si todo salió perfecto, debería salir algo parecido a esto cuando ingresamos al dominio.
Ahora, vamos a iniciar sesión con el usuario de nuestro blog, lo que inmediatamente nos lleva a la pantalla de escritura.
Crea tu primera publicación
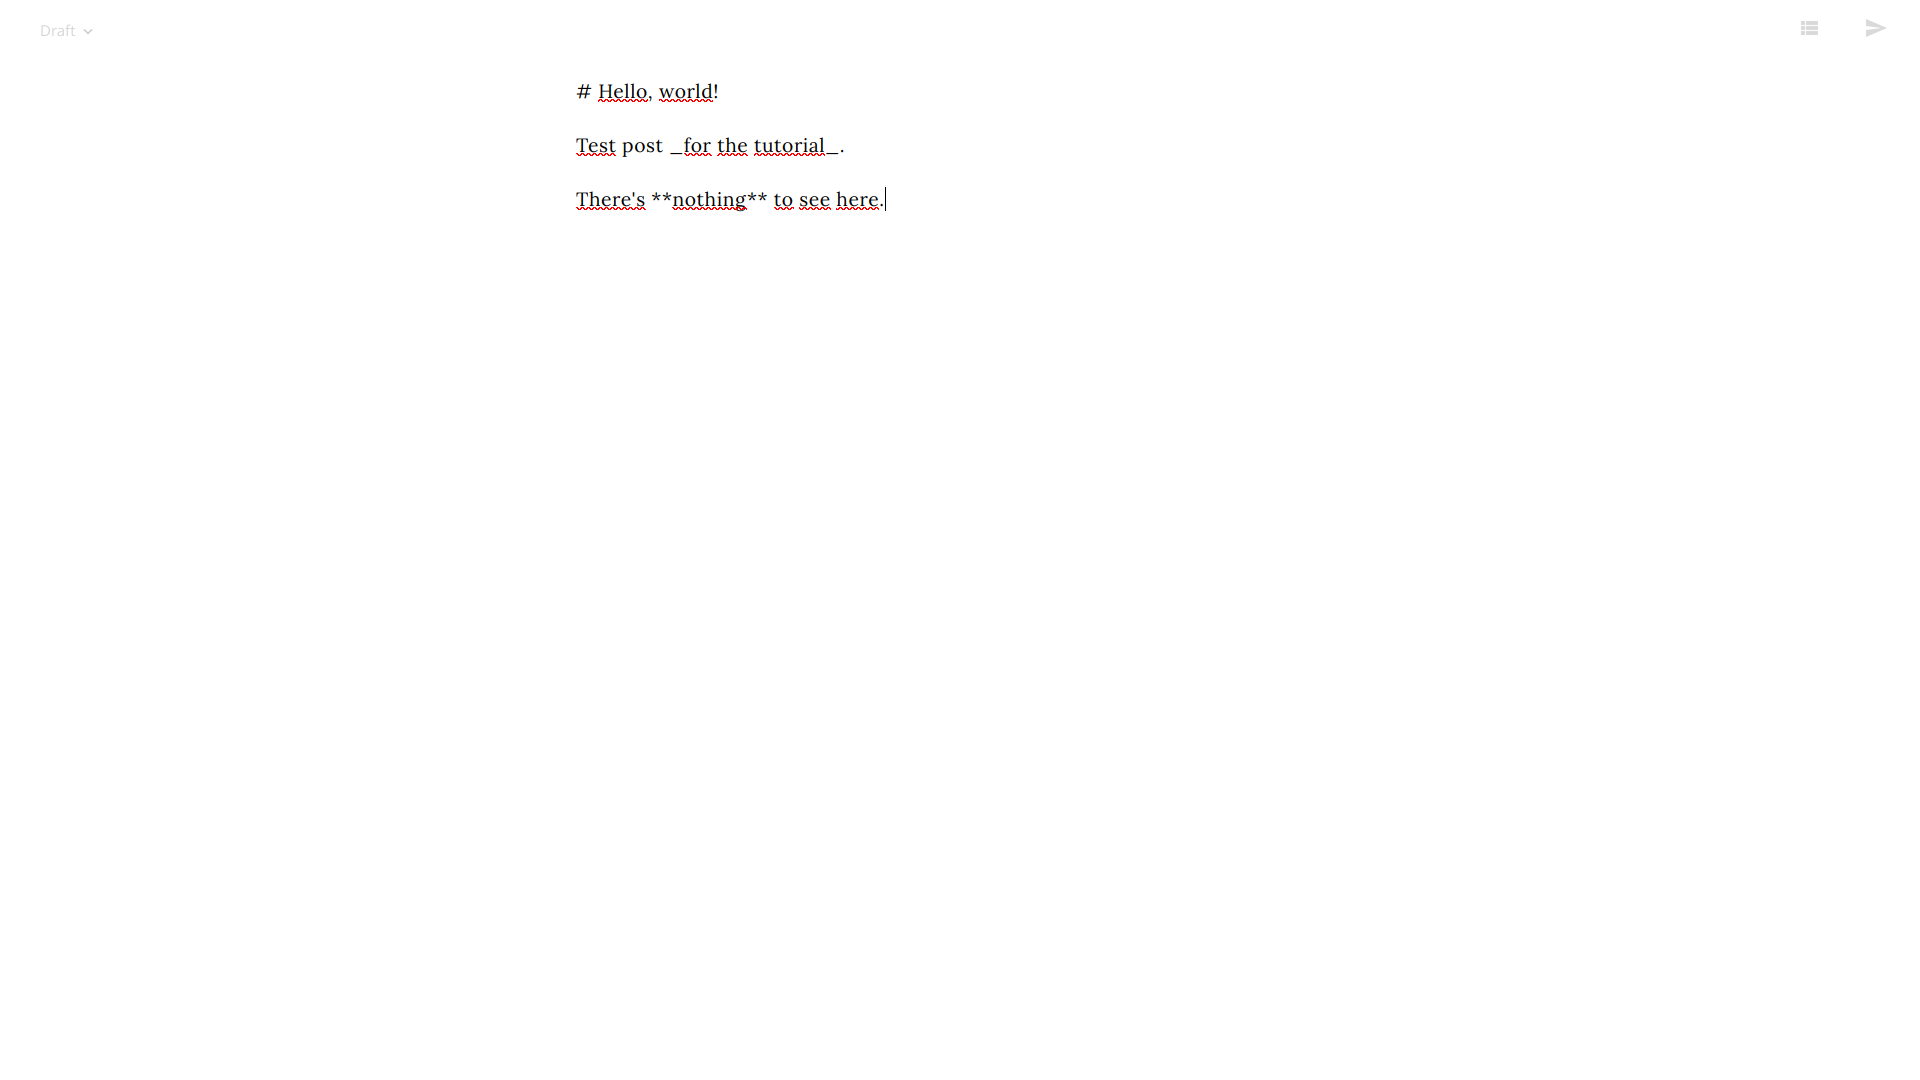
La pantalla de edición es más bien simple.
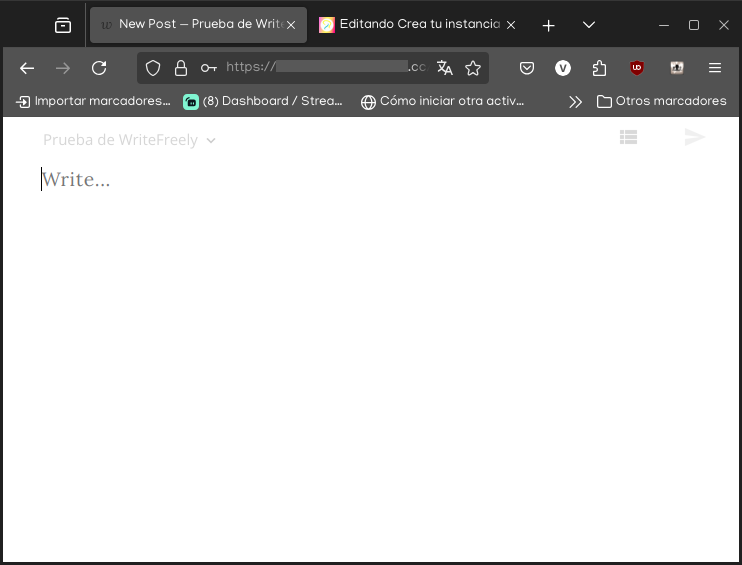
De base, no hay muchas opciones de edición. Así que vamos a explicar cómo funciona.
La primera linea siempre es la linea de título. Así que para ponerle nombre a la publicación, Sólo escribimos algo, y presionamos dos veces [Enter].
Para el cuerpo de la publicación, tenemos varias opciones de formato de texto. Podemos escribir usando HTML y Markdown, incluso de forma intercambiada. Dejo una tabla comparativa sobre qué puedes hacer con los diferentes códigos disponibles.
|
HTML |
Markdown |
| Encabezados |
<h1>Encabezado</h1>
<h2>Encabezado</h2>
<h3>Encabezado</h3>
<h4>Encabezado</h4>
<h5>Encabezado</h5>
<h6>Encabezado</h6>
|
# Encabezado
## Encabezado
### Encabezado
#### Encabezado
##### Encabezado
###### Encabezado
|
| Formatos de texto |
<strong>Negrita</strong>
<b>Negrita</b>
<em>Cursiva</em>
<i>Cursiva</i>
|
**Negrita**
__Negrita__
*Cursiva*
_Cursiva_
|
| Listas |
<ul>
<li>Lista simple</li>
<li>Lista simple</li>
<ul>
<li>Subelemento</li>
</ul>
</ul>

<ol>
<li>Lista numerada</li>
<li>Lista numerada</li>
<ol>
<li>Lista numerada</li>
</ol>
</ol>
|
* Lista simple
* Lista simple
  * Subelemento

1. Lista numerada
2. Lista numerada
  1. Lista numerada
|
| Enlaces |
<a href="https://val-vgms.gay/val">El mejor blog del mundo</a>
<a href="mailto:[email protected]">Envía un correo electrónico</a>
|
[El mejor blog del mundo](https://val-vgms.gay/val)
[Envía un correo electrónico](mailto:[email protected])
|
| Imágenes |
<img src="https://i.snap.as/T05UTpx.jpg" alt="Radiación cósmica" />
|

|
| Texto citado |
<blockquote>El veloz murciélago hindú comía feliz cardillo y kiwi.
La cigüeña tocaba el saxofón detrás del palenque de paja.

<i>Microsoft en su programa de visor de tipografías</i>
</blockquote>
|
> El veloz murciélago hindú comía feliz cardillo y kiwi.
> La cigüeña tocaba el saxofón detrás del palenque de paja.
>
> _Microsoft en su programa de visor de tipografías_
|
| Bloques de código |
<pre>
<code class="language-ini hljs">
[Sección]
; Comentario
Llave = Valor 1
Otra_llave = valor 2
</code>
</pre>
|
```ini
[Sección]
; Comentario
Llave = Valor 1
Otra_llave = valor 2
```
|
También hay cosas que no puedes hacer con Markdown, pero sí con HTML. Más específicamente, las etiquetas <iframe>, <audio> y <video>.
Y una vez que hayamos ingresado algo de texto, y presionemos el botón de publicar...

...nos saldrá para poderlo compartir con el mundo.
Una vez hayamos hecho nuestra primera publicación, vamos a personalizar nuestro blog.
Configurando las opciones del blog
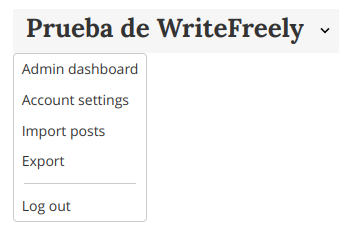
Tenemos muchas opciones para nuestro blog. Para ello, vamos a ir al menú que aparece en la esquina superior izquierda.
Ahora, en esta nueva pantalla, vamos a ver varias opciones. Vamos a explicarlas todas.
Los primeros dos campos de texto son el nombre y la descripción de tu blog. Completamente personales, así que no puedo guiarte en eso.
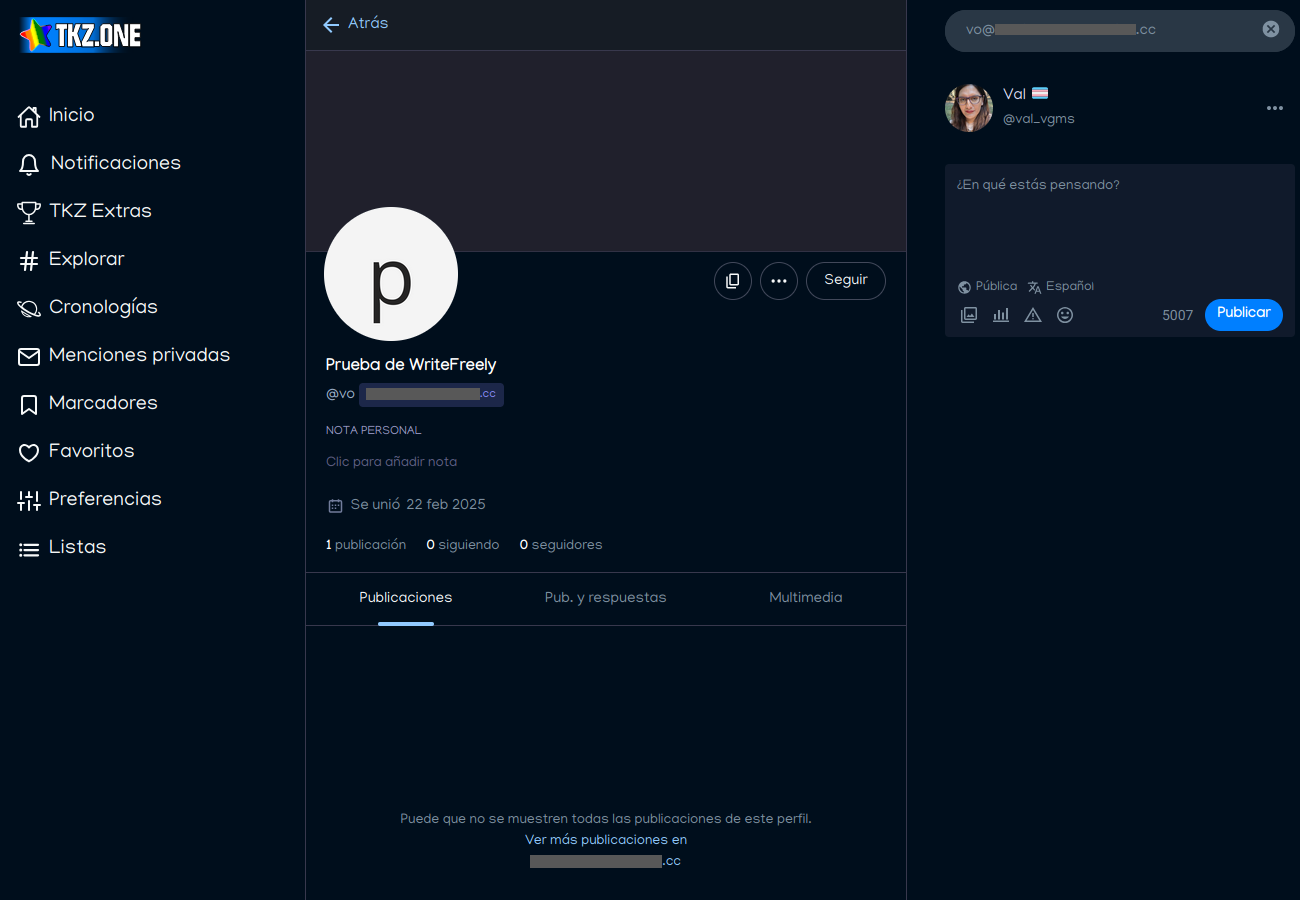
En la URL, vamos a poder ver la dirección pública, y si activamos la feredación, también vamos a poder ver nuestro alias en el fediverso. Útil por si queremos que nos sigan desde Mastodon, Friendica, Pixelfed, y otras redes del fediverso.
En la parte de Visibilidad, puedes decir si quieres que tus publicaciones sean visibles para cualquiera, personas con el enlace, sólo tú mientras inicias sesión, o cualquiera con una contraseña que definas.
Para las actualizaciones, están activas la fuente RSS y la federación a través de ActivityPub, para que puedan seguir tu blog desde su lector RSS favorito, o incluso desde sus cuentas de Mastodon, por decir algo.
El formato de muestra permite tres opciones. El formato tradicional de blog muestra las publicaciones más recientes primero, y lo hace con fechas. El formato de novela oculta las fechas y muestra las publicaciones más antiguas primero, para que lo vayas leyendo en orden cronológico. Y el formato de anotaciones oculta las fechas, pero muestra las publicaciones más recientes primero.
El renderizado de texto nos permite habilitar Mathjax para pasar fórmulas matemáticas y que estas se vean bien. Markdown está habilitado por defecto.
El apartado de CSS personalizado nos permite cambiar la apariencia de nuestro blog. Hay diversos temas en write.as para que puedas estudiar cómo están hechos, e incluso copiarlos por completo. Que, de hecho, acabo de cambiar un poco el CSS de este blog para que utilice más el ancho de la pantalla, sin realmente cambiar nada de la apariencia (de eso me encargo después). Les dejo ese CSS:
body#post article{
    max-width: 75rem;
}

article img{
    display: block;
    margin-left: auto;
    margin-right: auto;
}
En la parte de firma de publicación puedes ingresar un texto que quieras que se agregue a la parte final de todas tus publicaciones.
Y finalmente, en la parte de Verificación, puedes poner la dirección de otro sitio con el que interactúes en la red abierta o el fediverso. Como tu perfil de Mastodon.
Pero no son todas las opciones que podemos modificar. Ya que, si vamos al submenú del nombre de nuestra instancia, vamos a encontrar varios enlaces más.
Por ahora, vamos a enfocarnos en las opciones de administración.
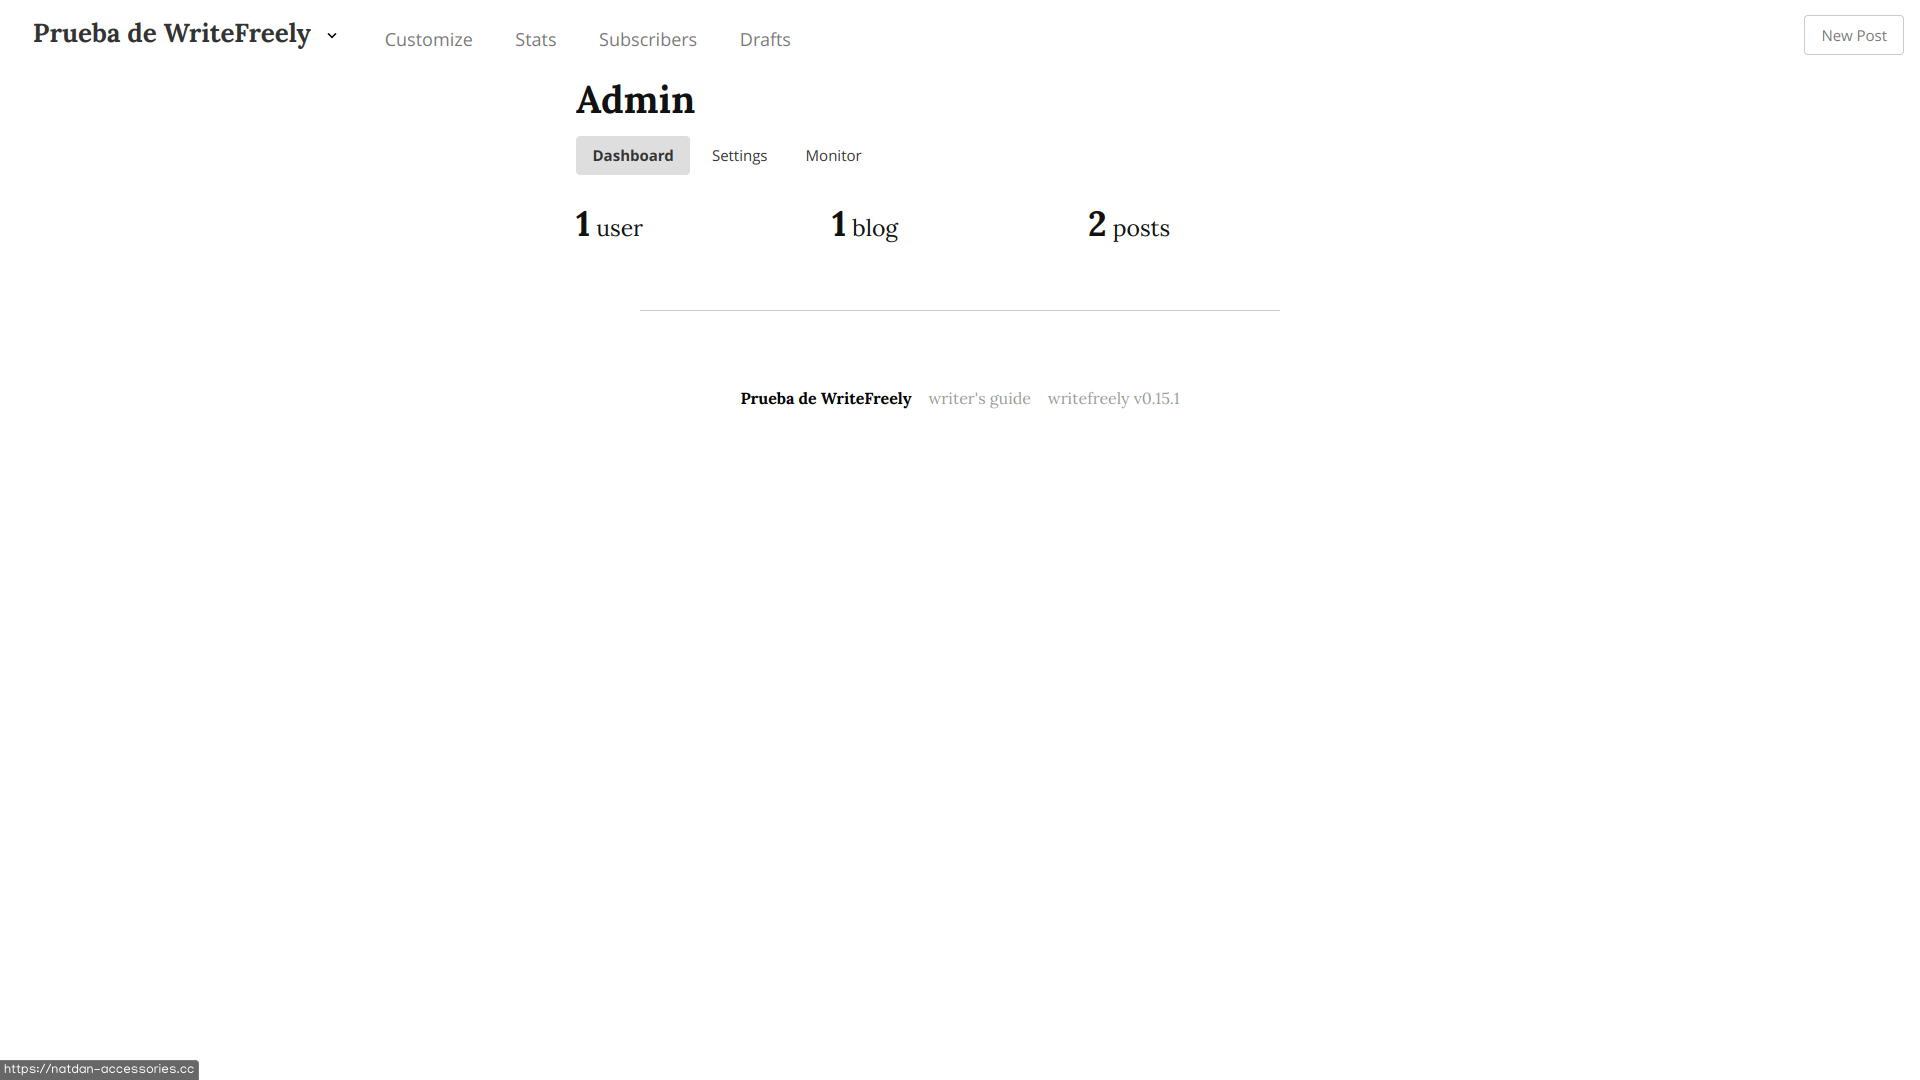
Esta primera pantalla no nos muestra gran información, más que las estadísticas de las publicaciones. Pero justo donde vemos el submenú de esta pantalla, hay tres pestañas, y la que de verdad nos interesa es la de Configuraciones, la segunda.
El host nos dice la dirección de nuestra instancia de WriteFreely. No modificable.
El modo comunidad nos permite saber si está configurada para un sólo usuario, o para varios. Cosa que configuramos al inicializar WriteFreely.
Si configuramos nuestra instancia para múltiples usuarios, se activan cinco opciones más.
La primera opción es la página de inicio para usuarios no registrados. Al alojar varios blogs, podría haber diferentes páginas, e incluso hay un feed general de todos los blogs registrados (de hecho, así está configurada esta instancia, al tener un usuario para el blog en español, y otro para el blog en inglés, y la página de llegada es ese feed).
La opción de registros abiertos permite decidir si quieres que personas externas puedan registrarse a tu instancia.
La opción de permitir borrado de cuenta permite si los usuarios pueden borrar sus cuentas (y sus blogs) cuando lo deseen, o si sólo la administración puede eliminar usuarios.
La opción de permitir invitaciones es útil cuando los registros están cerrados, ya que permite decidir si los usuarios registrados pueden invitar gente, si sólo la administración puede invitar gente, o si las invitaciones están bloqueadas.
Y finalizando con las opciones para instancias multiusuario, el Lector permite habilitar o deshabilitar el feed de todos los blogs de la instancia.
Volviendo a las opciones generales, la opción de instancia privada limita el acceso a los blogs a gente que tenga una cuenta en la instancia. Eso puede ser útil para, digamos, comunidades privadas como reporteros de un periódico local.
La opción de Federación permite que tu blog pueda ser buscado en el fediverso. Por ejemplo, ya pude buscar el perfil de la instancia de este tutorial desde mi perfil de Mastodon.
La opción de estadísticas públicas permiten que se puedan monitorizar las estadísticas de la instancia por servicios como Fediverse Observer.
La opción de Monetización web permite recibir micropagos de visitantes a tu blog. Pero no la he explorado tan a fondo porque honestamente no me interesa recibir ingresos por este blog. Pero si eres un periodista independiente, puede serte útil explorar esta característica.
Y finalmente, la opción de longitud de nombre de usuario permite configurar qué tan corto puede ser un nombre de usuario. Podrías configurar nombres de usuario tan cortos como un caracter, o tan largos como quieras.
Estas son las opciones básicas pero más importantes que puedes configurar desde La interfaz de tu navegador. Pero hay más opciones que puedes modificar desde el archivo de configuración de WriteFreely, que se encuentra ubicado junto al ejecutable (/srv/http/writefreely/config.ini en Arch, y /var/www/html/writefreely/config.ini en Debian). Y el proyecto de WriteFreely tiene una página dedicada a detallar las opciones modificables más a detalle, aunque esta está en inglés.
Traducción de (gran parte de) la interfaz de usuario
Hasta ahora, hemos visto la interfaz de WriteFreely en inglés (aunque he explicado sus opciones en español). Pero ¿realmente podemos cambiar la interfaz del blog por completo al español? Honestamente, no. Hay cosas que sí se deben cambiar desde el código fuente para lograr una interfaz al 100% en español. Y no sé lo suficiente sobre el lenguaje go (por no decir que no sé nada) para modificar el código fuente de WriteFreely. Lo que sí sé es lo suficiente de HTML para modificar los archivos de las plantillas que utiliza el programa para que puedan mostrarse en español.
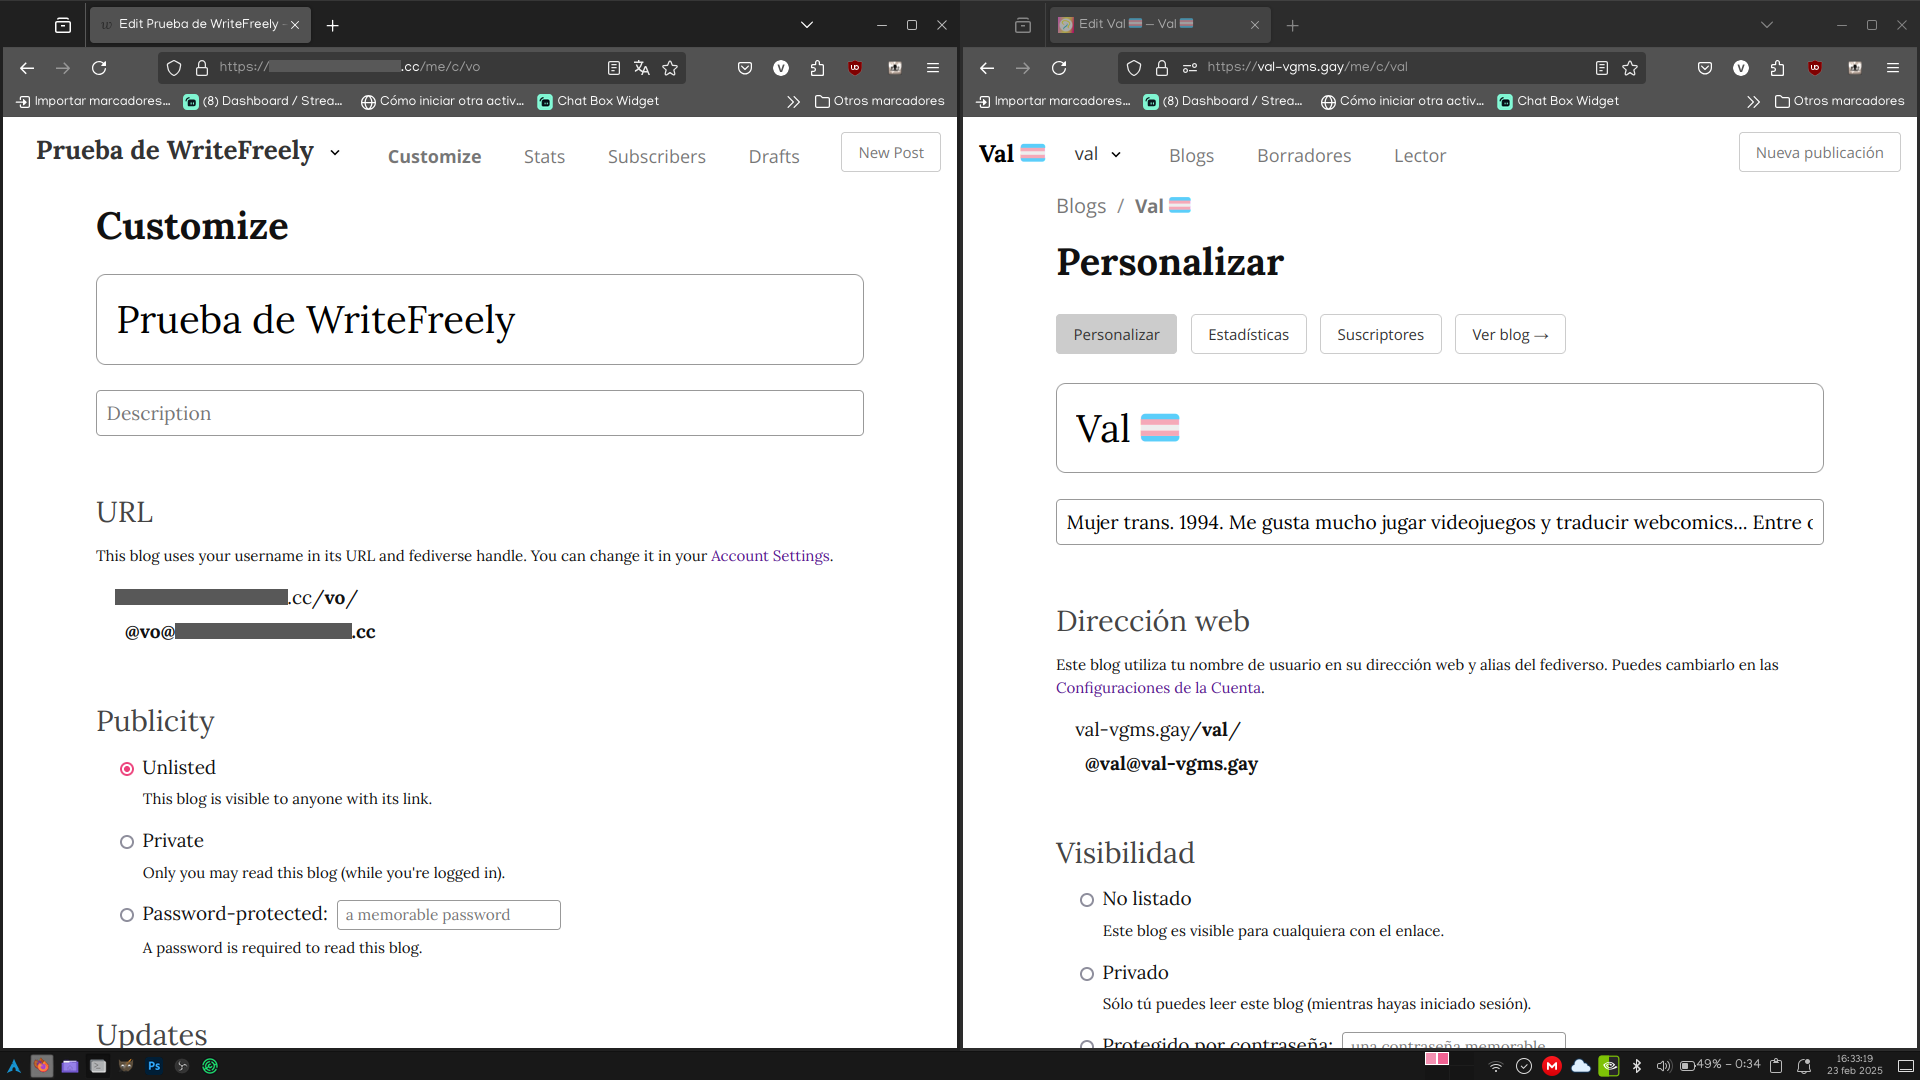
De hecho, ya me encargué de modificar las plantillas para esta instancia. Dejo una comparativa de cómo quedaría la página de personalización de blog tanto para la instancia de este tutorial sin modificar, como para esta instancia ya modificada.
Y si quieres descargar las plantillas modificadas al español, convenientemente tengo un archivo zip que puedes descargar haciendo clic aquí. Una vez descargados estos archivos, sólo hay qué extraerlos y reemplazar las carpetas en el servidor.
Debes tener en cuenta que estos archivos son para la versión 0.15.1, que al día de escribir esto es la última versión. Podría actualizar los archivos con cada versión que salga, pero conociéndome, se me va a olvidar en algún punto.
Habilita las suscripciones por correo electrónico
Muy bonito que te puedan seguir desde el Fediverso, y todo. Pero ¿qué hay de los que no tienen cuenta por estos lares, pero quieren seguir nuestras publicaciones? Bueno, pues además del feed RSS tenemos la opción de habilitar el correo electrónico para suscripciones y recuperación de contraseña. Sin embargo, no se encuentra integrado dentro de WriteFreely como tal, sino que dependemos de Mailgun, un servicio externo gratuito, aunque con características adicionales de pago. Vamos a revisar la configuración de la cuenta para agregarla a WriteFreely.
La página de registro de Mailgun es bastante sencilla y directa, incluso todavía más que la de Porkbun.

Y una vez que llenamos el formulario, la cuenta está creada, pero no activa. Debe ser validada primero, como se indica en el banner de arriba.

Para validar nuestra cuenta, debemos ingresar nuestro número telefónico, seleccionando el país.

Una vez ingresado tu número, recibirás un mensaje de texto con un código para completar la validación. Lo introducimos, y ya nuestra cuenta estará validada.

Ahora, iremos a la pestaña de Get Started para comenzar con la configuración.

Incluso, tendremos nuestro siguiente paso resaltado en este centro de control. Lo que nos facilita la guía de configuración de Mailgun. Vamos con la creación de la Llave API.

Sólo le daremos un nombre a la API que crearemos. No debe ser realmente algo rebuscado. Y una vez que tengamos el nombre, tendremos la llave creada.

Cópiala y guárdala en un lugar seguro.
Para el siguiente paso, que es enviar un correo electrónico de prueba, tendremos dos opciones. A través de API, o por cliente SMTP.

Por API, tenemos los códigos de diferentes lenguajes para integrar en los proyectos.

Y por SMTP es más acorde con lo que hemos usado desde siempre con cualquier aplicación de correo electrónico. Iniciar sesión, y eso.

Pero por ahora, ignoraremos el email de prueba. :P
Lo que nos interesa es la siguiente parte, que es la de agregar dominio personalizado.

En el apartado de Domain name, pondremos nuestro dominio, y le daremos al botón azul. Lo que nos llevará a la siguiente pantalla.

Esta información nos va a servir para introducirla en nuestro panel de control de Cloudflare dentro de las configuraciones de registros DNS de nuestro dominio. Para introducirlo, vamos al inicio de la cuenta, hacemos clic en nuestro dominio, y en el panel de la izquierda, seleccionamos la opción de DNS. Deberíamos estar aquí.

Y para agregar los registros de Mailgun a Cloudflare, sólo presionamos el botón azul de Agregar registro, lo que nos abre estos campos.

Ahora, seleccionamos el tipo que nos da Mailgun, y copiamos el host de Mailgun y lo pegamos en el nombre de Cloudflare, y el valor de Mailgun va en el contenido de Cloudflare. Hacemos esto por cada entrada que nos da Mailgun, y en el caso de la entrada CNAME deshabilitaremos el interruptor de proxy.
Opcionalmente, podemos poner el comentario en Cloudflare para indicar que esos son los registros de Mailgun. Yo lo puse por organización, pero no es necesario.
Una vez que hayamos terminado de agregar todas las entradas, en Mailgun presionamos el botón de Verificar que se encuentra hasta arriba. Si lo hicimos bien, incluso recibiremos un correo electrónico indicando que la configuración fue exitosa.

Ahora, en Mailgun, vamos a generar la nueva API de envío de correos para nuestro dominio, yendo a la pestaña de claves de envío.

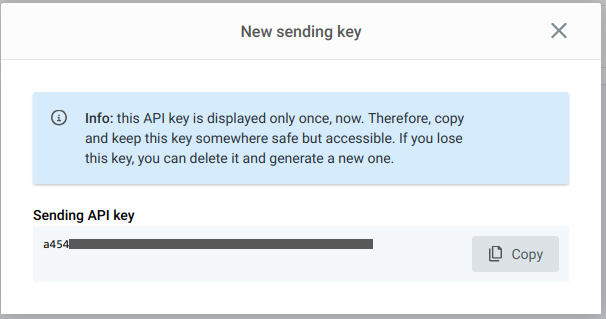
Al presionar el botón de Agregar clave de envío, volveremos a configurar una nueva, esta específica para producción en nuestro blog. Le daremos un nombre, y se nos muestra la clave generada una sola vez. Es importante que la copiemos, porque la utilizaremos en un momento.
Ahora, vamos a configurar las claves directamente en WriteFreely. Para ello, abriremos el archivo de configuración.
Desde Arch:
nano /srv/http/writefreely/config.ini
Desde Debian:
nano /var/www/html/writefreely/config.ini
Y en este archivo, vamos a buscar las siguientes lineas.
[email]
domain          =
mailgun_private =
En domain vamos a poner nuestro dominio, y en mailgun_private la clave que acabamos de generar.

Guardamos el archivo, y reiniciamos el servicio de WriteFreely.
sudo systemctl restart writefreely
Y ahora, si nos vamos a las opciones de personalización del blog, en las opciones de actualizaciones, veremos una nueva opción, para habilitar las suscripciones por correo electrónico.

Una vez que están habilitadas, en la página principal de tu blog, hasta abajo, los usuarios externos pueden ingresar su correo para comenzar la suscripción.

Una vez que lo ingresen, deben confirmar su suscripción en su bandeja de entrada.

El mensaje de confirmación luce más o menos así.

Y una vez que nuestros suscriptores confirmen su suscripción, y enviemos una publicación, nuestros suscriptores por correo recibirán las publicaciones 15 minutos después de haberlas posteado. Por ejemplo, voy a copiar el texto de un generador de texto Lorem Ipsum sólo por propósitos de demostración del correo electrónico. Y tras un rato, la tendremos disponible tanto en el fediverso como enviada al correo electrónico.

¡Finalmente hemos terminado de instalar y configurar WriteFreely, y ya podemos publicar nuestros pensamientos en internet! Aunque no es todo lo que podemos hacer con el servidor, aprovechando las ventajas del proxy inverso.
Aplicaciones web adicionales
Si en algún momento decides que quieres hacer otro sitio web independiente de WriteFreely, podemos crear otro directorio para apuntar a un subdominio que podemos crear, sin necesidad de comprar otro. Que de hecho, yo ya hice un subdominio para otro proyecto que quiero hacer. Este de hecho es menos importante que el del dominio que compré para este tutorial, así que para este sí les digo que planeo hacer una guía dinámica de comandos, habilidades, estilos de combate y golpes finales para Kingdom Hearts Birth by Sleep Final Mix. Estoy consciente de que ya existe un sitio web similar (muy bueno por cierto), pero no está completo con lo que quiero integrar, además de que carece de opciones para visualizar los comandos en diferentes idiomas. Por ejemplo, cambiar libremente entre inglés, español, japonés, italiano, francés y alemán. Pero me estoy desviando del tema.
Este proceso lo voy a hacer desde mi servidor principal, ya no desde el del tutorial. Para que ya quede de una vez. Mi servidor está en un sistema Raspberry Pi OS (basado en Debian), pero igual proveeré instrucciones para Arch.
Primero, yo recomiendo crear una carpeta al lado de la carpeta principal de WriteFreely. En mi caso, sería en /var/www/bbs, y poner ahí tus archivos del sitio adicional. Por ahora, sólo tengo la página de prueba.
Una vez creada la carpeta y puestos los archivos, vamos a habilitar un nuevo puerto y un nuevo host de proxy inverso para nuestro subdominio.
Para lo primero, vamos a modificar la configuración de Apache para pasar tráfico por más puertos.
Desde Arch modificaremos el archivo principal.
sudo nano /etc/httpd/conf/httpd.conf
Desde Debian, será el archivo de puertos.
sudo nano /etc/apache2/ports.conf
Vamos a buscar la linea que dice Listen 80, y justo debajo pondremos una nueva linea con un nuevo puerto. En mi caso, utilicé el puerto 8084.
Listen 80
Listen 8084
Guardamos nuestro archivo, y ahora modificaremos el archivo de hosts virtuales para el proxy inverso.
Desde Arch:
sudo nano /etc/httpd/conf/extra/httpd-vhosts.conf
Desde Debian:
sudo nano /etc/apache2/sites-enabled/000-default.conf
Y debajo del contenido que habíamos agregado al inicio, pondríamos el siguiente contenido:
<Directory /ruta/al/directorio/creado>
        Options Indexes FollowSymLinks
        AllowOverride All
        Require all granted
</Directory>

<VirtualHost *:8084>
	DocumentRoot /ruta/al/directorio/creado
</VirtualHost>
Una vez habiendo creado el host virtual, reiniciamos el servicio de Apache.
Desde Arch:
sudo systemctl restart httpd
Desde Debian:
sudo systemctl restart apache2
Ahora, vamos a movernos al panel de control de Zero Trust de Cloudflare a crear el subdominio.
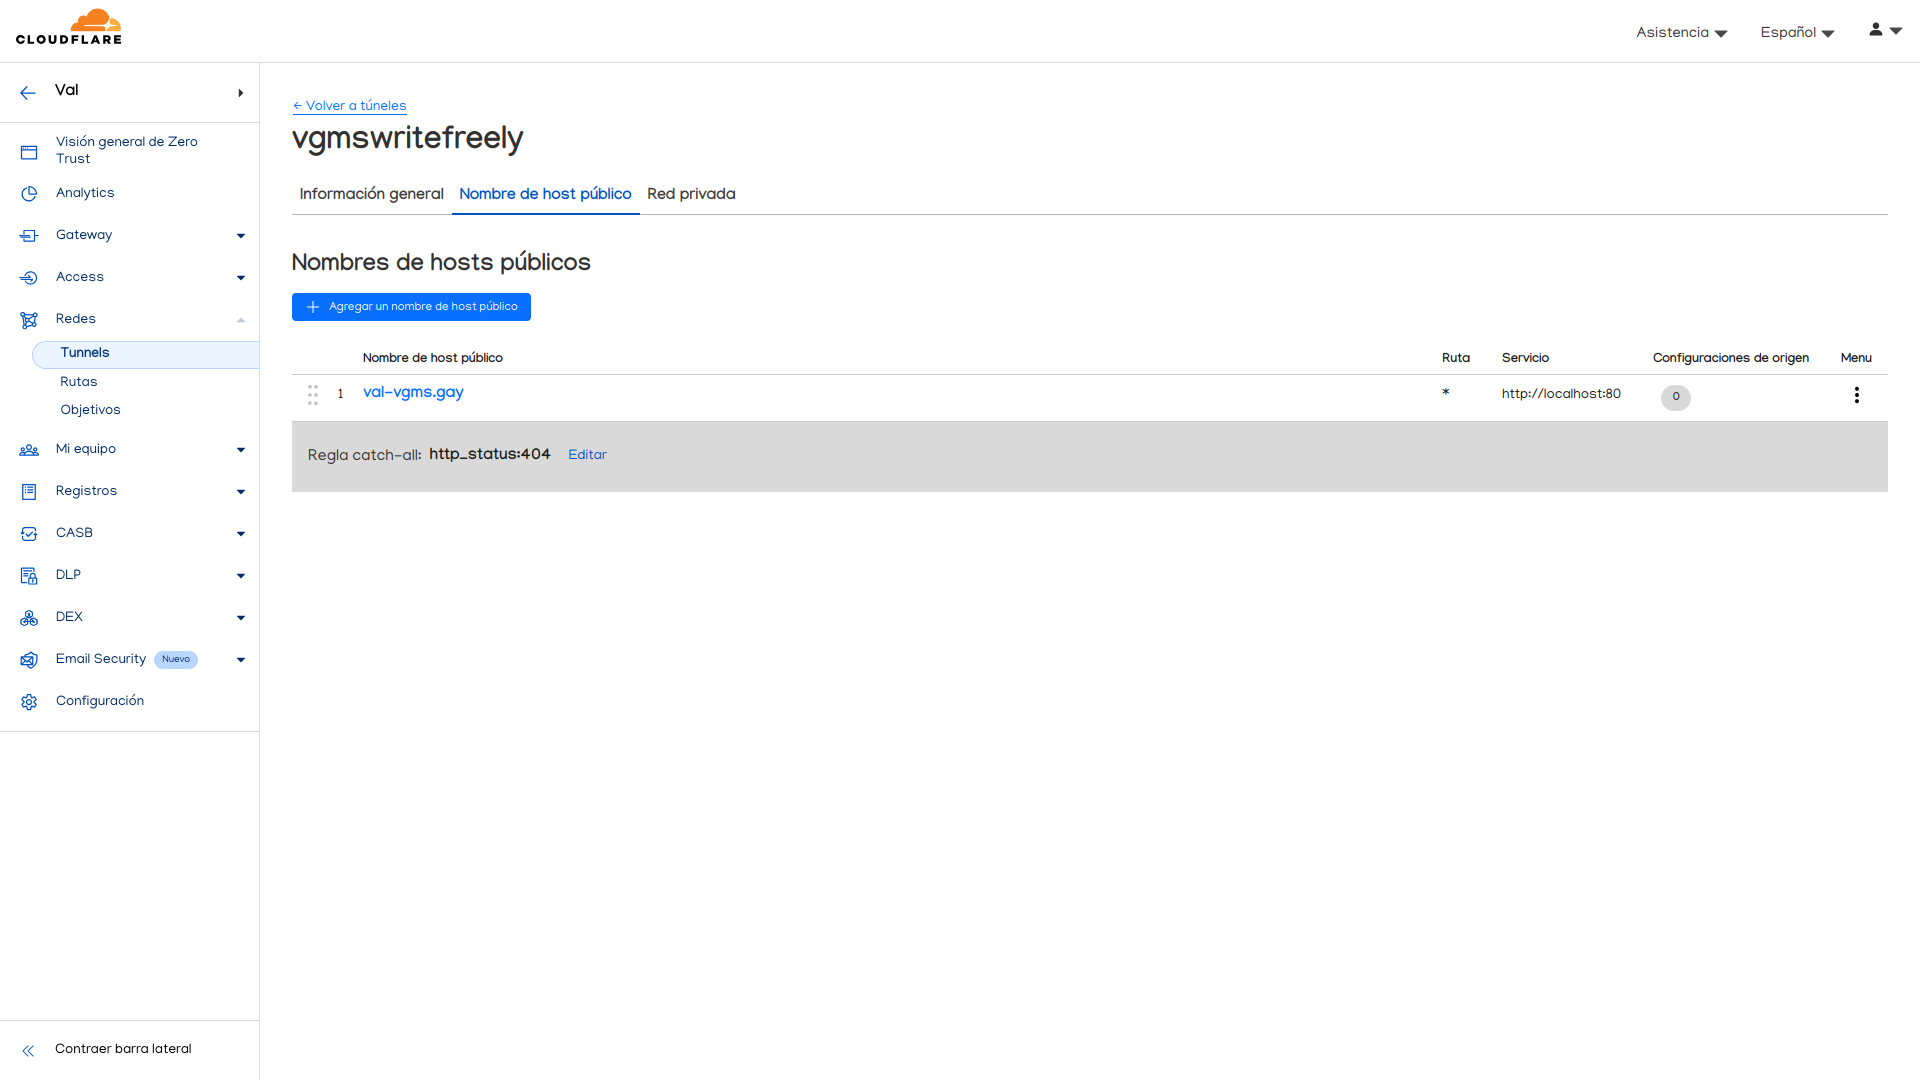
Una vez ahí, vamos a la sección de Redes en la parte de la izquierda, y una vez ahí, al centro, vamos a ver nuestro túnel.
Le damos a nuestro túnel, y en el panel de la derecha, al botón de Editar. En el panel que aparece, le damos a la segunda pestaña de Nombre de host público. Debemos estar en este panel.
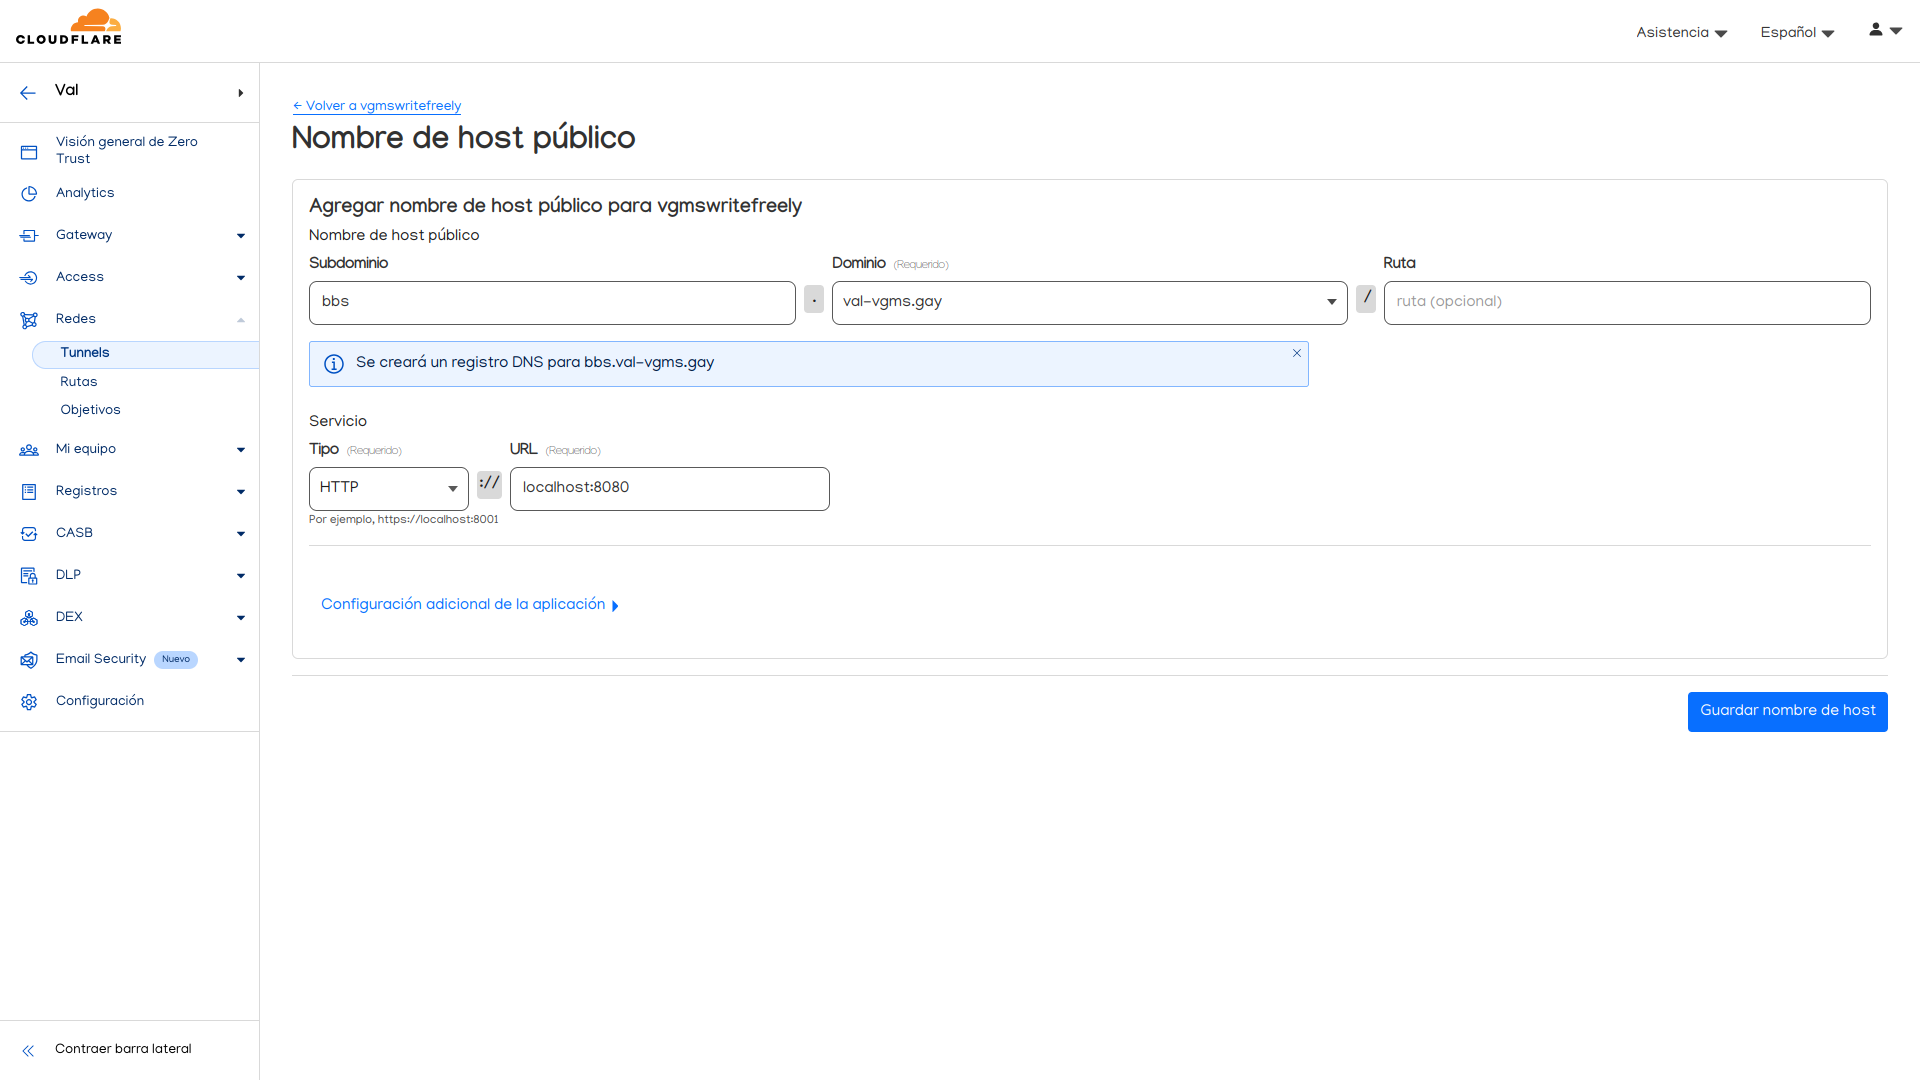
Si presionamos el botón de Agregar un nombre de host público, avanzamos a esta pantalla. Que convenientemente ya llené con los datos de mi subdominio como demostración. Es importante que en Tipo de servicio, seleccionemos HTTP, y no HTTPS.
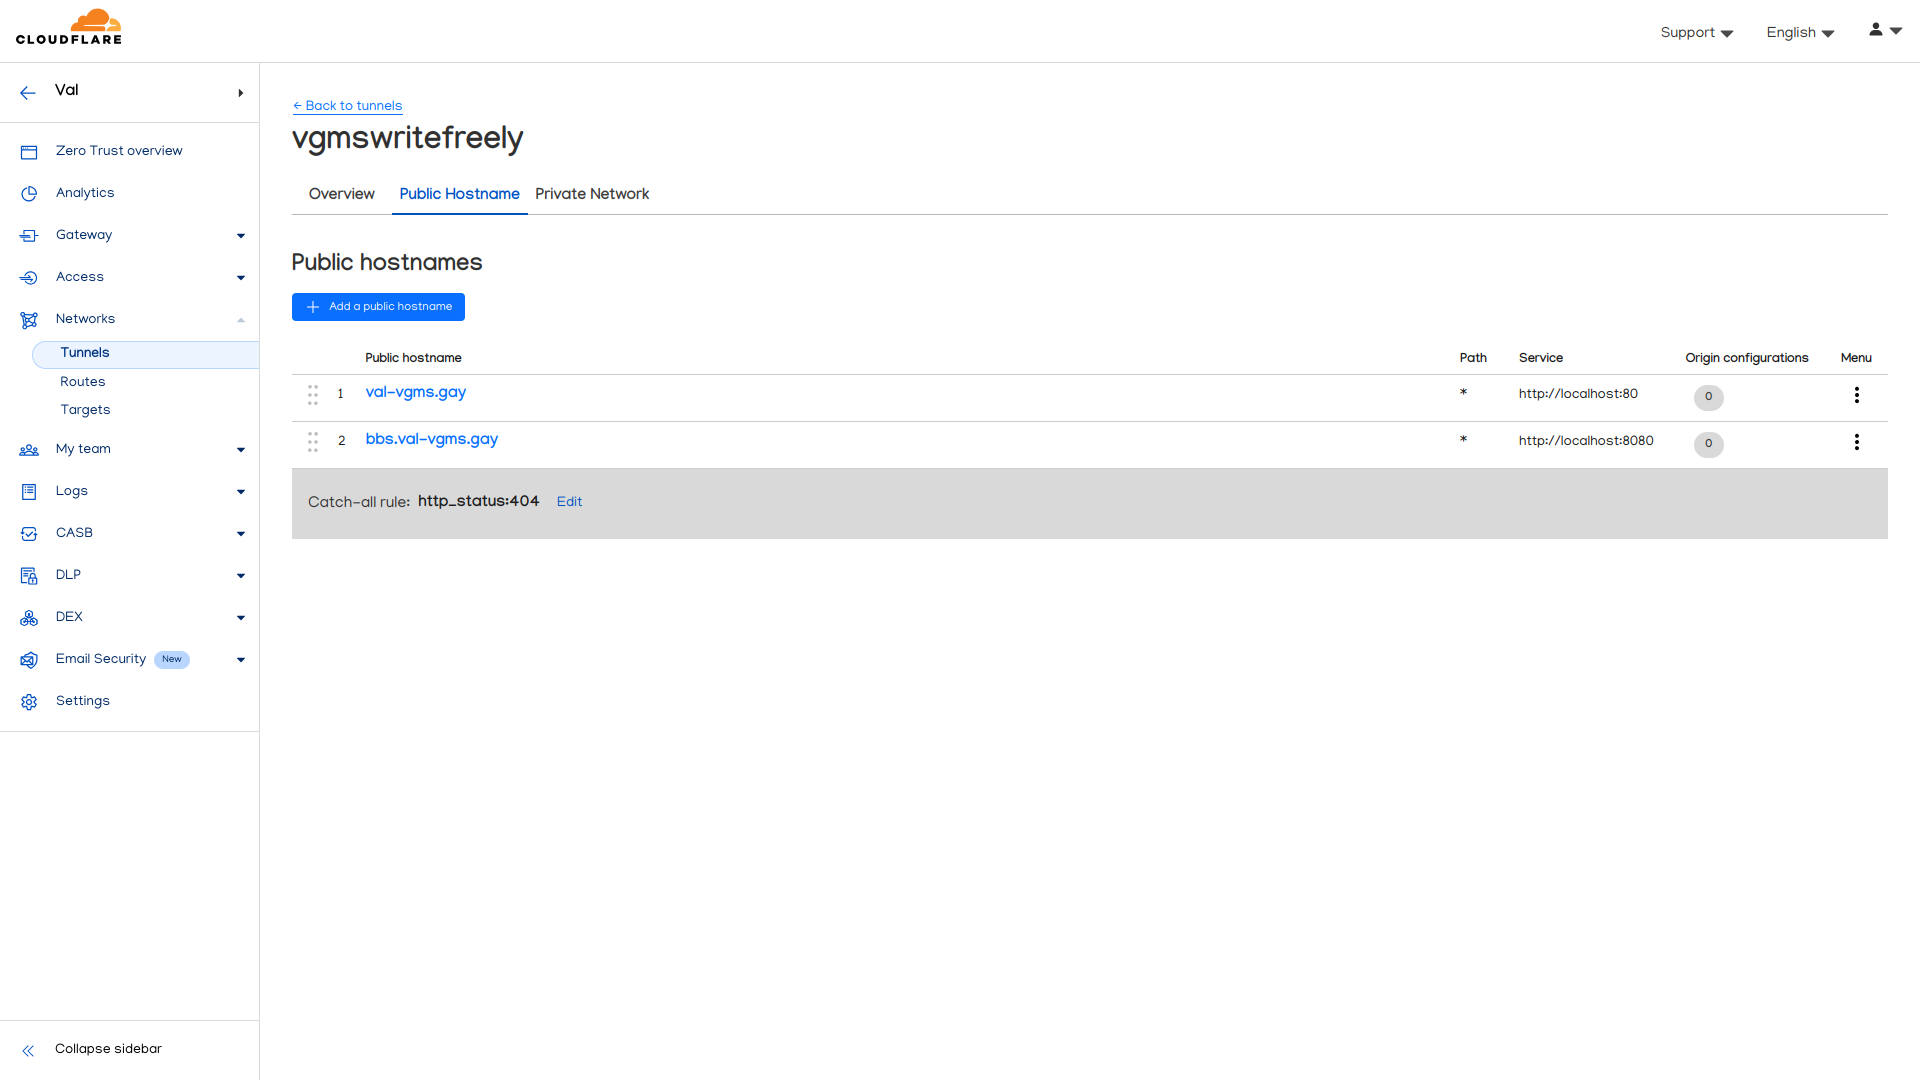
Y cuando le damos al botón de Guardar nombre de host, ya aparecerá de forma automática en nuestro túnel.
Y podremos ver el sitio separado también.

Comentarios finales
Finalmente hemos terminado con este viaje de configurar todo nuestro servidor desde cero hasta tener una instancia de WriteFreely para poder tener nuestro blog completamente funcional, y potencialmente extender las capacidades de nuestro servidor para ofrecer más servicios.
Fue una experiencia con la que aprendí mucho, tanto al configurar el servidor como tal como incluso escribiendo este tutorial. Sé que es una publicación demasiado extensa, pero pienso que, al cubrir todos los puntos de forma bastante detallada, puede ayudar a muchas personas a no tener qué realizar el proceso buscando tutoriales separados para poder lograr este propósito. Porque, seamos honestos. El tutorial que se encuentra disponible en la página oficial de WriteFreely no detalla muchas cosas sobre la configuración de manera detallada, e incluso esta publicación podría generar algo de preguntas.
Por lo que me pongo a su total disposición para ayudar en lo que pueda. Tanto desde mi perfil en Mastodon como por mensaje a Signal.
¡Nos vemos en la próxima publicación!